Home › HYBRID SYSTEM › P112 HYBRID VEHICLE CONTROL › HYBRID CONTROL SYSTEM

DTC    P0A60-288    Drive Motor "A" Phase V Current

DTC    P0A60-289    Drive Motor "A" Phase V Current

DTC    P0A60-290    Drive Motor "A" Phase V Current

DTC    P0A60-292    Drive Motor "A" Phase V Current

DTC    P0A60-294    Drive Motor "A" Phase V Current

DTC    P0A60-501    Drive Motor "A" Phase V Current

DTC    P0A63-296    Drive Motor "A" Phase W Current

DTC    P0A63-297    Drive Motor "A" Phase W Current

DTC    P0A63-298    Drive Motor "A" Phase W Current

DTC    P0A63-300    Drive Motor "A" Phase W Current

DTC    P0A63-302    Drive Motor "A" Phase W Current

DTC    P0A63-502    Drive Motor "A" Phase W Current

for Preparation Click here


DESCRIPTION

See the description of the inverter .
The motor inverter current sensors detect the amperage that flows through the V and W phase cables between the inverter and MG1/MG2. The inverter transmits information that is necessary for effecting control, such as the amperage and voltage, to the HV control ECU.
The HV control ECU monitors the inverter current sensors to detect a malfunction in the sensor system.
It does not detect malfunctions in the high voltage system.

DTC No.
INF Code
DTC Detection Condition
Trouble Area
P0A60
288
Phase V current sub sensor of motor inverter current sensor malfunction
  1. Wire harness or connector
  2. Inverter with converter assembly
P0A60
289
Open in phase V current sub sensor circuit of motor inverter current sensor
  1. Wire harness or connector
  2. Inverter with converter assembly
P0A60
290
Phase V current main sensor of motor inverter current sensor malfunction
  1. Wire harness or connector
  2. Inverter with converter assembly
P0A60
292
Open in phase V current main sensor circuit of motor inverter current sensor
  1. Wire harness or connector
  2. Inverter with converter assembly
P0A60
294
Phase V current main and sub sensors of motor inverter current sensor performance problem
  1. Wire harness or connector
  2. Inverter with converter assembly
P0A60
501
Phase V current main and sub sensors of motor inverter current sensor offset malfunction
  1. Wire harness or connector
  2. Inverter with converter assembly
P0A63
296
Phase W current sub sensor of motor inverter current sensor malfunction
  1. Wire harness or connector
  2. Inverter with converter assembly
P0A63
297
Open in phase W current sub sensor circuit of motor inverter current sensor
  1. Wire harness or connector
  2. Inverter with converter assembly
P0A63
298
Phase W current main sensor of motor inverter current sensor malfunction
  1. Wire harness or connector
  2. Inverter with converter assembly
P0A63
300
Open in phase W current main sensor circuit of motor inverter current sensor
  1. Wire harness or connector
  2. Inverter with converter assembly
P0A63
302
Phase W current main and sub sensors of motor inverter current sensor performance problem
  1. Wire harness or connector
  2. Inverter with converter assembly
P0A63
502
Phase W current main and sub sensors of motor inverter current sensor offset malfunction
  1. Wire harness or connector
  2. Inverter with converter assembly

MONITOR DESCRIPTION

The HV control ECU monitors the motor inverter current sensor. If the HV control ECU detects a fault, it will illuminate the MIL and set a DTC.

MONITOR STRATEGY


Related DTCs
P0A60 (INF 288 / 289 / 290 / 292 / 294 / 501):
Motor inverter current sensor / Phase V current sensor malfunction
P0A63 (INF 296 / 297 / 298 / 300 / 302 / 502):
Motor inverter current sensor / Phase W current sensor malfunction
Required sensor / components
Motor inverter current sensor, motor resolver
Frequency of operation
Continuous
Duration
TOYOTA's intellectual property
MIL operation
Immediately
Sequence of operation
None

TYPICAL ENABLING CONDITIONS


The monitor will run whenever the following DTCs are not present
TOYOTA's intellectual property
Other conditions belong to TOYOTA's intellectual property
-

TYPICAL MALFUNCTION THRESHOLDS


TOYOTA's intellectual property
-

COMPONENT OPERATING RANGE


P0A60 (INF 288 / 289 / 290 / 292 / 294 / 501): 
Motor inverter current sensor
DTC P0A60 (INF 288 / 289 / 290 / 292 / 294 / 501) is not detected

P0A63 (INF 296 / 297 / 298 / 300 / 302 / 502): 
Motor inverter current sensor
DTC P0A63 (INF 296 / 297 / 298 / 300 / 302 / 502) is not detected

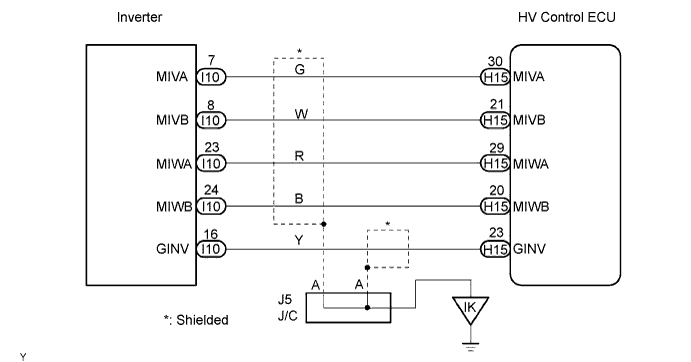
WIRING DIAGRAM


A092099E01


INSPECTION PROCEDURE

CAUTION:
  1. Before inspecting the high-voltage system, take safety precautions to prevent electrical shocks, such as wearing insulated gloves and removing the service plug grip. After removing the service plug grip, put it in your pocket to prevent other technicians from reconnecting it while you are servicing the high-voltage system.
  2. After disconnecting the service plug grip, wait for at least 5 minutes before touching any of the high-voltage connectors or terminals.

HINT:
At least 5 minutes are required to discharge the high-voltage condenser inside the inverter.

1.CHECK HARNESS AND CONNECTOR (HYBRID VEHICLE CONTROL ECU - INVERTER)

CAUTION:
Wear insulated gloves before performing the following operation.

  1. Turn the power switch OFF.

  1. Remove the service plug grip .

    NOTICE:
    Turning the power switch ON (READY) with the service plug grip removed could cause malfunction. Therefore, never turn the power switch ON (READY) in this state.


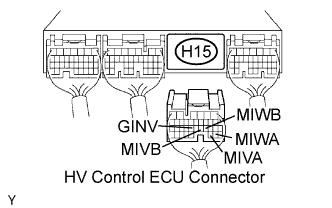
    A065744E82
  1. Disconnect the H15 HV control ECU connector.

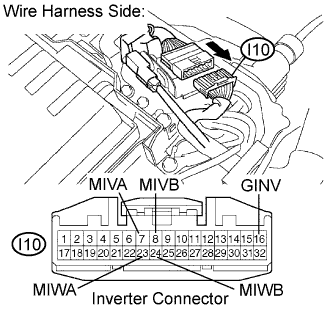
  1. Remove the inverter cover .


    A092041E07
  1. Disconnect the I10 inverter connector.

  1. Turn the power switch ON (IG).

    HINT:
    DTCs for the interlock switch system are output when turning the power switch ON (IG) with both service plug grip and inverter cover removed.

  1. Measure the voltage between the terminals of the HV control ECU connector and body ground.

    Standard voltage:
    Tester Connection
    Specified Condition
    MIVA (H15-30) - Body ground
    Below 1 V
    MIVB (H15-21) - Body ground
    Below 1 V
    MIWA (H15-29) - Body ground
    Below 1 V
    MIWB (H15-20) - Body ground
    Below 1 V
    GINV (H15-23) - Body ground
    Below 1 V

  1. Turn the power switch OFF.

  1. Measure the resistance between the wire harness side connectors.

    Standard resistance (Check for open):
    Tester Connection
    Specified Condition
    MIVA (H15-30) - MIVA (I10-7)
    Below 1 Ω
    MIVB (H15-21) - MIVB (I10-8)
    Below 1 Ω
    MIWA (H15-29) - MIWA (I10-23)
    Below 1 Ω
    MIWB (H15-20) - MIWB (I10-24)
    Below 1 Ω
    GINV (H15-23) - GINV (I10-16)
    Below 1 Ω
    Standard resistance (Check for short):
    Tester Connection
    Specified Condition
    MIVA (H15-30) or MIVA (I10-7) - Body ground
    10 kΩ or higher
    MIVB (H15-21) or MIVB (I10-8) - Body ground
    10 kΩ or higher
    MIWA (H15-29) or MIWA (I10-23) - Body ground
    10 kΩ or higher
    MIWB (H15-20) or MIWB (I10-24) - Body ground
    10 kΩ or higher
    GINV (H15-23) or GINV (I10-16) - Body ground
    10 kΩ or higher

  1. Reconnect the inverter connector.

  1. Reconnect the HV control ECU connector.

  1. Reinstall the inverter cover .

  1. Reinstall the service plug grip .


NG
REPAIR OR REPLACE HARNESS OR CONNECTOR
OK

REPLACE INVERTER WITH CONVERTER ASSEMBLY