| YES |  |
| GO TO RELEVANT DTC CHART |
DTC P0A78-586 Drive Motor "A" Inverter Performance |
| DTC No. | INF Code | DTC Detection Condition | Trouble Area |
| P0A78 | 586 | Inverter voltage (VH) sensor performance problem |
|
| Related DTCs | P0A78 (INF 586): Voltage (VH) sensor deviation |
| Required sensor / components | Motor inverter, battery ECU |
| Frequency of operation | Continuous |
| Duration | TOYOTA's intellectual property |
| MIL operation | Immediately |
| Sequence of operation | None |
| The monitor will run whenever the following DTCs are not present | TOYOTA's intellectual property |
| Other conditions belong to TOYOTA's intellectual property | - |
| TOYOTA's intellectual property | - |
| Motor inverter | DTC P0A78 (INF 586) is not detected |
| 1.READ OUTPUT DTC (HV ECU) |
Connect the Techstream to the DLC3.
Turn the power switch ON (IG).
Enter the following menus: Powertrain / Hybrid Control / Trouble Codes.
Check if DTCs are output.
|
| ||||
| NO | |
 |
| 2.CHECK HARNESS AND CONNECTOR (HYBRID VEHICLE CONTROL ECU - INVERTER) |
Turn the power switch OFF.
Remove the service plug grip .
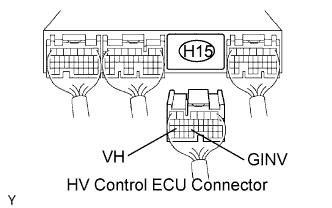 |
Disconnect the H15 HV control ECU connector.
Remove the inverter cover .
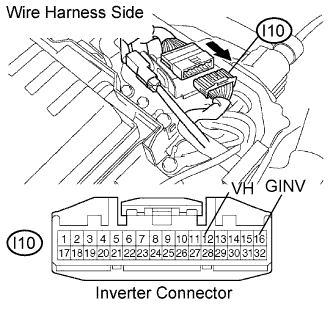 |
Disconnect the I10 inverter connector.
Turn the power switch ON (IG).
Measure the voltage between the terminals of the HV control ECU connector and body ground.
| Tester Connection | Specified Condition |
| VH (H15-26) - Body ground | Below 1 V |
| GINV (H15-23) - Body ground | Below 1 V |
Turn the power switch OFF.
Measure the resistance between the wire harness side connectors.
| Tester Connection | Specified Condition |
| VH (H15-26) - VH (I10-12) | Below 1 Ω |
| GINV (H15-23) - GINV (I10-16) | Below 1 Ω |
| Tester Connection | Specified Condition |
| VH (H15-26) or VH (I10-12) - Body ground | 10 kΩ or higher |
| GINV (H15-23) or GINV (I10-16) - Body ground | 10 kΩ or higher |
Reconnect the inverter connector.
Reconnect the HV control ECU connector.
Reinstall the inverter cover .
Reinstall the service plug grip .
|
| ||||
| OK | ||
 | ||
| ||