| YES |  |
| GO TO DTC CHART. FIND PAGE NUMBER TO PROCEED TO DIAGNOSTIC TROUBLESHOOTING FLOWCHART |
DTC P0A7A-322 Generator Inverter Performance |
| DTC No. | INF Code | DTC Detection Condition | Trouble Area |
| P0A7A | 322 | Generator inverter fail (GFIV) signal detection (inverter overheating) |
|
| Related DTCs | P0A7A (INF 322): Generator inverter / GFIV detection over heat |
| Required sensor / components | Generator inverter |
| Frequency of operation | Continuous |
| Duration | TOYOTA's intellectual property |
| MIL operation | Immediately |
| Sequence of operation | None |
| The monitor will run whenever the following DTCs are not present | TOYOTA's intellectual property |
| No other condition | - |
| Generator inverter | Overheated |
| Generator inverter | DTC P0A7A (INF 322) is not detected |
| 1.READ OUTPUT DTC (HV ECU) |
Connect the Techstream to the DLC3.
Turn the power switch ON (IG).
Enter the following menus: Powertrain / Hybrid Control / Trouble Codes.
Check if DTCs are output.
| DTC No. | Relevant Diagnosis |
| P0A1D | Hybrid Powertrain Control Module |
| P0A2B, P0A2C or P0A2D | Drive Motor "A" Temperature Sensor Circuit System |
| P0A37, P0A38 or P0A39 | Generator Temperature Sensor Circuit System |
| P0A3F, P0A40 or P0A4 | Drive Motor "A" Position Sensor Circuit System |
| P0A4B, P0A4C or P0A4D | Generator Position Sensor Circuit System |
| P0A60 or P0A63 | Drive Motor "A" Current Sensor Circuit System |
| P0A72 or P0A75 | Generator Current Sensor Circuit System |
| P0A78 | Drive Motor "A" Inverter Performance |
| P0A7A | Generator Inverter Performance |
| P0A90 | Drive Motor "A" Performance |
| P0A92 | Hybrid Generator Performance |
| P0A93 | Inverter Cooling System Malfunction |
| P0A94 | DC / DC Converter Malfunction |
| P0AA1, P0AA4, P0AE0, P0AE6, P0AE7, P0ADB or P0ADF | System Main Relay Circuit System |
| P0AA6, P3004 | High Voltage System |
| P0AEE | Motor Inverter Temperature Sensor Malfunction |
| P3000 | HV Battery System Malfunction |
| P3110 | Integration Relay Malfunction |
| P3221 | Generator Inverter Temperature Sensor Circuit System |
| P3226 | DC / DC Boost Converter Temperature Sensor Circuit System |
|
| ||||
| NO | |
 |
| 2.CHECK QUANTITY OF HV COOLANT |
Check that there is a sufficient amount of coolant for the inverter.
|
| ||||
| OK | |
|
| 3.CHECK COOLANT HOSE |
Check that the hoses of the cooling system are not bent or clogged (refer to the cooling system [Click here]).
|
| ||||
| OK | |
|
| 4.CHECK CONNECTION CONDITION OF WATER PUMP CONNECTOR (LOOSENESS AND POOR CONTACT) |
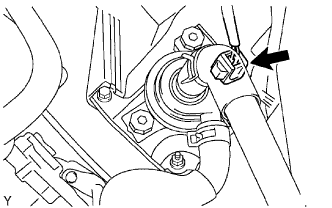 |
Check the connection condition of the water pump connector.
|
| ||||
| OK | |
|
| 5.CHECK WATER PUMP WITH MOTOR ASSEMBLY |
Turn the power switch ON (IG).
Check the operation of the water pump.
|
| ||||
| OK | |
|
| 6.CHECK CONNECTION CONDITION OF COOLING FAN MOTOR CONNECTOR (LOOSENESS AND POOR CONTACT) |
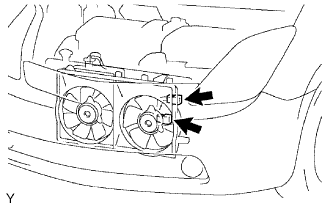 |
Check the connection condition of the cooling fan motor connectors.
|
| ||||
| OK | |
|
| 7.INSPECT COOLING FAN MOTOR |
Inspect the cooling fan motor .
|
| ||||
| OK | |
|
| 8.INSPECT NO. 2 COOLING FAN MOTOR |
Inspect the No. 2 cooling fan motor .
|
| ||||
| OK | |
|
| 9.CHECK CONNECTION CONDITION OF HYBRID VEHICLE CONTROL ECU CONNECTOR (LOOSENESS AND POOR CONTACT) |
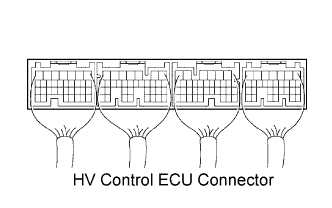 |
Check the connection condition of all the connectors at the HV control ECU.
|
| ||||
| OK | |
|
| 10.CHECK CONNECTION CONDITION OF INVERTER CONNECTOR (LOOSENESS AND POOR CONTACT) |
Turn the power switch OFF.
Remove the service plug grip .
Remove the inverter cover .
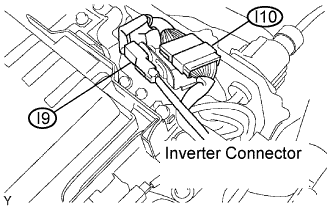 |
Check the connection condition of the I9 and I10 inverter connectors.
Reinstall the inverter cover .
Reinstall the service plug grip .
|
| ||||
| OK | |
|
| 11.CONFIRM INFORMATION (EXCLUSIVE INFO 4) |
Connect the Techstream to the DLC3.
Turn the power switch ON (IG).
Enter the following menus: Powertrain / Hybrid Control / Trouble Codes.
Select DTC P0A7A to display its freeze frame data.
Select the item that has INF code 322 from among "Detail Code 1 to 5, Detail Information 1 to 5" and press ENTER.
Read "Exclusive Information 4".
| Displayed in Exclusive Information 4 | Proceed to |
| -127 to -120, -95 to -88, -63 to -56, -31 to -24, 1 to 8, 33 to 40, 65 to 72, 97 to 104 | A |
| -119 to -112, -87 to -80, -55 to -48, -23 to -16, 9 to 16, 41 to 48, 73 to 80, 105 to 112 | B |
| -111 to -104, -79 to -72, -47 to -40, -15 to -8, 17 to 24, 49 to 56, 81 to 88, 113 to 120 | C |
| -103 to -96, -71 to -64, -39 to -32, -7 to 0, 25 to 32, 57 to 64, 89 to 96, 121 to 127 | D |
|
| ||||
|
| ||||
|
| ||||
| A | |
|
| 12.INSPECT HYBRID VEHICLE GENERATOR ASSEMBLY |
Turn the power switch OFF.
Remove the service plug grip .
Remove the inverter cover .
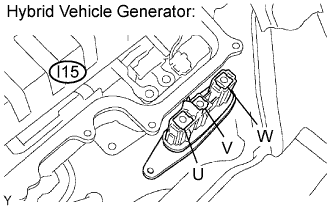 |
Disconnect the three-phase alternating current cable for the hybrid vehicle generator from the inverter.
Using a milliohm meter, measure the resistance between the three-phase alternating current cable terminals of the hybrid vehicle generator.
| Tester Connection | Specified Condition* |
| U (I15-1) - V (I15-2) | Below 109 mΩ at 68°F (20°C) |
| V (I15-2) - W (I15-3) | Below 109 mΩ at 68°F (20°C) |
| W (I15-3) - U (I15-1) | Below 109 mΩ at 68°F (20°C) |
Calculate the difference between the maximum and minimum resistance between terminals U - V, V - W, and W - U.
Using a megohmmeter, measure the insulation resistance between the three-phase alternating current cable terminals of the hybrid vehicle generator and the body ground.
| Tester Connection | Specified Condition |
| U (I15-1) - Body ground | 10 MΩ or higher |
| V (I15-2) - Body ground | 10 MΩ or higher |
| W (I15-3) - Body ground | 10 MΩ or higher |
Reconnect the three-phase alternating current cable for the hybrid vehicle generator.
|
| ||||
| OK | |
|
| 13.PERFORM ACTIVE TEST BY THE TECHSTREAM (FORCIBLE STOP OF INVERTER DRIVE) |
Check that the service plug grip and inverter cover have been removed.
Connect the Techstream to the DLC3.
Turn the power switch ON (IG).
Enter the following menus: Powertrain / Hybrid Control / Active Test.
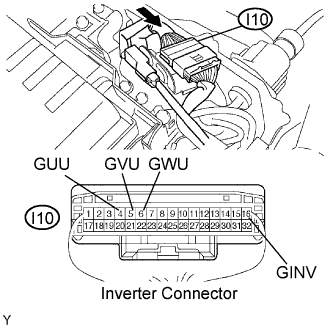 |
Measure the voltage between the terminals of the inverter connector while effecting "Forcible Stop of Inverter Drive".
| Tester Connection | Specified Condition |
| GUU (I10-4) - GINV (I10-16) | 12 to 16 V |
| GVU (I10-5) - GINV (I10-16) | 12 to 16 V |
| GWU (I10-6) - GINV (I10-16) | 12 to 16 V |
Turn the power switch OFF.
|
| ||||
| OK | ||
 | ||
| ||
| 14.PERFORM ACTIVE TEST BY THE TECHSTREAM (FORCIBLE STOP OF INVERTER DRIVE) |
Check that the service plug grip and inverter cover have been removed.
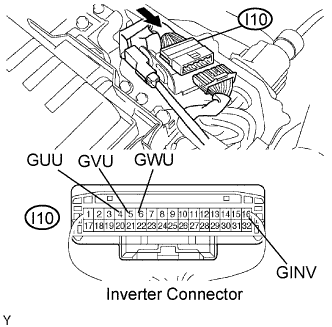 |
Disconnect the I10 inverter connector.
Connect the Techstream to the DLC3.
Turn the power switch ON (IG).
Enter the following menus: Powertrain / Hybrid Control / Active Test.
Measure the voltage between the terminals of the inverter connector while effecting "Forcible Stop of Inverter Drive".
| Tester Connection | Specified Condition |
| GUU (I10-4) - GINV (I10-16) | 14 to 16 V |
| GVU (I10-5) - GINV (I10-16) | 14 to 16 V |
| GWU (I10-6) - GINV (I10-16) | 14 to 16 V |
Turn the power switch OFF.
Reconnect the inverter connector.
Reinstall the inverter cover .
Reinstall the service plug grip .
|
| ||||
| OK | ||
| ||
| ||
