Home › HYBRID SYSTEM › P112 HYBRID VEHICLE CONTROL › HYBRID CONTROL SYSTEM

DTC    P0A90-239    Drive Motor "A" Performance

DTC    P0A90-241    Drive Motor "A" Performance

DTC    P0A90-602    Drive Motor "A" Performance

for Preparation Click here


DESCRIPTION

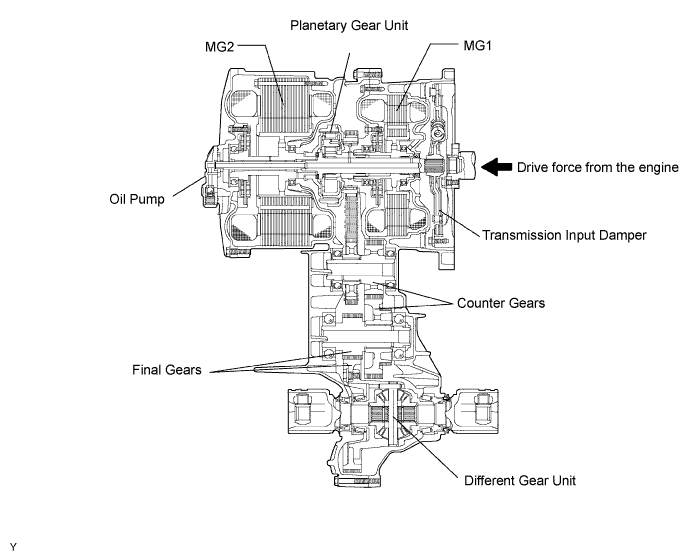
The HV transaxle consists of a planetary gear unit, MG1 and MG2.
A gear unit uses the planetary gear to split engine output in accordance with a driving request during driving the vehicle or charging its internal HV battery.
The MG2 provides assistance to the engine output while increasing the drive force of the vehicle. Furthermore, the MG2 effects regenerative braking by converting the energy (which is consumed in the form of heat during normal braking) into electrical energy and recovering it into the HV battery. Through regenerative braking, as well as decelerating the vehicle, the MG2 generates high-voltage electrical power which is used for the purpose of charging the HV battery.
The MG1 supplies electrical power, which is used for charging the HV battery or for driving the MG2. It also has a stepless transmission function to control the transaxle by regulating the amount of generation of electrical energy, which effectively varies the MG1 speed. In addition, the MG1 is used as a starter motor to start the engine.
The transmission input damper absorbs the shock that accompanies transmission of the drive force from the engine.

A092301E02


DTC No.
INF Code
DTC Detection Condition
Trouble Area
P0A90
239
HV transaxle input malfunction (shaft damaged)
  1. Engine assembly
  2. HV transaxle assembly (shaft or gear)
  3. Transmission input damper
  4. Wire harness or connector
  5. HV control ECU
P0A90
241
HV transaxle input malfunction (torque limiter slipping)
  1. Engine assembly
  2. HV transaxle assembly (shaft or gear)
  3. Transmission input damper
  4. Wire harness or connector
  5. HV control ECU
P0A90
602
HV transaxle output malfunction
  1. Engine assembly
  2. HV transaxle assembly (shaft or gear)
  3. Transmission input damper
  4. Wire harness or connector
  5. HV control ECU

WIRING DIAGRAM

Refer to DTC P0A0F (INF 238) .

INSPECTION PROCEDURE

1.READ OUTPUT DTC (ENGINE)
  1. Connect the Techstream to the DLC3.

  1. Turn the power switch ON (IG).

  1. Enter the following menus: Powertrain / Engine Control / Trouble Codes.

  1. Check if DTCs are output.

    Result:
    DTCs are output


YES
GO TO RELEVANT DTC CHART
NO


2.CHECK CRANKSHAFT PULLEY REVOLUTION
  1. Turn the power switch OFF.

  1. Jack up the vehicle.

  1. Manually turn the crankshaft pulley to check if the crankshaft rotates.

    OK:
    The crankshaft rotates


NG
Go to step 10
OK


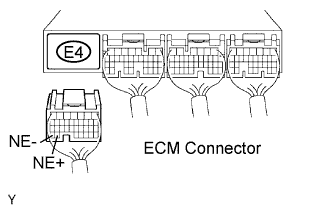
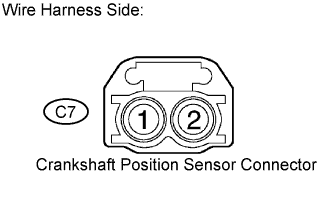
3.CHECK HARNESS AND CONNECTOR (ECM - CRANKSHAFT POSITION SENSOR)
A065743E70
A092031E01
  1. Disconnect the E4 ECM connector.

  1. Disconnect the C7 crankshaft position sensor connector.

  1. Measure the resistance between the wire harness side connectors.

    Standard resistance (Check for open):
    Tester Connection
    Specified Condition
    NE+ (E4-33) - Crankshaft position sensor (C7-1)
    Below 1 Ω
    NE- (E4-34) - Crankshaft position sensor (C7-2)
    Below 1 Ω

    Standard resistance (Check for short):
    Tester Connection
    Specified Condition
    NE+ (E4-33) or Crankshaft position sensor (C7-1) - Body ground
    10 kΩ or higher
    NE- (E4-34) or Crankshaft position sensor (C7-2) - Body ground
    10 kΩ or higher

  1. Reconnect the crankshaft position sensor connector.

  1. Reconnect the ECM connector.


NG
REPAIR OR REPLACE HARNESS OR CONNECTOR
OK


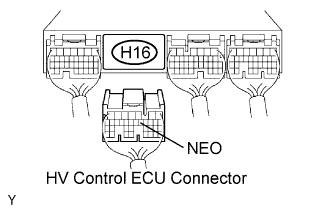
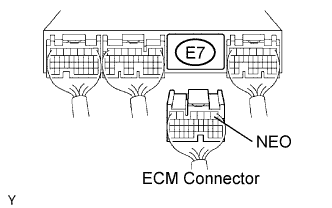
4.CHECK HARNESS AND CONNECTOR (HYBRID VEHICLE CONTROL ECU - ECM)
A065745E37
A065744E24
  1. Disconnect the H16 HV control ECU connector.

  1. Disconnect the E7 ECM connector.

  1. Measure the resistance between the wire harness side connectors.

    Standard resistance (Check for open):
    Tester Connection
    Specified Condition
    NEO (H16-12) - NEO (E7-1)
    Below 1 Ω

    Standard resistance (Check for short):
    Tester Connection
    Specified Condition
    NEO (H16-12) or NEO (E7-1) - Body ground
    10 Ω or higher

  1. Reconnect the ECM connector.

  1. Reconnect the HV control ECU connector.


NG
REPAIR OR REPLACE HARNESS OR CONNECTOR
OK


5.CHECK AND CLEAR DTC (HV ECU)
  1. Connect the Techstream to the DLC3.

  1. Turn the power switch ON (IG).

  1. Enter the following menus: Powertrain / Hybrid Control / Trouble Codes.

  1. Check and record the DTCs, the freeze frame data, and the information.

  1. Clear the DTCs of the HV ECU.


NEXT


6.CHECK READY LIGHT
  1. Connect the Techstream to the DLC3.

  1. Turn the power switch ON (IG).

  1. Enter the following menus: Powertrain / Engine Control / Data List.

  1. Read the "Generator (MG1) Rev" and "Engine Spd" values.

  1. Turn the power switch ON (READY).

    OK:
    READY light turns ON

    HINT:
    If the READY light does not turn ON, and the reading on the Techstream shows DTC P0A90 (INF 239) (HV transaxle input malfunction [shaft damaged]), or the MG1 turns but the engine does not crank, replace the hybrid vehicle transaxle assembly.


NG
REPLACE HYBRID VEHICLE TRANSAXLE ASSEMBLY
OK


7.CHECK ENGINE REVOLUTION-UP
  1. Connect the Techstream to the DLC3.

  1. Turn the power switch ON (IG).

  1. Enter the following menus: Powertrain / Engine Control / Data List.

  1. Read the "Generator (MG1) Rev" and "Engine Spd" values.

  1. With the READY light turned ON, depress the accelerator pedal for 10 seconds while the shift position is in P.

    OK:
    The engine revs up

    HINT:
    If the engine does not rev up, and the reading on the Techstream shows DTC P0A90 (INF 239) (HV transaxle input malfunction [shaft damaged]), or the MG1 turns but the engine does not crank, replace the hybrid vehicle transaxle assembly.


NG
REPLACE HYBRID VEHICLE TRANSAXLE ASSEMBLY
OK


8.CHECK CREEP MOVEMENT
  1. Connect the Techstream to the DLC3.

  1. Turn the power switch ON (READY).

  1. Jack up the vehicle.

  1. Depress the brake pedal, move the selector lever to the D position, and release the brake pedal.

    OK:
    The wheels turn (creep movement)

    HINT:
    If the wheels do not turn, and the reading on the Techstream shows DTC P0A90 (INF 602) (HV transaxle output malfunction), replace the hybrid vehicle transaxle assembly.


NG
REPLACE HYBRID VEHICLE TRANSAXLE ASSEMBLY
OK


9.CHECK ENGINE ACCELERATION SPEED
  1. Connect the Techstream to the DLC3.

  1. While driving at the vehicle speed of more than 6 mph (10 km/h), fully depress the accelerator pedal to raise the engine speed.

    OK:
    The engine speed increases smoothly

    HINT:
    If the engine over-revs or the reading on the Techstream shows DTC P0A90 (INF 241) (HV transaxle input malfunction [torque limiter slipping]), replace the transmission input damper.


NG
REPLACE TRANSMISSION INPUT DAMPER ASSEMBLY
OK

PERFORM SIMULATION TEST. IF SYMPTOM IS NOT REPRODUCED, REPLACE HV TRANSAXLE AND HV CONTROL ECU 

10.CHECK FRONT TIRE REVOLUTION
  1. Turn the power switch ON (IG).

  1. Depress the brake pedal, move the selector lever to the N position.

  1. Jack up the vehicle.

  1. Manually turn the crankshaft pulley to check if the front tires rotate.

    OK:
    The front tires rotate


NG
REPAIR OR REPLACE ENGINE ASSEMBLY
OK

REPAIR OR REPLACE HYBRID VEHICLE TRANSAXLE ASSEMBLY