STEERING COLUMN ASSEMBLY > REMOVAL |
| 1. REMOVE NO. 2 REAR FLOOR BOARD |
| 2. REMOVE REAR DECK FLOOR BOX |
| 3. REMOVE NO. 3 REAR FLOOR BOARD ASSEMBLY |
| 4. DISCONNECT CABLE FROM NEGATIVE BATTERY TERMINAL |
| 5. PLACE FRONT WHEELS FACING STRAIGHT AHEAD |
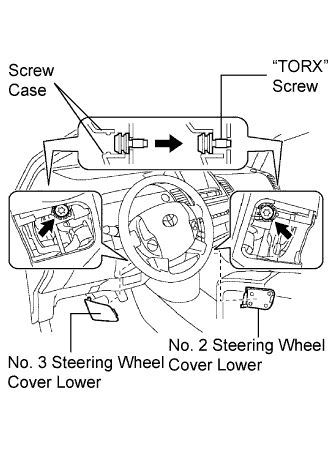
| 6. REMOVE NO. 2 STEERING WHEEL COVER LOWER |
| 7. REMOVE NO. 3 STEERING WHEEL COVER LOWER |
| 8. REMOVE STEERING PAD ASSEMBLY |
|
Straighten the front wheels.
Using a T30 "TORX" socket, loosen the 2 screws until the groove along each screw circumference catches on the screw case.
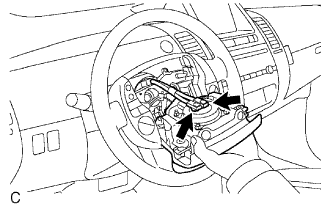 |
Pull out the steering pad from the steering wheel and support the steering pad with one hand as shown in the illustration.
Using a screwdriver, disconnect the 2 airbag connectors.
Disconnect the horn connector and remove the steering pad.
| 9. REMOVE STEERING WHEEL ASSEMBLY |
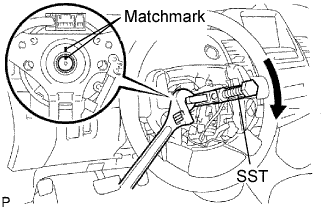 |
Remove the nut and put matchmarks on the steering wheel and steering main shaft.
Using SST, remove the steering wheel.
| 10. REMOVE TILT LEVER BRACKET |
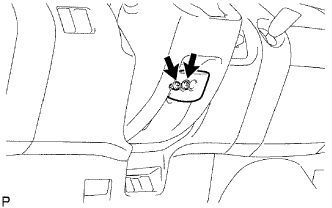 |
Remove the 2 screws and tilt lever bracket.
| 11. REMOVE STEERING COLUMN COVER |
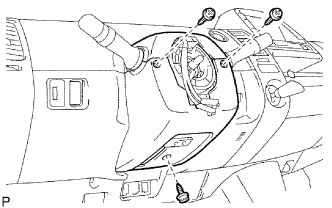 |
Detach the 4 claws and remove the 3 screws. Then remove the steering column lower cover and the steering column upper cover.
| 12. REMOVE TURN SIGNAL SWITCH ASSEMBLY |
Remove the clamp and remove the turn signal switch from the steering column.
| 13. REMOVE SPIRAL CABLE SUB-ASSEMBLY |
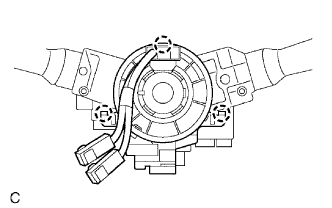 |
Disconnect the airbag connector.
Detach the 3 claws and remove the spiral cable.
| 14. REMOVE FRONT DOOR INSIDE SCUFF PLATE LH |
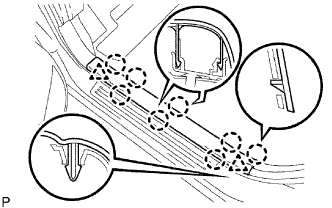 |
Using a screwdriver, detach the 8 claws and 2 clips, and remove the scuff plate.
| 15. REMOVE FRONT DOOR INSIDE SCUFF PLATE RH |
| 16. REMOVE COWL SIDE TRIM BOARD LH |
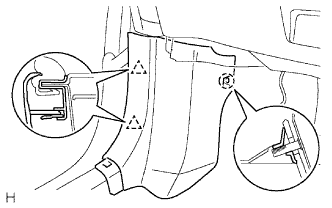 |
Using a screwdriver, detach the claw and 2 clips, and remove the trim board.
| 17. REMOVE COWL SIDE TRIM BOARD RH |
| 18. REMOVE NO. 1 INSTRUMENT PANEL REGISTER ASSEMBLY |
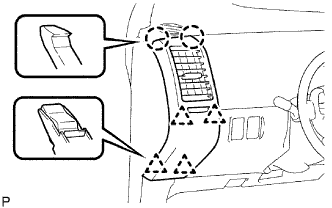 |
Detach the 2 claws and 4 clips, and remove the instrument panel register.
| 19. REMOVE LOWER INSTRUMENT PANEL FINISH PANEL SUB-ASSEMBLY |
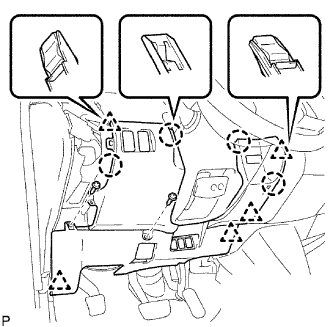 |
Remove the 2 screws.
Disconnect the hood lock control cable.
Detach the 4 claws and 5 clips.
Disconnect all connectors and remove the instrument panel finish panel.
| 20. REMOVE UPPER INSTRUMENT PANEL FINISH PANEL SUB-ASSEMBLY |
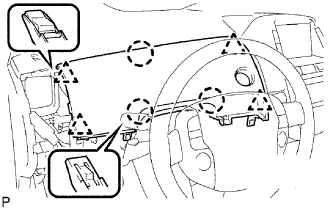 |
Detach the 3 claws and 4 clips.
Disconnect the connector and remove the instrument panel finish panel.
| 21. REMOVE NO. 3 INSTRUMENT PANEL REGISTER ASSEMBLY |
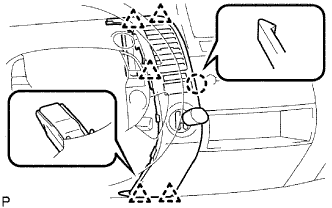 |
Detach the claw and 5 clips.
Disconnect the connector and remove the instrument panel register.
| 22. REMOVE NO. 4 INSTRUMENT PANEL REGISTER ASSEMBLY |
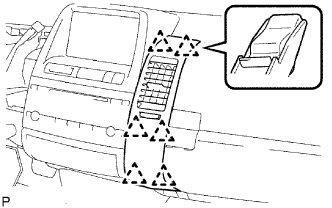 |
Detach the 6 clips and remove the instrument panel register.
| 23. REMOVE NO. 2 INSTRUMENT PANEL REGISTER ASSEMBLY |
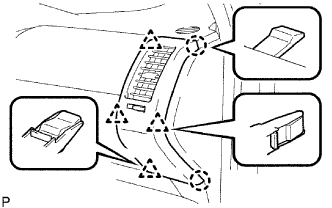 |
Detach the 2 claws and 4 clips, and remove the instrument panel register.
| 24. REMOVE MULTI-DISPLAY |
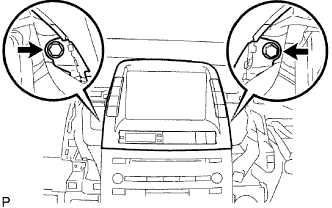 |
Remove the 2 bolts.
Disconnect the connector and remove the multi-display.
| 25. REMOVE GLOVE COMPARTMENT DOOR STOPPER SUB-ASSEMBLY |
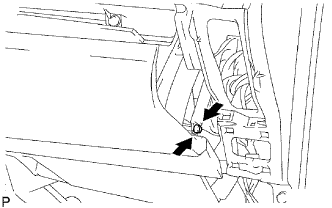 |
Holding the part indicated in the illustration, remove the glove compartment door stopper from the glove compartment door.
| 26. REMOVE GLOVE COMPARTMENT DOOR ASSEMBLY |
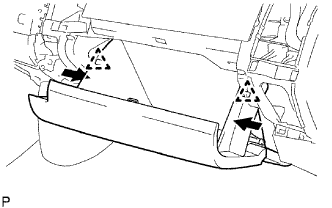 |
While pushing in the sides of the glove compartment door as indicated by the arrows in the illustration, open the door to release it from the 2 stoppers.
Open the door until it is horizontal.
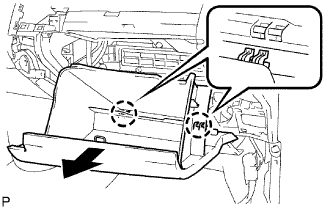 |
Pull the glove compartment door toward the rear of the vehicle to detach the 2 hinges and remove the glove compartment door.
| 27. REMOVE GLOVE COMPARTMENT DOOR |
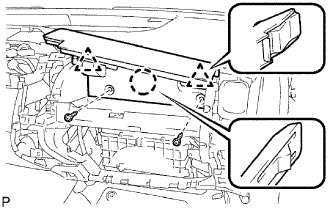 |
Remove the 2 screws.
Detach the claw and 2 clips, and remove the glove compartment door.
| 28. REMOVE NO. 1 INSTRUMENT PANEL SPEAKER PANEL SUB-ASSEMBLY (w/ JBL Sound System) |
| 29. REMOVE FRONT PILLAR GARNISH CORNER PIECE RH |
| 30. REMOVE FRONT PILLAR GARNISH CORNER PIECE LH |
|
Using a screwdriver, detach the 8 claws and 2 clips, and remove the scuff plate.
| 31. REMOVE FRONT PILLAR GARNISH ASSEMBLY LH |
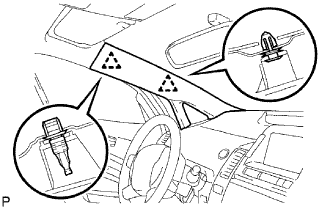 |
w/o Curtain Shield Airbag:
Using a screwdriver, detach the 2 clips and remove the pillar garnish.
w/ Curtain Shield Airbag:
Remove the pillar garnish.
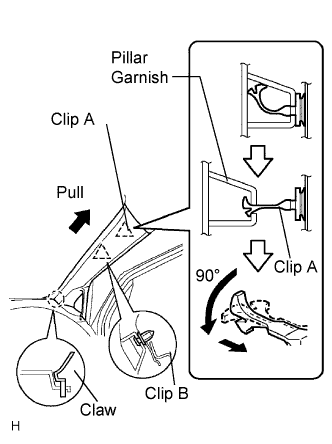 |
Pull the pillar garnish so that clip B detaches, the base of clip A detaches, and the tip of clip A locks in the pillar garnish's hole.
Using needle-nose pliers, rotate clip A 90°. Then pull the pillar garnish to release the tip of clip A from the pillar garnish.
Pull the pillar garnish in the direction indicated by the arrow in the illustration to detach the claw.
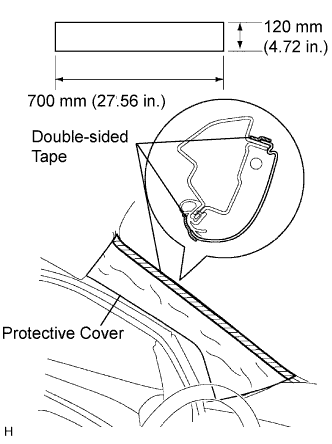 |
w/ Curtain Shield Airbag:
Protect the curtain shield airbag LH.
Thoroughly cover the airbag with cloth or nylon that is approximately 700 mm (27.56 in.) x 120 mm (4.72 in.) and fix the ends of the cover with double-sided tape, as shown in the illustration.
| 32. REMOVE FRONT PILLAR GARNISH ASSEMBLY RH |
| 33. DISCONNECT PASSENGER AIRBAG CONNECTOR |
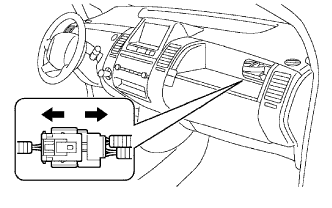 |
Disconnect the front passenger airbag connector.
| 34. REMOVE INSTRUMENT PANEL PASSENGER AIRBAG ASSEMBLY |
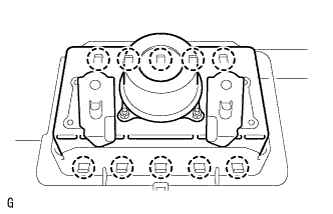 |
Detach the 10 claws and remove the front passenger airbag.
| 35. DISCONNECT POWER STEERING ECU ASSEMBLY |
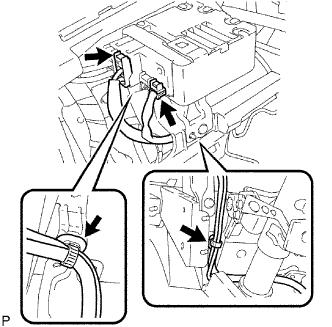 |
Disconnect the torque sensor wire harness clamp from the bottom surface of the power steering ECU.
Disconnect the torque sensor wire harness clamp from the instrument panel reinforcement.
Disconnect the 2 steering column connectors from the power steering ECU.
| 36. REMOVE FRONT FLOOR FOOTREST LH |
Using a flat head screwdriver, pull the front floor footrest forward, detach the 2 clips, and remove the front floor footrest.
| 37. REMOVE COLUMN HOLE COVER SILENCER SHEET |
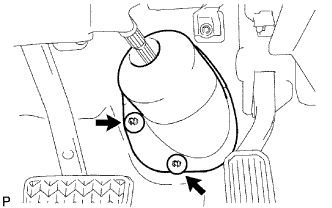 |
Fold back the floor carpet and remove the 2 clips and column hole cover silencer sheet.
| 38. REMOVE NO. 2 STEERING INTERMEDIATE SHAFT SUB-ASSEMBLY |
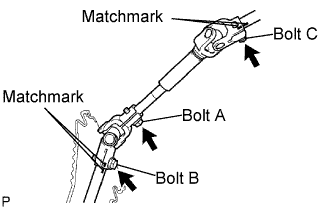 |
Loosen the bolt labeled A on the steering sliding yoke.
Put matchmarks on the steering intermediate shaft and steering intermediate shaft.
Remove the bolt labeled B and separate the steering intermediate shaft from the steering intermediate shaft.
Put matchmarks on the steering intermediate shaft and steering column.
Remove the bolt labeled C and separate the steering intermediate shaft from the steering column.
| 39. REMOVE STEERING SLIDING YOKE SUB-ASSEMBLY |
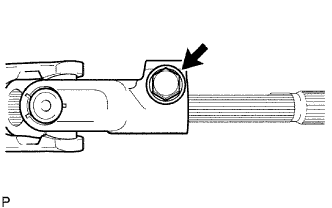 |
Remove the bolt and steering sliding yoke from the steering intermediate shaft.
| 40. REMOVE STEERING COLUMN ASSEMBLY |
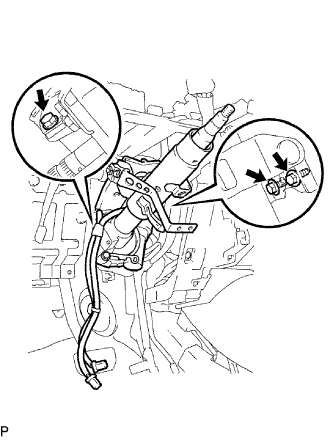 |
Disconnect the connectors and wire harness clamps from the steering column.
Remove the 3 bolts and steering column.