Home › BRAKE › BRAKE › REAR DRUM BRAKE

REAR DRUM BRAKE > REMOVAL

for Preparation Click here


HINT:
  1. Use the same procedures for the LH side and RH side.
  2. The procedures listed below are for the LH side.
  3. If work that does not involve brake fluid bleeding, such as drum brake shoe replacement, is started 2 minutes or more after the power switch is turned OFF, brake control (Electronically Controlled Brake system) prohibition is not necessary.


1. REMOVE REAR WHEEL


2. SET BRAKE CONTROL OFF


F046145E01

NOTICE:
Prohibit the brake control (Electronically Controlled Brake system) before bleeding the brake fluid.

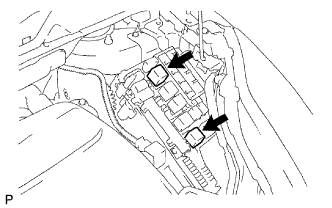
  1. With the power switch OFF to prohibit brake control, remove the No. 1 and No. 2 motor relays.

    NOTICE:
    If the pump motor operates while there is air remaining inside the brake actuator hose, the air will enter the actuator, resulting in difficulty in air bleeding.

    HINT:
    Brake control (Electronically Controlled Brake system) can be prohibited by selecting "ELECTRONICALLY CONTROLLED BRAKE SYSTEM INVALID" on the Techstream.


3. DRAIN BRAKE FLUID

NOTICE:
Wash brake fluid off immediately if it adheres to any painted surfaces.


4. REMOVE REAR BRAKE DRUM SUB-ASSEMBLY


    F047456E01
  1. Put matchmarks on the rear brake drum and the axle hub.

  1. Release the parking brake and remove the rear brake drum.

    HINT:
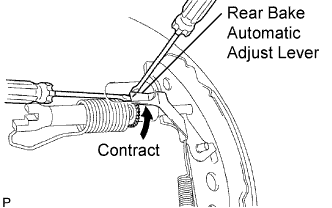
    If the rear brake drum cannot be removed, push the rear brake automatic adjust lever through the backing plate service hole using a screwdriver. Turn and contract the adjuster using another screwdriver.