Home › BRAKE › BRAKE CONTROL › SKID CONTROL SENSOR

SKID CONTROL SENSOR > REMOVAL

for Preparation Click here


1. REMOVE REAR WHEEL


2. REMOVE REAR BRAKE DRUM SUB-ASSEMBLY


    F047456E01
  1. Put matchmarks on the rear brake drum and the axle hub.

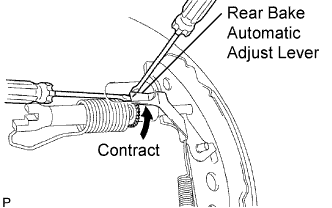
  1. Release the parking brake and remove the rear brake drum.

    HINT:
    If the rear brake drum cannot be removed, push the rear brake automatic adjust lever through the backing plate service hole using a screwdriver. Turn and contract the adjuster using another screwdriver.


3. SEPARATE SKID CONTROL SENSOR WIRE


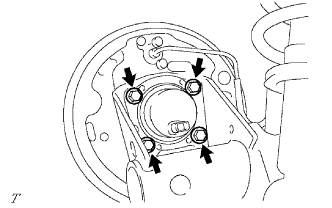
4. REMOVE REAR AXLE HUB AND BEARING ASSEMBLY


    C066800E01
  1. Remove the 4 bolts and then remove the axle hub and bearing.


5. REMOVE SKID CONTROL SENSOR
  1. Install the 4 hub nuts to the 4 rear axle hub bolts. Placing an aluminum plate below the rear axle hub and bearing, place them into the vise.

    NOTICE:
    Replace the rear axle hub and bearing if it is dropped or receives a strong shock.

  1. Using a pin punch (3 mm) or hammer, remove the 2 pins from SST (09520-00031) and separate the attachment (09521-00010).
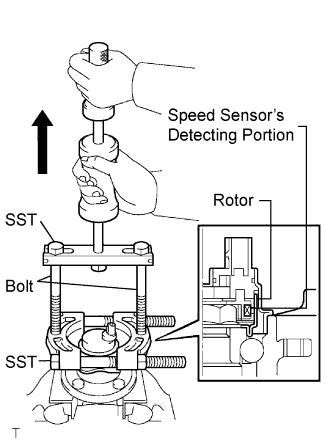


    F008657E04
  1. Using SST and 2 bolts (90101-12007), remove the sensor from the rear axle hub and bearing.

    SST
    09520-00031   (09520-00040)
    09521-00020  
    09950-00020  

    NOTICE:
    1. Pull the sensor off straight, being careful not to make contact with the sensor rotor.
    2. If the sensor rotor is damaged or deformed, replace the rear axle hub and bearing.
    3. Do not scratch the area where the sensor contacts the rear axle hub and bearing.
    4. Do not allow foreign matter to attach to the sensor rotor.