 |
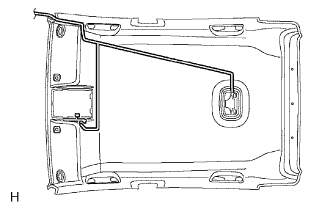
Align the markings, and then install the wire harness with tape.
- NOTICE:
- Attach the roof wire harness securely.
ROOF HEADLINING > INSTALLATION |
| 1. INSTALL ROOF HEADLINING ASSEMBLY |
|
Align the markings, and then install the wire harness with tape.
Install the silencer pads and headlining pad to the headlining.
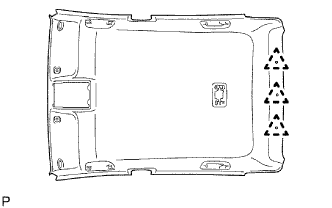 |
Install the headlining with the 3 clips.
| 2. INSTALL VISOR HOLDER |
Install the visor holder and turn it clockwise.
| 3. INSTALL VISOR ASSEMBLY LH |
Connect the connector.
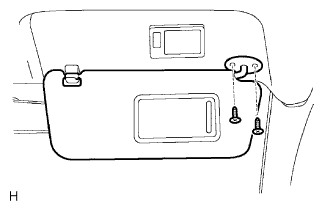 |
Install the visor with the 2 screws.
| 4. INSTALL VISOR ASSEMBLY RH |
| 5. INSTALL ASSIST GRIP SUB-ASSEMBLY |
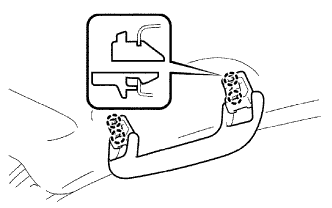 |
Attach the 4 claws to install the assist grip.
| 6. INSTALL ASSIST GRIP COVER |
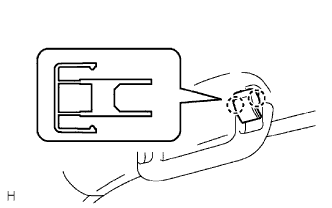 |
Attach the 4 claws to install the 2 covers.
| 7. INSTALL NO. 1 ROOM LIGHT ASSEMBLY |
Connect the room light connector.
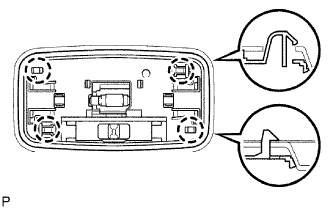 |
Attach the 4 claws to install the room light.
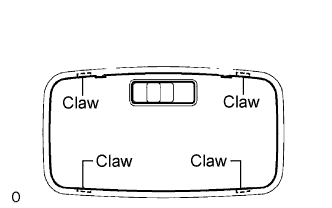 |
Attach the 4 claws to install the room light lens.
| 8. INSTALL MAP LIGHT ASSEMBLY |
Connect the map light connector.
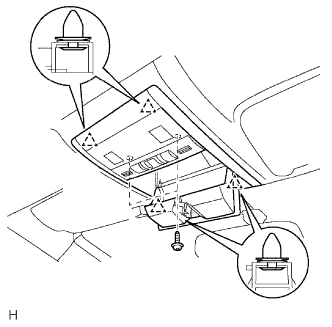 |
Attach the 4 clips to install the map light.
Install the 2 screws.
| 9. INSTALL ROOF SIDE INNER GARNISH ASSEMBLY LH |
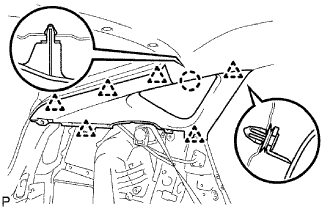 |
Attach the 6 clips and claw to install the inner garnish.
| 10. INSTALL ROOF SIDE INNER GARNISH ASSEMBLY RH |
| 11. REMOVE DECK TRIM SIDE PANEL ASSEMBLY LH |
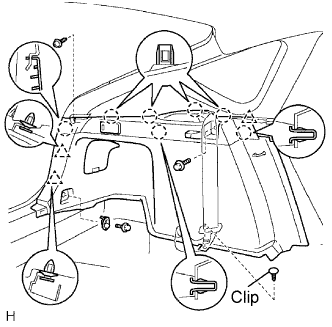 |
Attach the 7 claws and 3 clips to install the side panel.
Install the clip, screw and 2 bolts.
| 12. INSTALL DECK TRIM SIDE PANEL ASSEMBLY RH |
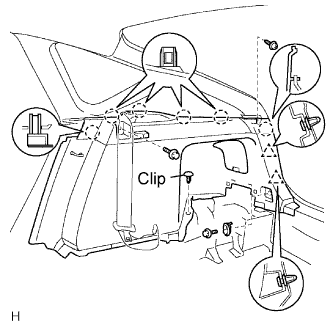 |
Attach the 6 claws and 2 clips to install the side panel.
Install the clip, screw and 2 bolts.
| 13. INSTALL REAR DECK TRIM COVER |
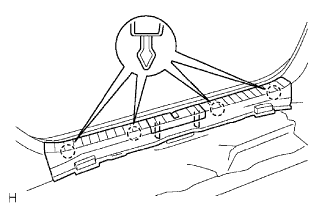 |
Attach the 4 claws to install the trim cover.
| 14. INSTALL REAR NO. 1 FLOOR BOARD |
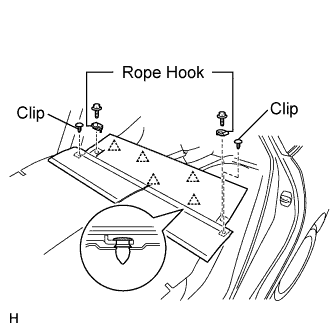 |
Attach the 5 clips to install the floor board.
Install the 2 clips, 2 bolts and 2 rope hooks.
| 15. INSTALL DECK FLOOR BOX LH |
| 16. INSTALL REAR DECK FLOOR BOX |
| 17. INSTALL REAR NO. 4 FLOOR BOARD |
| 18. INSTALL REAR NO. 3 FLOOR BOARD |
| 19. INSTALL REAR NO. 2 FLOOR BOARD |
| 20. INSTALL TONNEAU COVER ASSEMBLY |
| 21. INSTALL BACK DOOR WEATHERSTRIP |
| 22. DISCONNECT REAR SEAT 3 POINT TYPE BELT ASSEMBLY LH |
Connect the floor anchor with the bolt.
| 23. DISCONNECT REAR SEAT 3 POINT TYPE BELT ASSEMBLY RH |
Connect the floor anchor with the bolt.
| 24. INSTALL CENTER PILLAR GARNISH LH |
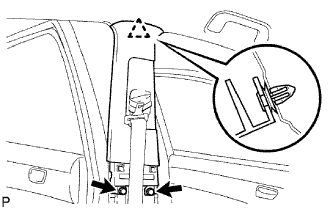 |
Attach the clip to install the pillar garnish.
Install the 2 screws.
| 25. INSTALL CENTER PILLAR GARNISH RH |
| 26. INSTALL CENTER PILLAR LOWER GARNISH LH |
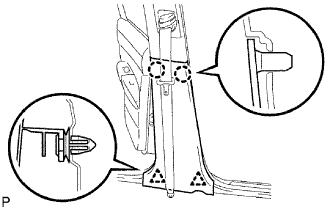 |
Attach the 2 claws and 2 clips to the lower garnish.
| 27. INSTALL CENTER PILLAR LOWER GARNISH RH |
| 28. DISCONNECT FRONT SEAT OUTER BELT ASSEMBLY RH |
Connect the floor anchor with the bolt.
| 29. DISCONNECT FRONT SEAT OUTER BELT ASSEMBLY LH |
Connect the floor anchor with the bolt.
| 30. INSTALL LAP BELT OUTER ANCHOR COVER |
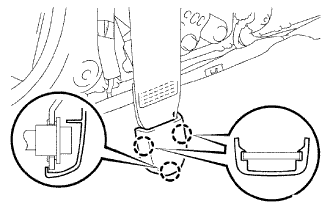 |
Attach the 3 claws to install the anchor cover.
| 31. INSTALL REAR DOOR OPENING TRIM WEATHERSTRIP LH |
| 32. INSTALL REAR DOOR OPENING TRIM WEATHERSTRIP RH |
| 33. INSTALL REAR SIDE SEATBACK FRAME LH |
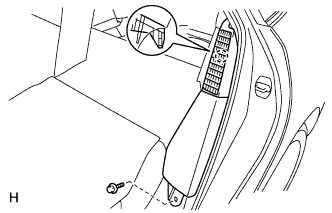 |
Attach the claw to install the frame.
Install the bolt.
| 34. INSTALL REAR SIDE SEATBACK FRAME RH |
| 35. INSTALL REAR DOOR SCUFF PLATE LH |
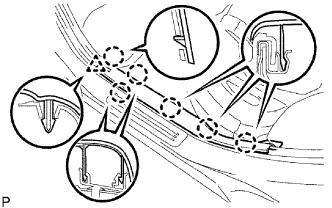 |
Attach the 6 claws and clip to install the scuff plate.
| 36. INSTALL REAR DOOR SCUFF PLATE RH |
| 37. INSTALL REAR SEAT CUSHION ASSEMBLY |
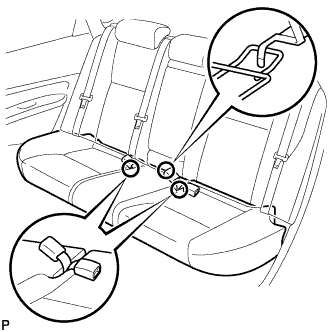 |
Attach the seat cushion's rear hook to the center hinge.
Insert the inner belts through the slits on the seat cushion.
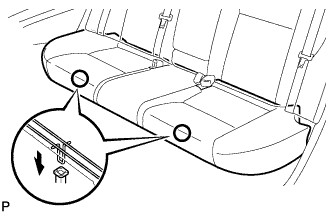 |
Attach the seat cushion's 2 front hooks to the vehicle body.
Confirm that the seat cushion is firmly installed.
| 38. INSTALL FRONT PILLAR GARNISH LH |
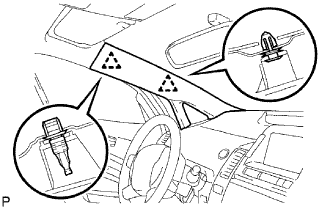 |
w/o Curtain Shield Airbag:
Attach the 2 clips to install the pillar garnish.
w/ Curtain Shield Airbag:
Remove the protective cover.
w/ Curtain Shield Airbag:
Install the pillar garnish.
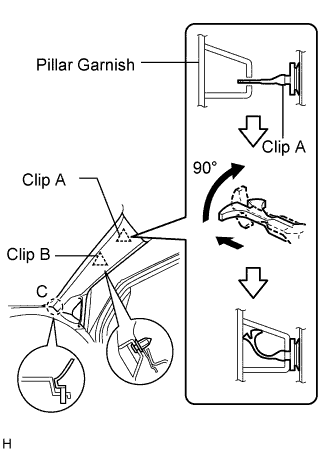 |
Set the claws of the pillar garnish to the area labeled C.
Insert the tip of clip A into the pillar garnish's hole.
Using needle-nose pliers, rotate the tip of clip A 90°. Then push the pillar garnish toward the vehicle body to attach the base of clip A and clip B.
| 39. INSTALL FRONT PILLAR GARNISH RH |
| 40. INSTALL FRONT PILLAR GARNISH CORNER PIECE LH |
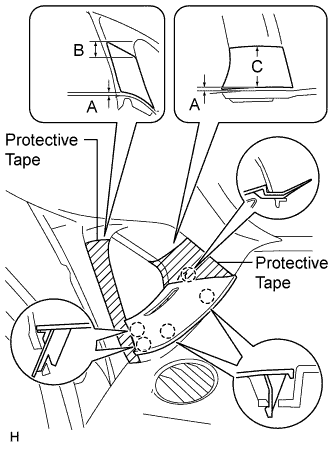 |
Put protective tape as shown in the illustration.
| Area | Specified Condition |
| A | 2.0 mm (0.079 in.) |
| B | 10.0 mm (0.394 in.) |
| C | 50.0 mm (1.969 in.) |
Attach the 5 claws to install the corner piece.
| 41. INSTALL FRONT PILLAR GARNISH CORNER PIECE RH |
| 42. INSTALL FRONT DOOR OPENING TRIM WEATHERSTRIP LH |
| 43. INSTALL FRONT DOOR OPENING TRIM WEATHERSTRIP RH |
| 44. INSTALL COWL SIDE TRIM BOARD LH |
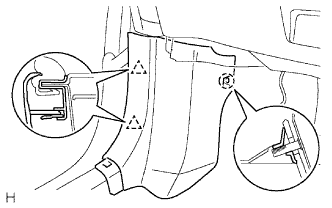 |
Attach the claw and 2 clips to install the trim board.
| 45. INSTALL COWL SIDE TRIM BOARD RH |
| 46. INSTALL FRONT DOOR SCUFF PLATE LH |
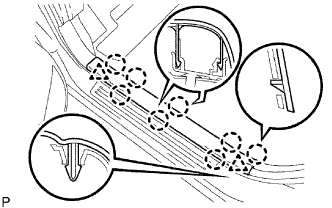 |
Attach the 8 claws and 2 clips to install the scuff plate.
| 47. INSTALL FRONT DOOR SCUFF PLATE RH |
| 48. DISCONNECT CABLE FROM NEGATIVE BATTERY TERMINAL |
| 49. PERFORM INITIALIZATION |
Perform initialization (Click here).