Home › ENGINE › 1NZ-FXE EMISSION CONTROL › FUEL TANK PRESSURE SENSOR

FUEL TANK PRESSURE SENSOR > REMOVAL

for Preparation Click here


1. REMOVE REAR NO. 2 FLOOR BOARD


    A088353E01
  1. Unlock the 2 washer tank cover knobs, and then remove the rear floor board.


2. REMOVE REAR DECK FLOOR BOX


    A088354E01
  1. Remove the rear deck floor box from the vehicle.


3. REMOVE REAR NO. 3 FLOOR BOARD


    A088355E02
  1. Detach the 4 claws, and then remove the floor board.


4. DISCONNECT CABLE FROM NEGATIVE BATTERY TERMINAL

CAUTION:
Wait at least 90 seconds after disconnecting the cable from the negative (-) battery terminal to prevent airbag and seat belt pretensioner activation.


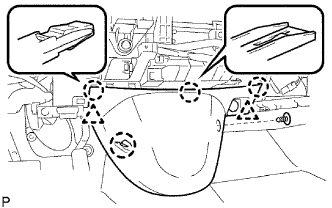
5. REMOVE LOWER CENTER INSTRUMENT PANEL FINISH PANEL


B074061E02
  1. Using a clip remover, remove the clip from the instrument panel finish panel lower center.

  1. Detach the 4 claws and 2 clips, and remove the instrument panel finish panel.


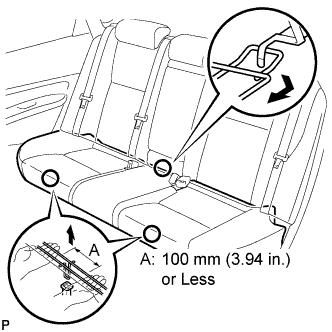
6. REMOVE REAR SEAT CUSHION ASSEMBLY


    B132600E01
  1. Detach the seat cushion's 2 front hooks from the vehicle body.

    NOTICE:
    Follow the instructions below carefully as the cushion frame deforms easily.


    1. Choose a hook to detach first. Place your hands near the hook as shown in the illustration. Then lift the seat cushion to detach the hook.

    2. Repeat for the other hook.

  1. Detach the seat cushion's rear hook.

  1. Remove the seat cushion.


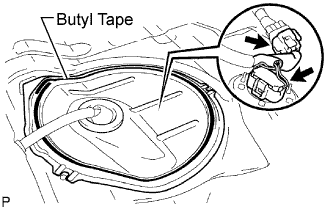
7. REMOVE REAR FLOOR SERVICE HOLE COVER


    A087483E02
  1. Remove the butyl tape and rear floor service hole cover.

  1. Disconnect the fuel pump connector.

  1. Disconnect the wire to wire connector.


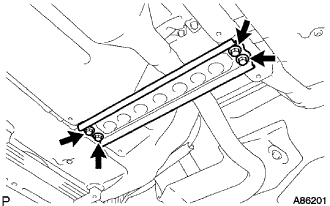
8. REMOVE FRONT FLOOR PANEL BRACE


    A086201
  1. Remove the 2 bolts and floor panel brace.


9. REMOVE FRONT EXHAUST PIPE


    A087436E01
  1. Using a clip remover, remove the clip.

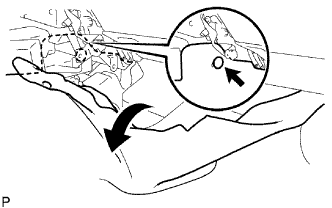
  1. Fold back the front floor carpet.


    A087437E01
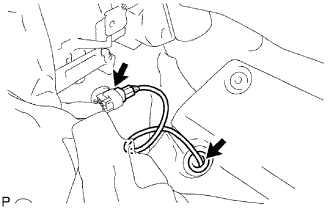
  1. Disconnect the heated oxygen sensor connector.

  1. Remove the grommet of the heated oxygen sensor from the vehicle.

  1. Remove the 2 bolts and 2 compression springs.

  1. Remove the gasket from the front exhaust pipe.

  1. Disconnect the tail pipe from the front exhaust pipe.

  1. Remove the 2 bolts and 2 compression springs.

  1. Remove the front exhaust pipe from the 2 exhaust pipe supports.


  1. Remove the gasket from the exhaust manifold.
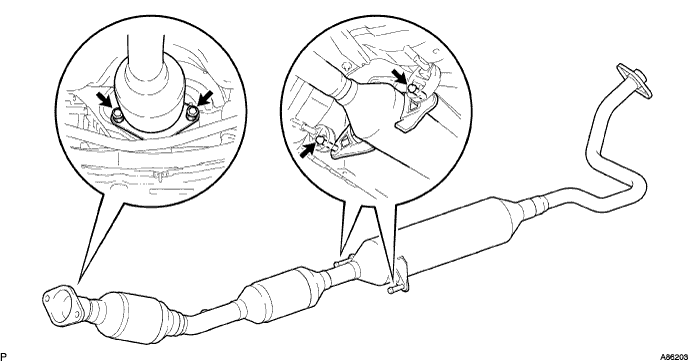

    A086203


10. REMOVE FUEL TANK SUB-ASSEMBLY


    A112310E01
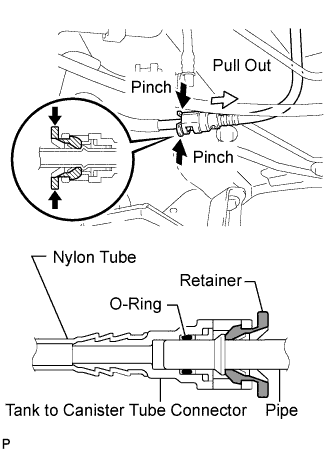
  1. Disconnect the fuel tank from the canister tube.

    1. Pinch the retainer of the fuel tube connector, then pull out the fuel tube connector to disconnect the fuel tank to canister tube from the pipe.
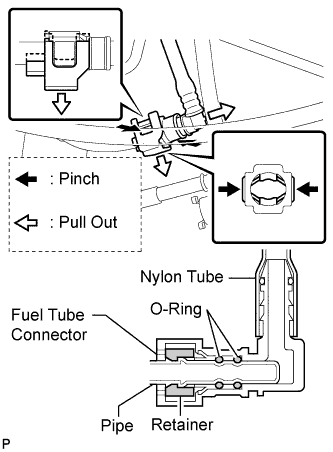
      NOTICE:
      1. Remove dirt or foreign objects on the fuel tube connector before this procedure.
      2. Do not allow any scratches or foreign objects on the parts when disconnecting them as the fuel tube connector has the O-ring that seals the pipe.
      3. Perform this work by hand. Do not use any tools.
      4. Do not forcibly bend, kink or twist the nylon tube.
      5. Protect the connecting part by covering it with a plastic bag after disconnecting the fuel tank from the canister tube.
      6. If the fuel tube connector and pipe are stuck, push and pull them to release them.


    A112311E02
  1. Disconnect the No. 2 fuel tank main tube.

    1. Remove the checker of the fuel tube connector from the pipe.

    2. Pinch the retainer of the fuel tube connector, and then pull out the fuel tube connector to disconnect the No. 2 fuel tank main tube from the pipe.
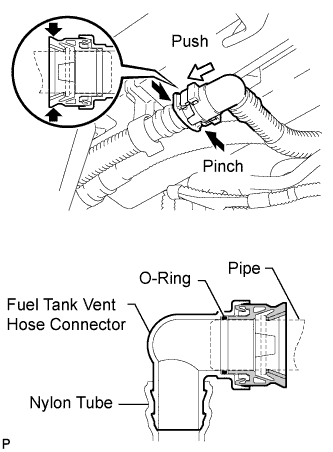
      NOTICE:
      1. Remove dirt or foreign objects on the fuel tube connector before this procedure.
      2. Do not allow any scratches or foreign objects on the parts when disconnecting them as the fuel tube connector has the O-rings that seal the pipe.
      3. Perform this work by hand. Do not use any tools.
      4. Do not forcibly bend, kink or twist the nylon tube.
      5. Protect the connecting part by covering it with a plastic bag after disconnecting the No. 2 fuel tank main tube.
      6. If the fuel tube connector and pipe are stuck, push and pull them to release them.


    A112312E02
  1. Disconnect the fuel tank vent hose.

    1. Pinch the retainer and pull out the fuel tank vent hose connector with the fuel tank vent hose connector pushed to the pipe side to disconnect the fuel tank vent hose from the canister filter.
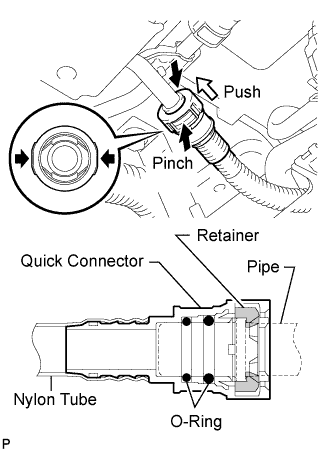
      NOTICE:
      1. Remove dirt or foreign objects on the fuel tank vent hose connector before this procedure.
      2. Do not allow any scratches or foreign objects on the parts when disconnecting them as the fuel tank vent hose connector has the O-ring that seals the pipe.
      3. Perform this work by hand. Do not use any tools.
      4. Do not forcibly bend, kink or twist the nylon tube.
      5. Protect the connecting part by covering it with a plastic bag after disconnecting the fuel tank vent hose.
      6. If the fuel tank vent hose connector and pipe are stuck, push and pull them to release them.


    A112313E01
  1. Disconnect the fuel suction tube.

    1. Pinch the retainer and pull out the suction tube connector with the suction tube connector pushed to the pipe side to disconnect the fuel suction tube from the fuel tank to filler pipe.
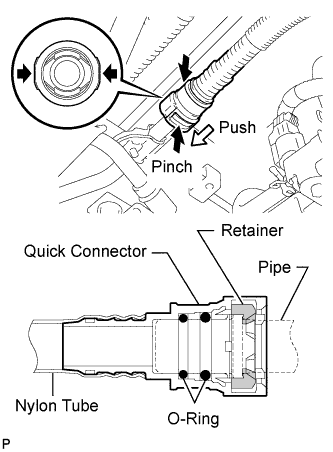
      NOTICE:
      1. Remove dirt or foreign objects on the quick connector before this procedure.
      2. Do not allow any scratches or foreign objects on the parts when disconnecting them as the fuel suction tube connector has the O-rings that seal the pipe.
      3. Perform this work by hand. Do not use any tools.
      4. Do not forcibly bend, kink or twist the nylon tube.
      5. Protect the connecting part by covering it with a plastic bag after disconnecting the fuel suction tube.
      6. If the fuel suction tube connector and pipe are stuck, push and pull them to release them.


    A112314E01
  1. Disconnect the No. 1 canister tube.

    1. Pinch the retainer and pull out the No. 1 canister tube connector with the No. 1 canister tube connector pushed to the pipe side to disconnect the No. 1 canister tube from the fuel tank to filler pipe.
      NOTICE:
      1. Remove dirt or foreign objects on the quick connector before this procedure.
      2. Do not allow any scratches or foreign objects on the parts when disconnecting them as the No. 1 canister tube connector has the O-rings that seal the pipe.
      3. Perform this work by hand. Do not use any tools.
      4. Do not forcibly bend, kink or twist the nylon tube.
      5. Protect the connecting part by covering it with a plastic bag after disconnecting the tank to canister tube.
      6. If the No. 1 canister tube connector and pipe are stuck, push and pull them to release them.


    A087489E02
  1. Set a transmission jack to the fuel tank.

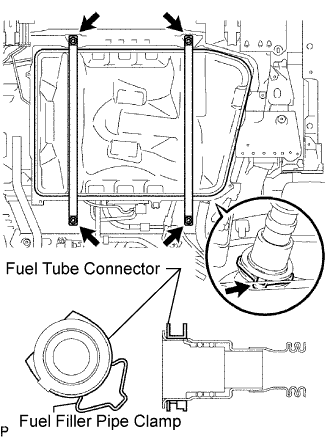
  1. Remove the fuel filler pipe clamp and fuel tube connector from the fuel tank inlet pipe.

  1. Remove the 4 bolts and No. 1 fuel tank band RH and LH.

  1. Operate the transmission jack, and then disconnect the fuel tank inlet pipe.

  1. Operate the transmission jack, and then remove the fuel tank.


11. REMOVE FUEL TANK PRESSURE SENSOR


    A088377E01
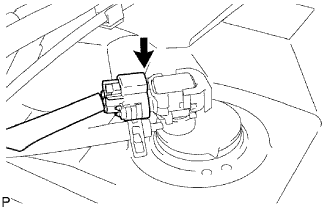
  1. Disconnect the fuel tank pressure sensor connector.
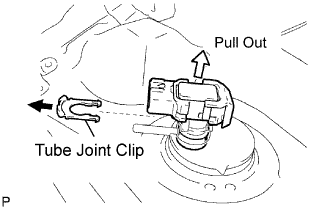


    A087499E01
  1. Remove the tube joint clip, then pull out the fuel tank pressure sensor from the fuel tank retainer.
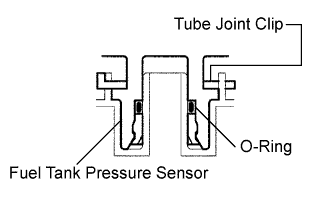
    NOTICE:
    A089469E02
    1. Remove dirt or foreign objects on fuel tank pressure sensor before this work.
    2. Do not allow any scratches or foreign objects on the parts when disconnecting as the fuel tank pressure sensor has the O-ring that seals the plug.
    3. Perform this work by hand. Do not use any tools.