HYBRID / BATTERY CONTROL HYBRID CONTROL SYSTEM Pattern Select Switch Power Mode Circuit
DESCRIPTION
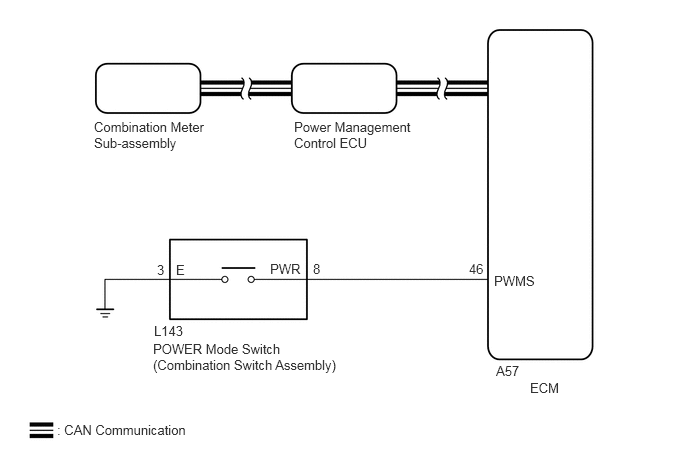
When selecting PWR mode, the POWER mode switch (combination switch assembly) operation signal is sent to the ECM. Following this, the drive torque is optimally controlled to obtain a sporty feel in response to the driver's acceleration operation.
WIRING DIAGRAM
PROCEDURE
A
B
A
B
Connect the GTS to the DLC3.
Turn the power switch on (IG).
Enter the following menus: Body Electrical / Combination Meter / Active Test / Indicat. Lamp ECT PWR.
Perform the "Indicat. Lamp ECT PWR" Active Test.
- OK:
The POWER mode indicator light comes on or blinks.
- Result:
Result Proceed to OK A NG (w/o Multi-information Display) B NG (w/ Multi-information Display) C
Turn the power switch off.
A
B
C
Connect the GTS to the DLC3.
Turn the power switch on (IG).
Enter the following menus: Powertrain / Hybrid Control / Data List / Pattern Switch (PWR/M).
Read the value displayed on the GTS.
| Tester Display | Measurement Item/Range | Normal Condition |
|---|---|---|
| Pattern Switch (PWR/M) | PWR mode transition availability/
ON or OFF |
In PWR mode: ON |
- Result:
Result Proceed to The GTS display changes according to the POWER mode switch (combination switch assembly) operation. A The GTS display does not changes according to the POWER mode switch (combination switch assembly) operation. B
Turn the power switch off.
A
B
Remove the POWER mode switch (combination switch assembly).
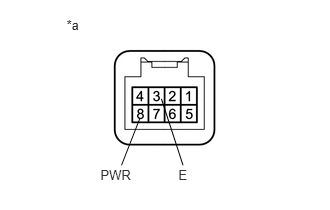
Measure the resistance according to the value(s) in the table below.
- Standard Resistance:
Tester Connection Condition Specified Condition 8 (PWR) - 3 (E) POWER mode switch (combination switch assembly) being pushed and held Below 1 Ω POWER mode switch (combination switch assembly) not pushed 10 kΩ or higher
| *a | Component without harness connected
(POWER Mode Switch (Combination Switch Assembly)) |
Install the POWER mode switch (combination switch assembly).
OK
NG
Disconnect the L143 POWER mode switch (combination switch assembly) connector.
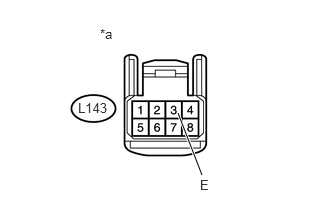
Measure the resistance according to the value(s) in the table below.
- Standard Resistance:
Tester Connection Condition Specified Condition L143-3 (E) - Body ground Always Below 1 Ω
| *a | Front view of wire harness connector
(to POWER Mode Switch (Combination Switch Assembly)) |
Reconnect the L143 POWER mode switch (combination switch assembly) connector.
OK
NG
Disconnect the A57 ECM connector.
Disconnect the L143 POWER mode switch (combination switch assembly) connector.
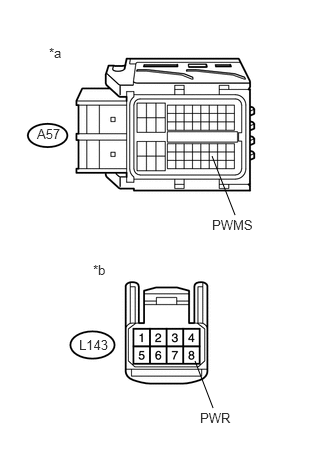
Measure the resistance according to the value(s) in the table below.
- Standard Resistance:
Tester Connection Condition Specified Condition A57-46 (PWMS) - L143-8 (PWR) Always Below 1 Ω A57-46 (PWMS) or L143-8 (PWR) - Body ground Always 10 kΩ or higher
| *a | Front view of wire harness connector
(to ECM) |
| *b | Front view of wire harness connector
(to POWER Mode Switch (Combination Switch Assembly)) |
Reconnect the L143 POWER mode switch (combination switch assembly) connector.
Reconnect the A57 ECM connector.
OK
NG