HYBRID / BATTERY CONTROL HYBRID CONTROL SYSTEM P2120-152 Throttle / Pedal Position Sensor / Switch "D" Circuit P2121-106 Throttle / Pedal Position Sensor / Switch "D" Circuit Range / Performance P2122-104 Throttle / Pedal Position Sensor / Switch "D" Circuit Low Input P2123-105 Throttle / Pedal Position Sensor / Switch "D" Circuit High Input P2125-153 Throttle / Pedal Position Sensor / Switch "E" Circuit P2126-109 Throttle / Pedal Position Sensor / Switch "E" Circuit Range / Performance P2127-107 Throttle / Pedal Position Sensor / Switch "E" Circuit Low Input P2128-108 Throttle / Pedal Position Sensor / Switch "E" Circuit High Input P2138-110 Throttle / Pedal Position Sensor / Switch "D" / "E" Voltage Correlation P2138-154 Throttle / Pedal Position Sensor / Switch "D" / "E" Voltage Correlation
DESCRIPTION
The accelerator pedal position sensor is mounted on the accelerator pedal to detect how much the pedal is depressed. This is a non-contact sensor with hall elements. There are 2 outputs from the sensor. One is used to detect the accelerator pedal position and the other is used as a confirmation to allow the detection of a malfunction in the sensor itself. Voltage is output from the accelerator pedal position sensor to terminals VPA1 and VPA2 of the power management control ECU. This voltage varies from 0 to 5 V in accordance with the accelerator pedal position. Terminal VPA2 is primarily used to detect a malfunction in the sensor itself. The power management control ECU determines the current accelerator pedal position and controls the hybrid control system based on signals received by terminals VPA1 and VPA2.
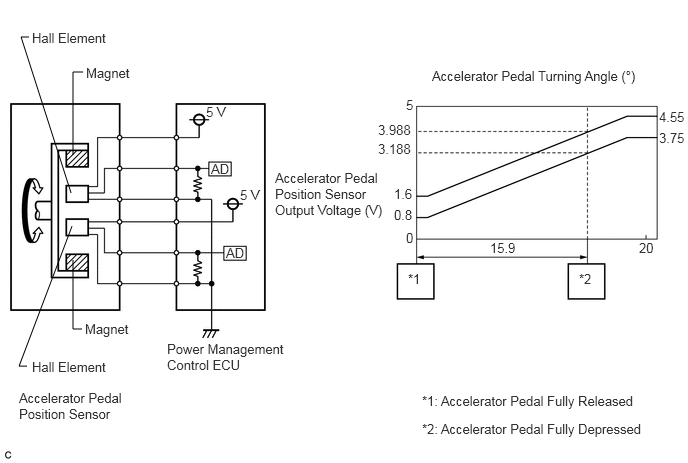
| DTC No. | INF Code | DTC Detection Condition | Trouble Area |
|---|---|---|---|
| P2120 | 152 | Main sensor circuit wiring malfunction or level is not stable | ·
Wire harness or connector ·
Accelerator pedal sensor assembly ·
Power management control ECU |
| P2121 | 106 | Internal error of the main sensor | |
| P2122 | 104 | Open or short to GND in the main sensor circuit | |
| P2123 | 105 | Short to +B in the main sensor circuit | |
| P2125 | 153 | Sub sensor circuit wiring malfunction or level is not stable | |
| P2126 | 109 | Internal error of the sub sensor | |
| P2127 | 107 | Open or short to GND in the sub sensor circuit | |
| P2128 | 108 | Short to +B in the sub sensor circuit | |
| P2138 | 110 | Difference between the main sensor value and sub sensor value is large. | |
| 154 | Main or sub sensor circuit wiring malfunction |
WIRING DIAGRAM
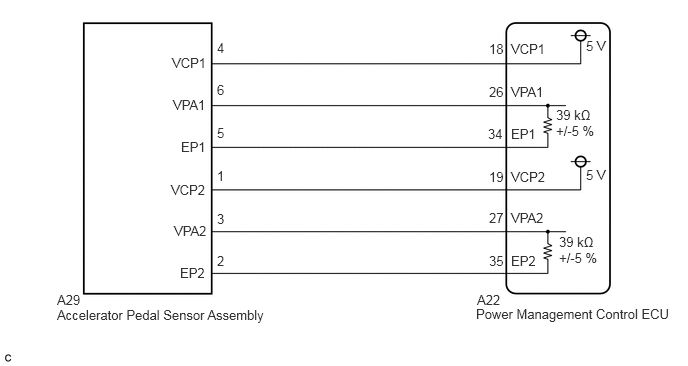
CAUTION / NOTICE / HINT
- HINT:
-
After the repair, clear the DTCs and perform the following procedure to check that DTCs are not output.
- 1.
Wait for approximately 10 seconds with the power switch on (READY) and park (P) selected, then fully depress and release the accelerator pedal several times.
PROCEDURE
Connect the GTS to the DLC3.
Turn the power switch on (IG).
Enter the following menus: Powertrain / Hybrid Control / Data List / Accel Pedal Pos #1, Accel Pedal Pos #2.
Read the Data List.
- Result:
Tester Display Accelerator Pedal Condition Specified Condition Accel Pedal Pos #1 Not depressed 8 to 28% Fully depressed 62 to 92% Not depressed → Fully depressed → Not depressed (Accelerator pedal should be operated slowly) Value changes progressively Accel Pedal Pos #2 Not depressed 20 to 44% Fully depressed 78 to 100% Not depressed → Fully depressed → Not depressed (Accelerator pedal should be operated slowly) Value changes progressively
Turn the power switch off.
OK
NG
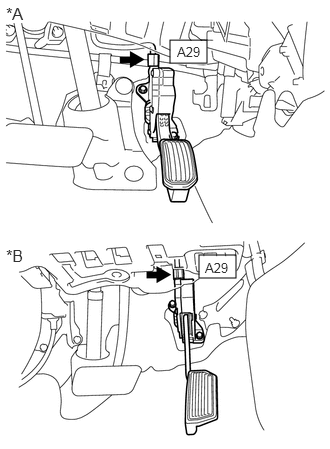
Check the connector connections and contact pressure of the relevant terminals for the accelerator pedal sensor assembly connector A29 (See page General>INTRODUCTION>HOW TO TROUBLESHOOT ECU CONTROLLED SYSTEMS>ELECTRONIC CIRCUIT INSPECTION PROCEDURE).
| *A | for LHD |
| *B | for RHD |
- OK:
The connectors are connected securely and there are no contact pressure problems.
OK
NG
OK
NG
Disconnect the A29 accelerator pedal sensor assembly connector.
Turn the power switch on (IG).
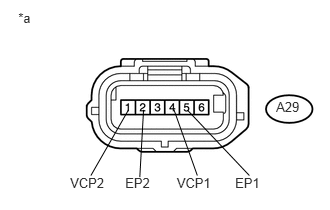
Measure the voltage according to the value(s) in the table below.
- Standard Voltage :
Tester Connection Condition Specified Condition A29-4 (VCP1) - A29-5 (EP1) Power switch on (IG) 4.5 to 5.5 V A29-1 (VCP2) - A29-2 (EP2) Power switch on (IG) 4.5 to 5.5 V
| *a | Front view of wire harness connector
(to Accelerator Pedal Sensor Assembly) |
Reconnect the A29 accelerator pedal sensor assembly connector.
Turn the power switch off.
OK
NG
Disconnect the A29 accelerator pedal sensor assembly connector.
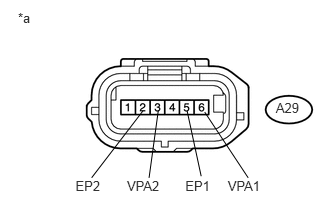
Measure the resistance according to the value(s) in the table below.
- Standard Resistance:
Tester Connection Condition Specified Condition A29-6 (VPA1) - A29-5 (EP1) Power switch off 36.60 to 41.61 kΩ A29-3 (VPA2) - A29-2 (EP2) Power switch off 36.60 to 41.61 kΩ
| *a | Front view of wire harness connector
(to Accelerator Pedal Sensor Assembly) |
Reconnect the A29 accelerator pedal sensor assembly connector.
OK
NG
Disconnect the A29 accelerator pedal sensor assembly connector.
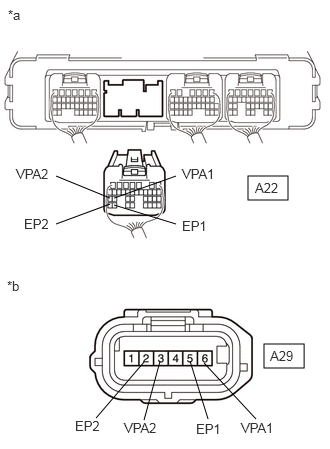
Disconnect the A22 power management control ECU connector.
Turn the power switch on (IG).
Measure the voltage according to the value(s) in the table below.
- Standard Voltage :
Tester Connection Condition Specified Condition A22-26 (VPA1) - Body ground Power switch on (IG) Below 1 V A22-27 (VPA2) - Body ground Power switch on (IG) Below 1 V A22-34 (EP1) - Body ground Power switch on (IG) Below 1 V A22-35 (EP2) - Body ground Power switch on (IG) Below 1 V
| *a | Rear view of wire harness connector
(to Power Management Control ECU) |
| *b | Front view of wire harness connector
(to Accelerator Pedal Sensor Assembly) |
- NOTICE:
-
Turning the power switch on (IG) with the power management control ECU connector disconnected causes other DTCs to be stored. Clear the DTCs after performing this inspection.
Turn the power switch off.
Measure the resistance according to the value(s) in the table below.
- Standard Resistance (Check for Open):
Tester Connection Condition Specified Condition A22-26 (VPA1) - A29-6 (VPA1) Power switch off Below 1 Ω A22-34 (EP1) - A29-5 (EP1) Power switch off Below 1 Ω A22-27 (VPA2) - A29-3 (VPA2) Power switch off Below 1 Ω A22-35 (EP2) - A29-2 (EP2) Power switch off Below 1 Ω
- Standard Resistance (Check for Short):
Tester Connection Condition Specified Condition A22-26 (VPA1) or A29-6 (VPA1) - Body ground and other terminals Power switch off 10 kΩ or higher A22-34 (EP1) or A29-5 (EP1) - Body ground and other terminals Power switch off 10 kΩ or higher A22-27 (VPA2) or A29-3 (VPA2) - Body ground and other terminals Power switch off 10 kΩ or higher A22-35 (EP2) or A29-2 (EP2) - Body ground and other terminals Power switch off 10 kΩ or higher
Reconnect the A22 power management control ECU connector.
Reconnect the A29 accelerator pedal sensor assembly connector.
OK
NG
Disconnect the A29 accelerator pedal sensor assembly connector.
Disconnect the A22 power management control ECU connector.
Turn the power switch on (IG).
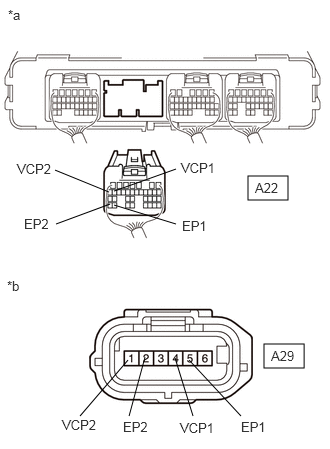
Measure the voltage according to the value(s) in the table below.
- Standard Voltage :
Tester Connection Condition Specified Condition A22-18 (VCP1) - Body ground Power switch on (IG) Below 1 V A22-34 (EP1) - Body ground Power switch on (IG) Below 1 V A22-19 (VCP2) - Body ground Power switch on (IG) Below 1 V A22-35 (EP2) - Body ground Power switch on (IG) Below 1 V
| *a | Rear view of wire harness connector
(to Power Management Control ECU) |
| *b | Front view of wire harness connector
(to Accelerator Pedal Sensor Assembly) |
- NOTICE:
-
Turning the power switch on (IG) with the power management control ECU connector disconnected causes other DTCs to be stored. Clear the DTCs after performing this inspection.
Turn the power switch off.
Measure the resistance according to the value(s) in the table below.
- Standard Resistance (Check for Open):
Tester Connection Condition Specified Condition A22-18 (VCP1) - A29-4 (VCP1) Power switch off Below 1 Ω A22-34 (EP1) - A29-5 (EP1) Power switch off Below 1 Ω A22-19 (VCP2) - A29-1 (VCP2) Power switch off Below 1 Ω A22-35 (EP2) - A29-2 (EP2) Power switch off Below 1 Ω
- Standard Resistance (Check for Short):
Tester Connection Condition Specified Condition A22-18 (VCP1) or A29-4 (VCP1) - Body ground and other terminals Power switch off 10 kΩ or higher A22-34 (EP1) or A29-5 (EP1) - Body ground and other terminals Power switch off 10 kΩ or higher A22-19 (VCP2) or A29-1 (VCP2) - Body ground and other terminals Power switch off 10 kΩ or higher A22-35 (EP2) or A29-2 (EP2) - Body ground and other terminals Power switch off 10 kΩ or higher
Reconnect the A22 power management control ECU connector.
Reconnect the A29 accelerator pedal sensor assembly connector.
OK
NG