HYBRID / BATTERY CONTROL POWER MODULE INTELLIGENT TRANSISTOR DISASSEMBLY
CAUTION / NOTICE / HINT
- NOTICE:
-
-
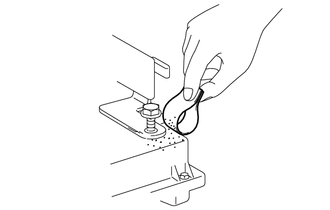
If metal shavings are created when bolts are removed from the inverter with converter assembly, remove them using tape or equivalent.
- HINT:
-
Prepare 2 tubes of thermal grease X-23-7884-4 (08887-02809) when replacing the power module intelligent transistor kit.
PROCEDURE

 G9200
1.REMOVE INVERTER WITH CONVERTER ASSEMBLY
2.DRAIN COOLANT (for Inverter)
- CAUTION:
-
Wear insulating gloves.
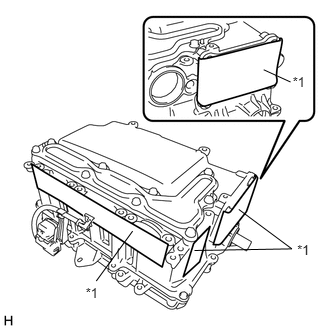
Apply protective tape to the areas shown in the illustration without leaving any gaps between the tape and part.
| *1 | Protective Tape |
- NOTICE:
-
Use non-residue type tape.
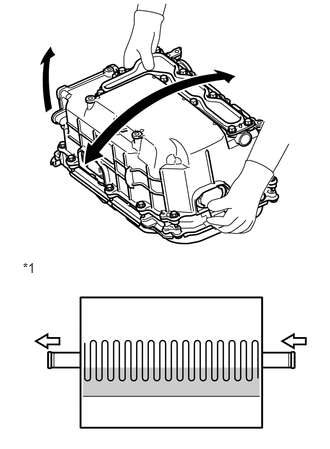
Tilt the inverter with converter assembly back and forth to drain the coolant (for inverter).
| *1 | Coolant (for inverter) Passage |
- NOTICE:
-
Do not hold the inverter with converter assembly by the coolant pipes or inverter signal connector.
- HINT:
-
The coolant (for inverter) passage is designed as shown in the illustration. Tilt the inverter with converter assembly back and forth repeatedly to drain the coolant (for inverter) completely.
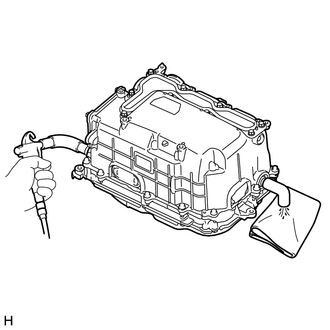
Blow compressed air into the inverter with converter assembly until most all of the coolant (for inverter) is blown out.
- NOTICE:
-
Do not damage the coolant pipes.
- HINT:
- ·
Use a piece of cloth as shown in the illustration to prevent the coolant (for inverter) from spraying.
·Cover the air inlet port with a piece of cloth to minimize air leakage.
G9200
3.CLEAN INVERTER WITH CONVERTER ASSEMBLY
- CAUTION:
-
Wear insulating gloves.
Using a piece of cloth, clean the outside of the inverter with converter assembly and around the bolts.
- NOTICE:
-
To prevent foreign matter from entering the inverter case with condenser, make sure that the protective tape is not partially removed.
Turn the inverter with converter assembly over and clean around the bolts.
- NOTICE:
-
Do not hold the inverter with converter assembly by the coolant pipes.
4.REMOVE INVERTER TERMINAL COVER
- CAUTION:
-
Wear insulating gloves.
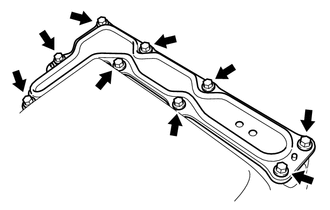
Remove the 9 bolts and inverter terminal cover.
- NOTICE:
-
Make sure to pull the inverter terminal cover straight up, as a connector is connected to the bottom of the cover.
5.REMOVE INVERTER SIGNAL CONNECTOR COVER
- CAUTION:
-
Wear insulating gloves.
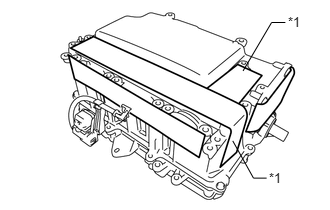
Apply protective tape to the area that was exposed when the inverter terminal cover was removed.
| *1 | Protective Tape |
- NOTICE:
-
Use non-residue type tape.
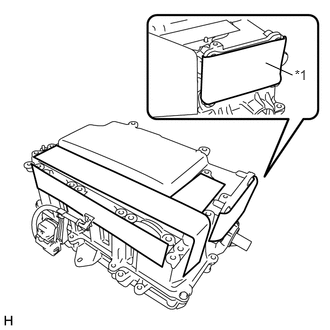
Remove the protective tape from the inverter signal connector.
| *1 | Protective Tape |
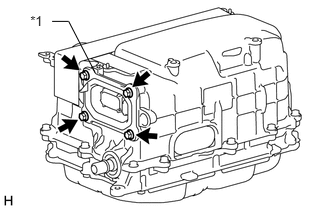
Remove the 4 bolts and inverter signal connector cover.
| *1 | Inverter Signal Connector Cover |
- HINT:
-
As there will be dust and dirt around the inverter signal connector cover gasket, before removing the inverter signal connector cover, clean the area around the inverter signal connector cover with a piece of cloth to prevent foreign matter from entering the inverter with converter assembly.
6.REMOVE NO. 1 AND NO. 2 INVERTER DRAIN PLUG
- CAUTION:
- ·
Wear insulating gloves.
·Wear protective goggles.
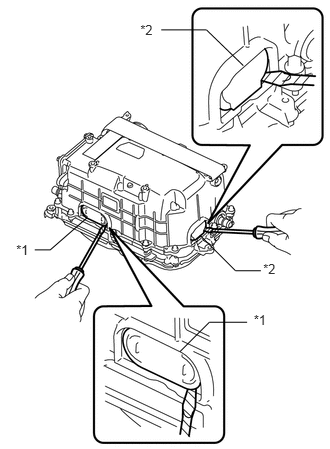
Using a screwdriver with its tip wrapped with protective tape, pry out the No. 1 and No. 2 inverter drain plugs from either side.
| *1 | No. 1 Inverter Drain Plug |
| *2 | No. 2 Inverter Drain Plug |
- NOTICE:
- ·
Do not damage the sealing surfaces of the inverter with converter assembly.
·Do not touch or allow grease or oil to contact the sealing surfaces of the inverter case with condenser.
7. VERIFY THAT VOLTAGE OF INVERTER WITH CONVERTER IS 0 V
- CAUTION:
-
Wear insulating gloves.
- NOTICE:
-
Do not allow any foreign matter or water to enter the inverter with converter assembly.
Using a voltmeter, measure the voltage between the high voltage cable connector terminals.
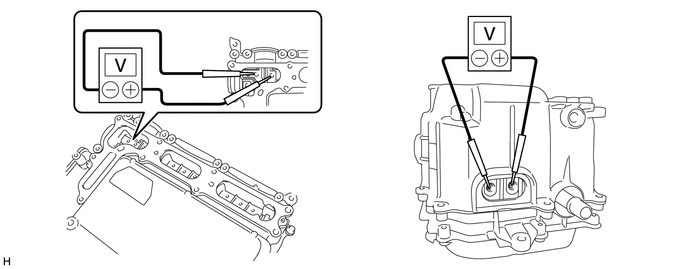
- Standard voltage:
0V
- HINT:
-
Use measuring range of DC 750 V or more on the voltmeter.
8.REMOVE INVERTER UNION GROMMET
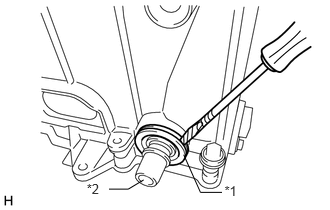
Using a screwdriver with its tip wrapped with protective tape, remove the 2 inverter union grommets from the inverter with converter assembly.
| *1 | Inverter Union Grommet |
| *2 | Coolant Pipe |
- NOTICE:
-
Pull the grommet straight out without applying any force to the coolant pipes.
9.REMOVE INVERTER CASE WITH CONDENSER
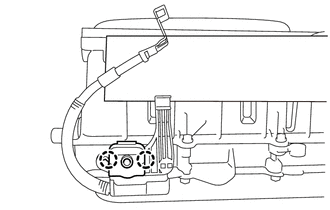
Disengage the 2 claws and open the terminal cover.
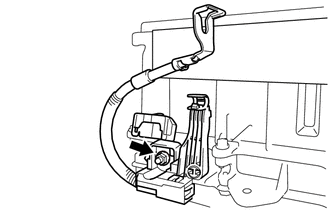
Loosen the nut of the No. 2 engine room wire to secure enough space to perform work.
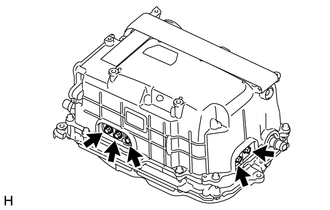
Remove the 5 bolts from the bus-bars.
- NOTICE:
-
Do not touch the bus-bars.
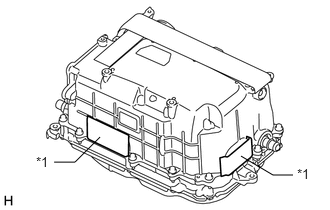
Apply protective tape to the installation holes of the No. 1 and No. 2 inverter drain plugs as shown in the illustration.
| *1 | Protective Tape |
- NOTICE:
- ·
Use non-residue type tape.
·Do not touch or allow grease or oil to contact the sealing surfaces of the inverter case with condenser.
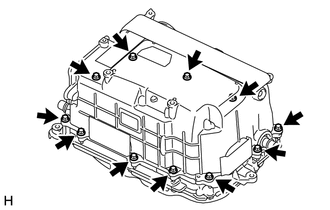
Remove the 11 bolts.
Apply protective tape to the coolant pipe as shown in the illustration. (Step A)
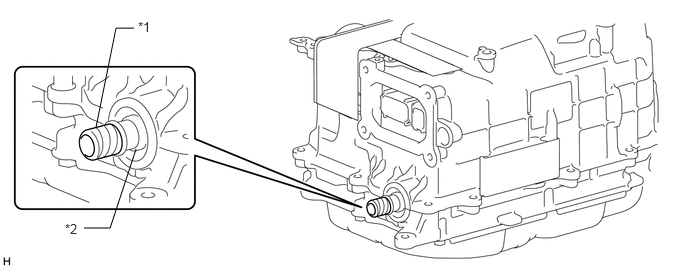
| *1 | Protective Tape | *2 | Coolant Pipe |
- NOTICE:
- ·
Do not apply excessive force to the coolant pipe.
·Do not damage the coolant pipe.
·Use non-residue type tape.
Install SST to the inverter with converter assembly. (Step B)
- SST
- 09891-47020
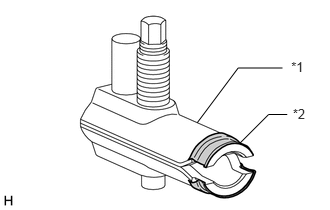
Apply protective tape to SST as shown in the illustration.
| *1 | SST |
| *2 | Protective Tape |
Insert SST into the inverter union grommet installation hole and tighten the bolt A of SST to install SST to the inverter with converter assembly as shown in the illustration.
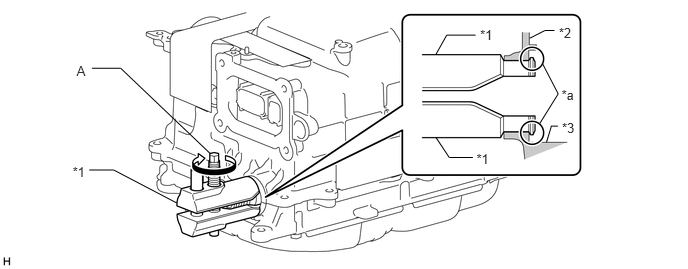
| *1 | SST | *2 | Inverter Case with Condenser |
| *3 | Hybrid Vehicle Converter Kit | - | - |
| *a | Tips | - | - |
- NOTICE:
- ·
Do not damage the grommet sealing surface of the inverter with converter assembly.
·Do not apply excessive force to the coolant pipe.
Check that the tips of SST are not in contact with the grommet sealing surface of the inverter with converter assembly.
While supporting SST by hand, tighten the bolt A of SST to separate the inverter case with condenser and hybrid vehicle converter kit as shown in the illustration. (Step C)
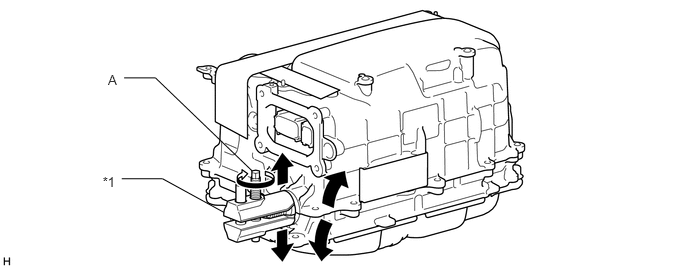
| *1 | SST | - | - |
- NOTICE:
-
Do not use air tools.
- HINT:
-
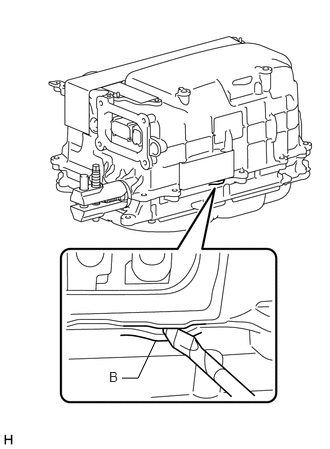 1.271,3.938 1.438,3.938 1.438,3.938 1.625,3.542 false 1.135,3.844 1.344,4.021 0.208,0.177 10 false B
-
Tighten the bolt (A) of SST and listen for 3 cracking sounds from the inverter case with condenser. After hearing the sounds, use a screwdriver with its tip wrapped with protective tape to pry between the parts at the area (B) shown in the illustration and separate them. If it is difficult to separate the parts, further tighten the bolt (A) of SST and pry between the parts again.
-
Do not pry between the parts excessively or the case rib (B) may be deformed or damaged.
Perform steps A, B and C on the opposite side of the inverter with converter assembly and remove the inverter case with condenser from the hybrid vehicle converter kit.
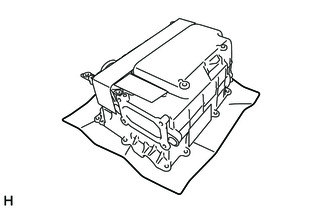
Place the inverter case with condenser on a clean piece of cloth.
- NOTICE:
- ·
Do not touch the bus-bars.
·Do not touch or allow grease or oil to contact the sealing surfaces of the inverter case with condenser.
10.HOW TO PREVENT STATIC ELECTRICITY
- SST
- 09890-47010
- NOTICE:
- ·
Static electricity should be eliminated when removing/installing the inverter with converter assembly.
·Do not touch the electronic components of a circuit board.
·Keep clothes away from electronic components.
·Place parts removed from the inverter with converter assembly on an antistatic mat.
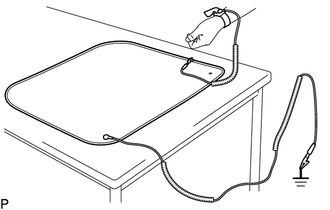
Wear an antistatic wrist strap.
Connect the ground clip of the antistatic mat securely to a ground point provided in the workshop or on a workbench (anchor bolt).
- HINT:
-
If the ground clip cable is too short, use an extension cable.
Connect the ground clip of the antistatic wrist strap securely to the specified point of the antistatic mat.
After removing the inverter case with condenser, perform work with bare hands to prevent damage from static electricity and entry of foreign matter.
11.REMOVE INVERTER TERMINAL WITH SENSOR SUB-ASSEMBLY
- NOTICE:
- ·
If metal shavings are created, remove them using tape or equivalent.
·Do not touch the circuit board.
·Do not allow any moisture to come into contact with the inverter terminal with sensor sub-assembly.
·Do not touch or allow grease or oil to contact the sealing surfaces of the inverter case with condenser.
·For inverter with converter assembly with part number G9200-47160, G9200-47161 or G9200-47162: Make sure to replace the inverter current sensor sub-assembly and inverter wire sub-assembly at the same time when replacing the MG control computer with bracket sub-assembly (See page Engine / Hybrid System>HYBRID / BATTERY CONTROL>INVERTER CURRENT SENSOR>COMPONENTS).
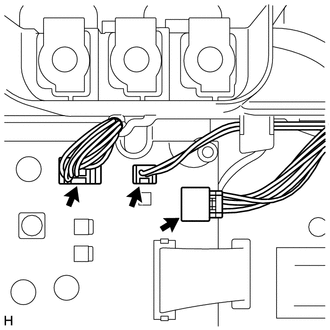
Disconnect the 3 connectors from the MG control computer with bracket sub-assembly.
- NOTICE:
-
If a pen sheet is provided, do not move it out of position when disconnecting the connectors.
- HINT:
- ·
The location of the connectors varies depending on the part number of the inverter with converter assembly. Confirm the part number before performing work.
·If the pen sheet is moved out of position, return it to its original position when installing the connectors.
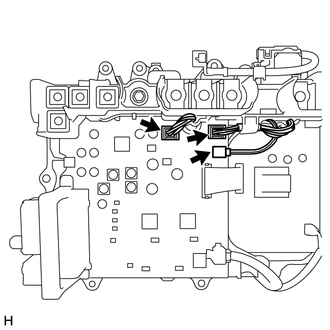
For inverter with converter assembly with part number G9200-47160, G9200-47161 or G9200-47162:
For inverter with converter assembly with part number other than G9200-47160, G9200-47161 or G9200-47162:
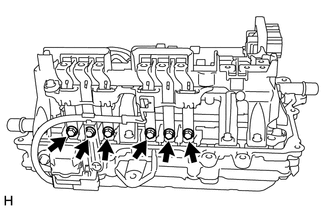
Remove the 6 bolts from the bus-bars.
- NOTICE:
-
Do not touch the bus-bars.
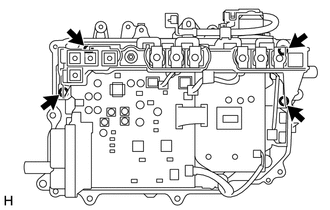
Remove the 4 bolts and inverter terminal with sensor sub-assembly.
12.REMOVE MG CONTROL COMPUTER WITH BRACKET SUB-ASSEMBLY
- NOTICE:
- ·
If metal shavings are created, remove them using tape or equivalent.
·Do not touch the circuit board.
·Do not allow any moisture to come into contact with the MG control computer with bracket sub-assembly.
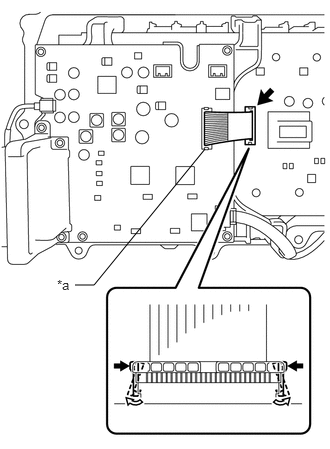
While disengaging the white resin lock claws of the connector, disconnect the flat cable from the power module intelligent transistor kit.
- NOTICE:
- ·
Do not disconnect the flat cable from the MG control computer with bracket sub-assembly.
·Do not use any tools.
| *a | Do not disconnect |
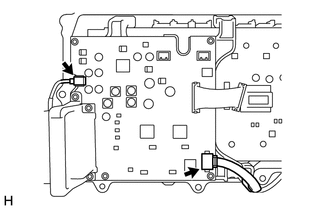
Disconnect the 2 connectors from the MG control computer with bracket sub-assembly.
- HINT:
-
If a pen sheet is provided, do not move it out of position when disconnecting the connectors.
Disengage the 2 wire harnesses from the 4 clamps.
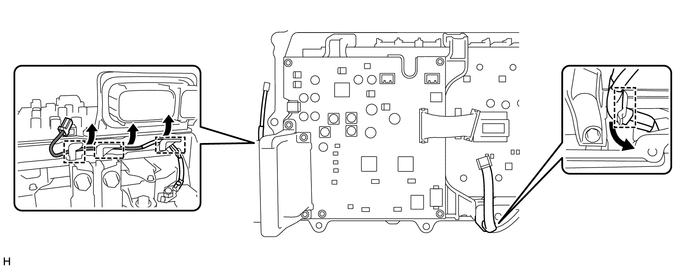
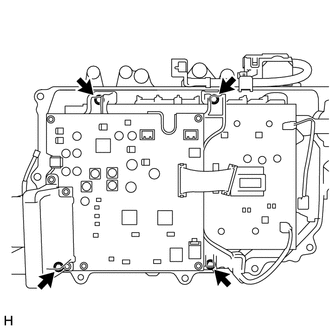
Remove the 4 bolts and MG control computer with bracket sub-assembly.
13.REMOVE POWER MODULE INTELLIGENT TRANSISTOR KIT
- NOTICE:
- ·
If metal shavings are created, remove them using tape or equivalent.
·Do not touch the circuit board.
·Do not allow any moisture to come into contact with the power module intelligent transistor kit.
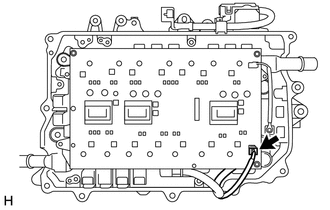
Disconnect the connector from the power module intelligent transistor kit.
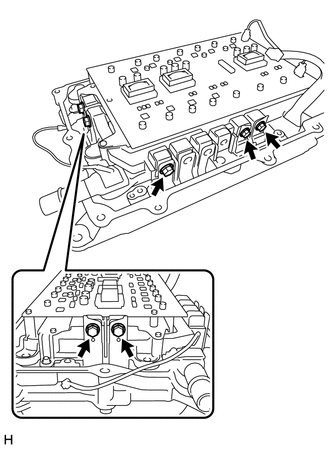
Remove the 5 bolts from the bus-bars.
- NOTICE:
-
Do not touch the bus-bars.
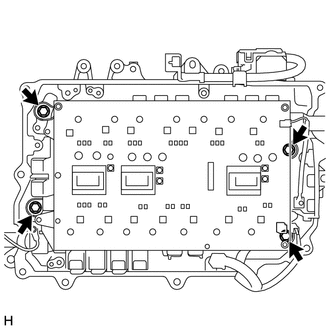
Remove the 4 bolts.
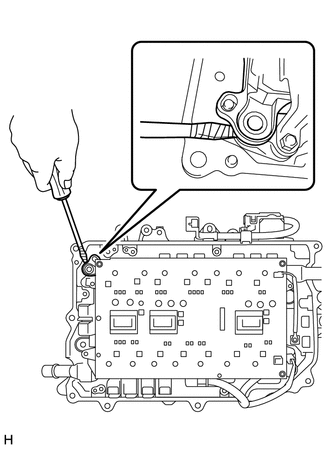
Using a screwdriver with its tip wrapped with protective tape, lift the power module intelligent transistor kit.
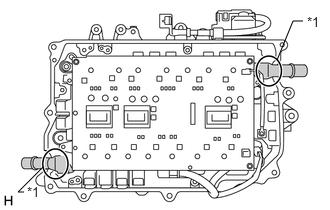
While holding the base of the coolant pipes, remove the power module intelligent transistor kit.
- NOTICE:
-
Do not touch the circuit board.
| *1 | Base of the coolant pipe |