P410 HYBRID TRANSMISSION / TRANSAXLE ELECTRONIC SHIFT LEVER SYSTEM C2300 Actuator System Malfunction
DESCRIPTION
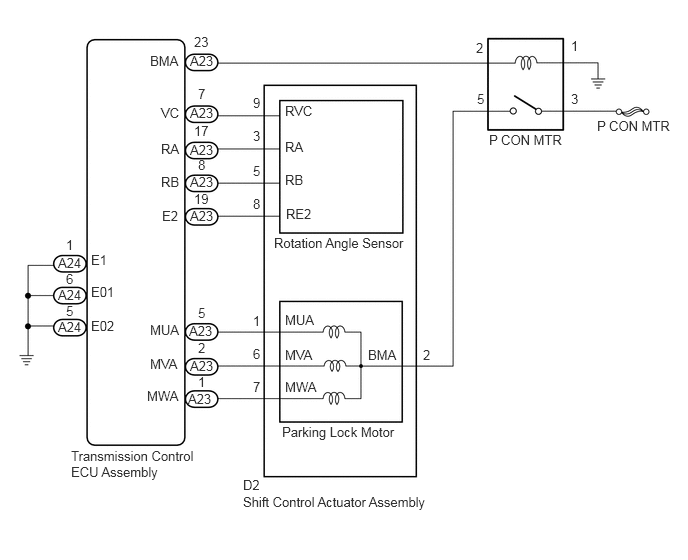
The shift control actuator assembly consists of a parking lock motor and rotation angle sensor. The transmission control ECU assembly receives a P position switch signal from the power management control ECU and activates the parking lock motor by controlling current, causing the parking lock mechanism to switch. The transmission control ECU assembly also detects the rotor rotation angle through the rotation angle sensor to control timing of current application to the coils.
The transmission control ECU assembly stores this DTC when it detects a malfunction in the actuator system or abnormal operation of the shift control actuator assembly caused by a power system malfunction, such as when the auxiliary battery has become discharged.
| DTC No. | DTC Detection Condition | Trouble Area |
|---|---|---|
| C2300 | Decrease in the power source voltage (+B), open or short in the P CONMTR relay, shift control actuator assembly (parking lock motor or rotation angle sensor) or wire harness, or an internal malfunction of the shift control actuator assembly (parking lock motor or rotation angle sensor). | ·
Transmission control ECU assembly ·
Auxiliary battery ·
Shift control actuator assembly ·
Hybrid vehicle transaxle assembly ·
Wire harness or connector |
WIRING DIAGRAM
CAUTION / NOTICE / HINT
- NOTICE:
- ·
Do not remove/install the auxiliary battery or disconnect the cable from the negative (-) auxiliary battery terminal before instructed.
·It may not be possible to clear the following DTCs using the GTS: DTC C2300 (Actuator System Malfunction), C2301 (Shift Changing Time Malfunction), C2303 (Short in Power Source Relay Circuit), C2304 (Open or Short Circuit in U Phase), C2305 (Open or Short Circuit in V Phase), C2306 (Open or Short Circuit in W Phase), C2307 (Power Supply) and C2309 (Open in B+ Circuit). In such cases, disconnect the P CON MAIN fuse and wait for at least 60 seconds to clear the DTCs after the repair.
·After turning the power switch off, waiting time may be required before disconnecting the cable from the negative (-) auxiliary battery terminal. Therefore, make sure to read the disconnecting the cable from the negative (-) auxiliary battery terminal notices before proceeding with work (See page General>INTRODUCTION>REPAIR INSTRUCTION>PRECAUTION).
PROCEDURE
Connect the GTS to the DLC3.
Turn the power switch on (IG).
Enter the following menus: Body Electrical / Transmission Control / Trouble Codes.
Read the freeze frame data "Current flag record" of DTC C2300.
- Result:
Result Proceed to OFF A ON B
Turn the power switch off.
A
B
Connect the GTS to the DLC3.
Turn the power switch on (IG).
Enter the following menus: Body Electrical / Transmission Control / Trouble Codes.
Check if DTCs are output.
- Result:
Result Proceed to None of the DTCs in the table below are output. A One of the DTCs in the table below is output. B
| DTC No. | Relevant Diagnosis |
|---|---|
| C2304 | Open or Short Circuit in U Phase |
| C2305 | Open or Short Circuit in V Phase |
| C2306 | Open or Short Circuit in W Phase |
Turn the power switch off.
A
B
Connect the GTS to the DLC3.
Release the brake pedal and turn the power switch on (IG).
- HINT:
-
Do not turn the power switch on (READY).
Enter the following menus: Body Electrical / Transmission Control / Trouble Codes.
Read the freeze frame data of DTC C2300.
- Result:
Result Proceed to IG (+B) voltage is 9 V or more A IG (+B) voltage is less than 9 V B
Turn the power switch off.
A
B
Turn the power switch on (IG).
Enter the following menus: Body Electrical / Transmission Control / Trouble Codes.
Read and record the DTCs and freeze frame data.
Turn the power switch off.
Disconnect the P CON MAIN fuse and wait for at least 60 seconds.
Check for DTCs again to see if the DTCs are cleared.
NEXT
Charge the auxiliary battery.
NEXT
Connect the GTS to the DLC3.
Release the brake pedal and turn the power switch on (IG).
- HINT:
-
Do not turn the power switch on (READY).
Depress the brake pedal and move the shift lever to select neutral (N).
Enter the following menus: Body Electrical / Transmission Control / Trouble Codes.
Check if DTCs are output.
- Result:
Result Proceed to DTC C2300 is output. A DTC C2300 is not output. B
Turn the power switch off.
A
B
Disconnect the A23 transmission control ECU assembly connector.
Disconnect the D2 shift control actuator assembly connector.
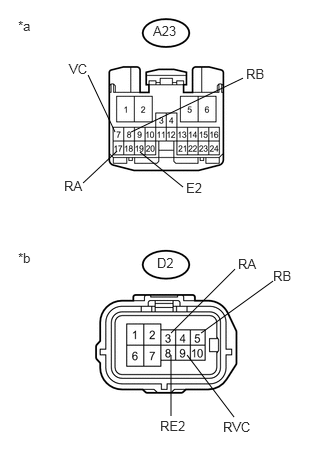
Measure the resistance according to the value(s) in the table below.
- Standard Resistance (Check for Open):
Tester Connection Condition Specified Condition A23-7 (VC) - D2-9 (RVC) Power switch off Below 1 Ω A23-17 (RA) - D2-3 (RA) Power switch off Below 1 Ω A23-8 (RB) - D2-5 (RB) Power switch off Below 1 Ω A23-19 (E2) - D2-8 (RE2) Power switch off Below 1 Ω
- Standard Resistance (Check for Short):
Tester Connection Condition Specified Condition A23-7 (VC) or D2-9 (RVC) - Body ground and other terminals Power switch off 10 kΩ or higher A23-17 (RA) or D2-3 (RA) - Body ground and other terminals Power switch off 10 kΩ or higher A23-8 (RB) or D2-5 (RB) - Body ground and other terminals Power switch off 10 kΩ or higher A23-19 (E2) or D2-8 (RE2) - Body ground and other terminals Power switch off 10 kΩ or higher
| *a | Front view of wire harness connector
(to Transmission Control ECU Assembly) |
| *b | Front view of wire harness connector
(to Shift Control Actuator Assembly) |
Connect the D2 shift control actuator assembly connector.
Connect the A23 transmission control ECU assembly connector.
OK
NG
Disconnect the A23 transmission control ECU assembly connector.
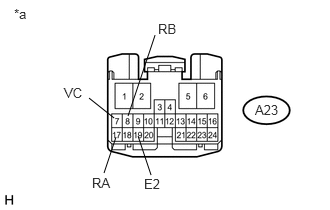
Measure the resistance according to the value(s) in the table below.
- Standard Resistance:
Tester Connection Condition Specified Condition A23-7 (VC) - A23-17 (RA) Power switch off 10 kΩ or higher A23-7 (VC) - A23-8 (RB) Power switch off 10 kΩ or higher A23-7 (VC) - A23-19 (E2) Power switch off 520 to 600 Ω A23-17 (RA) - A23-8 (RB) Power switch off 10 kΩ or higher A23-17 (RA) - A23-19 (E2) Power switch off 10 kΩ or higher A23-8 (RB) - A23-19 (E2) Power switch off 10 kΩ or higher
| *a | Front view of wire harness connector
(to Transmission Control ECU Assembly) |
Connect the A23 transmission control ECU assembly connector.
OK
NG
Disconnect the A24 transmission control ECU assembly connector.
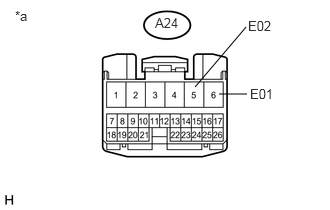
Measure the resistance according to the value(s) in the table below.
- Standard Resistance (Check for Open):
Tester Connection Condition Specified Condition A24-6 (E01) - Body ground Power switch off Below 1 Ω A24-5 (E02) - Body ground Power switch off Below 1 Ω
| *a | Front view of wire harness connector
(to Transmission Control ECU Assembly) |
Connect the A24 transmission control ECU assembly connector.
OK
NG
Apply that the parking brake.
Disconnect the D2 shift control actuator assembly connector.
Remove the 3 shift control actuator bolts (See page Drivetrain>P410 (HYBRID TRANSMISSION / TRANSAXLE)>SHIFT CONTROL ACTUATOR>COMPONENTS).
Slightly pull the shift control actuator assembly away from the hybrid vehicle transaxle.
Reconnect the D2 shift control actuator assembly connector.
Make sure the brake pedal is not depressed and turn the power switch on (ACC).
- NOTICE:
-
The shift control actuator assembly may operate if the power switch is turned on (IG) or on (READY). Do not turn the power switch on (IG) or on (READY) during this inspection to prevent the shift control actuator assembly from operating while in contact with the splines.
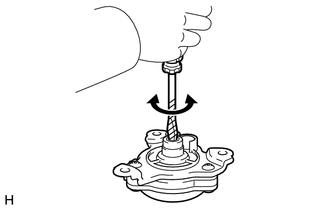
Using a screwdriver with its tip wrapped with protective tape or a piece of cloth, rotate the shaft.
- NOTICE:
- ·
Make sure to use a screwdriver with its tip wrapped with protective tape or a piece of cloth to prevent the splines of the actuator from being damaged.
·The shift control actuator assembly cannot be disassembled.
Confirm that the shaft of the shift control actuator assembly rotates smoothly.
- OK:
The shaft of the shift control actuator assembly rotates smoothly.
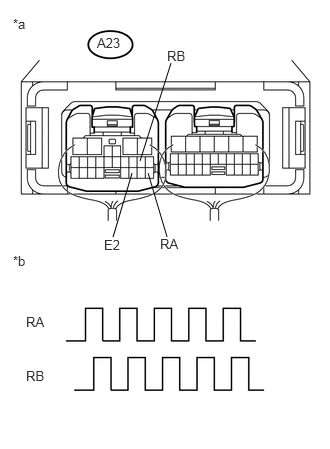
Measure the voltage according to the value(s) in the table below.
- HINT:
-
As the measured voltage may not appear as a pulse waveform if the shaft is rotated quickly, make sure to rotate the shaft slowly.
- Standard Voltage:
Tester Connection Condition Specified Condition A23-17 (RA) - A23-19 (E2) Power switch on (ACC), shaft being rotated 0 to 1.5 V ←→ 4 to 5.5 V A23-8 (RB) - A23-19 (E2) Power switch on (ACC), shaft being rotated 0 to 1.5 V ←→ 4 to 5.5 V
| *a | Component with harness connected
(Transmission Control ECU Assembly) |
| *b | Output Waveform while Shaft of Shift Control Actuator Assembly being Rotated (Example) |
Turn the power switch off.
OK
NG
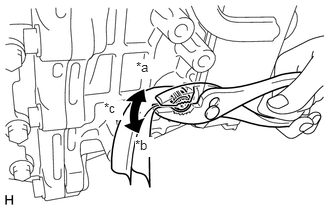
Wrap the shaft with a piece of cloth and turn it using pliers.
- OK:
The shaft rotates smoothly in the lock and unlock directions.
- NOTICE:
-
During this inspection, make sure to use a piece of cloth to prevent the shaft splines from being damaged.
- HINT:
- ·
When normal, the shaft cannot be rotated by hand without a tool.
·When normal, the shaft can be in the lock and unlock direction by applying a force of 4.0 to 7.0 N*m (41 to 71 kgf*cm, 36 to 61 in.*lbf).
| *a | Lock |
| *b | Unlock |
| *c | Rotate approximately 20° |
Set the shaft in the lock position after the inspection.
OK
NG
Turn the power switch on (IG).
Enter the following menus: Body Electrical / Transmission Control / Trouble Codes.
Read and record the DTCs and freeze frame data.
Turn the power switch off.
Disconnect the P CON MAIN fuse and wait for at least 60 seconds.
Check for DTCs again to see if the DTCs are cleared.
NEXT
Inspect the auxiliary battery (See page Power Source / Network>2ZR-FXE (BATTERY / CHARGING)>CHARGING SYSTEM>ON-VEHICLE INSPECTION).
- Result:
Result Proceed to Charge or replace the auxiliary battery. A The auxiliary battery voltage is normal. B
A
B
Charge or replace the auxiliary battery (See page Power Source / Network>2ZR-FXE (BATTERY / CHARGING)>AUXILIARY BATTERY>COMPONENTS).
NEXT