P410 HYBRID TRANSMISSION / TRANSAXLE ELECTRONIC SHIFT LEVER SYSTEM C2309 Open in B+ Circuit
DESCRIPTION
Auxiliary battery voltage will be applied to the +B terminal when the power switch is turned on (IG). When a +B terminal voltage malfunction is detected, the transmission control ECU assembly stores this DTC.
| DTC No. | DTC Detection Condition | Trouble Area |
|---|---|---|
| C2309 | With the power switch on (IG), voltage of transmission control ECU assembly terminal +B is 3 V or less for 1 second or more. | ·
Transmission control ECU assembly ·
IGCT fuse ·
IGCT NO. 2 fuse ·
Auxiliary battery ·
Wire harness or connector |
WIRING DIAGRAM
Refer to the wiring diagram for DTC C2307 (See page Drivetrain>P410 (HYBRID TRANSMISSION / TRANSAXLE)>ELECTRONIC SHIFT LEVER SYSTEM>C2307).
CAUTION / NOTICE / HINT
- NOTICE:
- ·
Do not remove/install the auxiliary battery or disconnect the cable from the negative (-) auxiliary battery terminal before instructed.
·It may not be possible to clear the following DTCs using the GTS: DTC C2300 (Actuator System Malfunction), C2301 (Shift Changing Time Malfunction), C2303 (Short in Power Source Relay Circuit), C2304 (Open or Short Circuit in U Phase), C2305 (Open or Short Circuit in V Phase), C2306 (Open or Short Circuit in W Phase), C2307 (Power Supply) and C2309 (Open in B+ Circuit). In such cases, disconnect the P CON MAIN fuse and wait for at least 60 seconds to clear the DTCs after the repair.
·After turning the power switch off, waiting time may be required before disconnecting the cable from the negative (-) auxiliary battery terminal. Therefore, make sure to read the disconnecting the cable from the negative (-) auxiliary battery terminal notices before proceeding with work (See page General>INTRODUCTION>REPAIR INSTRUCTION>PRECAUTION).
PROCEDURE
Connect the GTS to the DLC3.
Turn the power switch on (IG).
Enter the following menus: Body Electrical / Transmission Control / Data List / IG (+B) Voltage Value.
Read the Data List displayed on the GTS.
- Result:
Result Proceed to 3 V or less A Other than above B
Turn the power switch off.
A
B
Remove the IGCT fuse and IGCT NO. 2 fuse from the engine room relay block and junction block assembly.
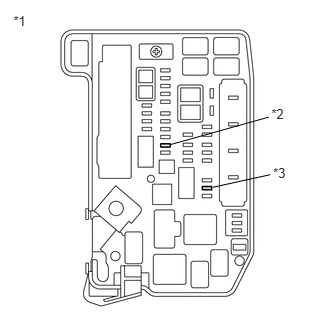
Measure the resistance according to the value(s) in the table below.
- Standard Resistance:
Tester Connection Condition Specified Condition IGCT fuse Always Below 1 Ω IGCT NO. 2 fuse Always Below 1 Ω
| *1 | Engine Room Relay Block and Junction Block Assembly |
| *2 | IGCT Fuse |
| *3 | IGCT NO. 2 Fuse |
Install the IGCT fuse and IGCT NO. 2 fuse.
OK
NG
Connect the GTS to the DLC3.
Turn the power switch on (IG).
Enter the following menus: Body Electrical / Transmission Control / Data List / Battery Voltage Value.
Read the Data List displayed on the GTS.
- Result:
Result Proceed to 9 V or more A Less than 9 V B
Turn the power switch off.
A
B
Disconnect the A23 transmission control ECU assembly connector.
Disconnect the A21 and A22 power management control ECU connectors.
Disconnect the A59 inverter with converter assembly connector.
Disconnect the L144 battery smart unit connector.
Remove the IGCT NO. 2 fuse from the engine room relay block and junction block assembly.
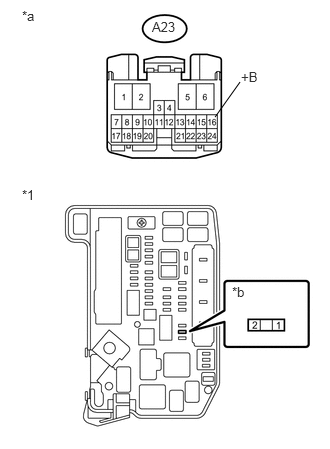
Measure the resistance according to the value(s) in the table below.
- Standard Resistance (Check for Open):
Tester Connection Condition Specified Condition A23-16 (+B) - 2 (IGCT NO. 2 fuse) Power switch off Below 1 Ω
- Standard Resistance (Check for Short):
Tester Connection Condition Specified Condition A23-16 (+B) - Body ground and other terminals Power switch off 10 kΩ or higher
| *1 | Engine Room Relay Block and Junction Block Assembly |
| *a | Front view of wire harness connector
(to Transmission Control ECU Assembly) |
| *b | IGCT NO. 2 Fuse Connector of Engine Room Relay Block and Junction Block Assembly |
- NOTICE:
-
Be careful not to break the fuse holder by forcing the tester probes into it during this inspection.
Install the IGCT NO. 2 fuse.
Connect the L144 battery smart unit connector.
Connect the A59 inverter with converter assembly connector.
Connect the A21 and A22 power management control ECU connectors.
Connect the A23 transmission control ECU assembly connector.
OK
NG