P410 HYBRID TRANSMISSION / TRANSAXLE HYBRID VEHICLE TRANSAXLE UNIT REASSEMBLY
PROCEDURE

 1.INSTALL STRAIGHT PIN
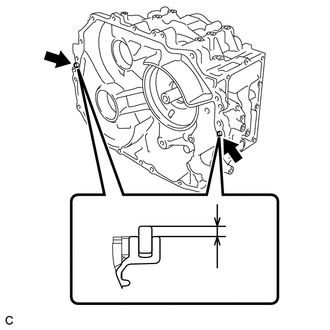
Install the 2 straight pins to the hybrid vehicle motor assembly.
- Standard Protrusion:
7.0 to 8.5 mm (0.276 to 0.335 in.)
2.INSTALL RADIAL BALL BEARING (LH SIDE)
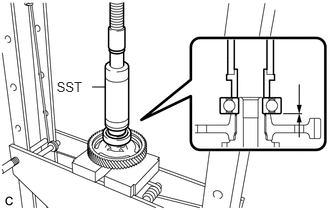
Using SST and a press, install the radial ball bearing (LH side) to the counter driven gear sub-assembly.
- SST
- 09316-60011 (09316-00011, 09316-00071)
- NOTICE:
-
Be sure to install the radial ball bearing (LH side) so that there is no clearance between the radial ball bearing (LH side) and the counter driven gear sub-assembly.
3.INSTALL RADIAL BALL BEARING (RH SIDE)
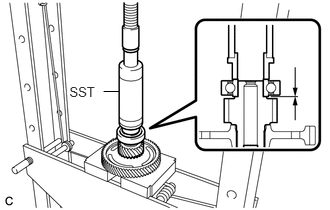
Using SST and a press, install the radial ball bearing (RH side) to the counter driven gear sub-assembly.
- SST
- 09316-60011 (09316-00011, 09316-00071)
- NOTICE:
-
Be sure to install the radial ball bearing (RH side) so that there is no clearance between the radial ball bearing (RH side) and the differential drive pinion.
4.INSTALL TAPERED ROLLER BEARING (RH SIDE INNER RACE)
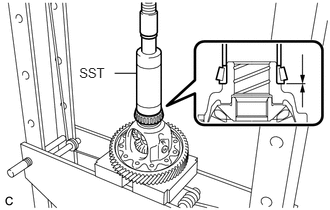
Using SST and a press, install the tapered roller bearing (RH side inner race) to the differential case sub-assembly.
- SST
- 09316-60011 (09316-00011)
- NOTICE:
-
Be sure to install the tapered roller bearing (RH side inner race) so that there is no clearance between the tapered roller bearing (RH side inner race) and the differential case sub-assembly.
5.INSTALL TAPERED ROLLER BEARING (LH SIDE INNER RACE)
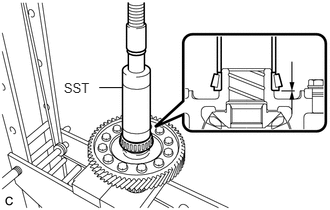
Using SST and a press, install the tapered roller bearing (LH side inner race) to the differential case sub-assembly.
- SST
- 09316-60011 (09316-00011)
- NOTICE:
-
Be sure to install the tapered roller bearing (LH side inner race) so that there is no clearance between the tapered roller bearing (LH side inner race) and the differential case sub-assembly.
6.INSTALL TAPERED ROLLER BEARING (LH SIDE OUTER RACE)
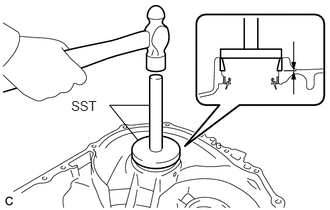
Using SST and hammer, install the tapered roller bearing (LH side outer race) to the hybrid vehicle motor assembly.
- SST
- 09950-60020 (09951-00750)
09950-70010 (09951-07200)
- NOTICE:
- ·
If the tapered roller bearing (LH side outer race) is deformed or damaged, replace it with a new one.
·Be sure to install the tapered roller bearing (LH side outer race) so that there is no clearance between the tapered roller bearing (LH side outer race) and the hybrid vehicle motor assembly.
7.INSTALL TAPERED ROLLER BEARING (RH SIDE OUTER RACE)
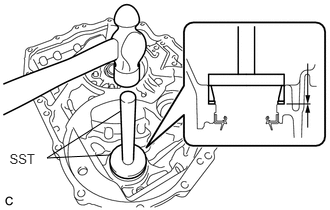
Using SST and hammer, install the tapered roller bearing (RH side outer race) and differential case RH shim to the hybrid vehicle generator assembly.
- SST
- 09950-60020 (09951-00750)
09950-70010 (09951-07200)
- NOTICE:
- ·
If the differential case RH shim or tapered roller bearing (RH side outer race) is deformed or damaged, replace it with a new one.
·Be sure to install the tapered roller bearing (RH side outer race) so that there is no clearance between the tapered roller bearing (RH side outer race) and the hybrid vehicle generator assembly.
8.ADJUST PRELOAD
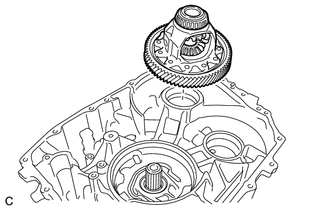
Install the differential case sub-assembly to the hybrid vehicle motor assembly.
Install the No. 1 engine hanger and No. 2 engine hanger with the 2 bolts and washer as shown in the illustration.
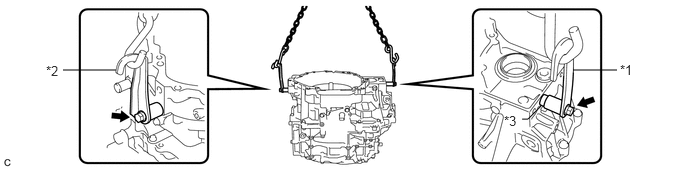
| *1 | No. 1 Engine Hanger | *2 | No. 2 Engine Hanger |
| *3 | Washer | - | - |
- Torque:
- 43 N*m (438 kgf*cm, 32 ft.*lbf)
| Part Name | Part No. |
|---|---|
| No. 1 engine hanger | 12281-37050 |
| No. 2 engine hanger | 12282-37040 |
| Bolt | 91552-81050 |
- HINT:
-
When installing the No. 1 engine hanger, use a washer with an appropriate thickness so that the No. 1 engine hanger will not interfere with the installation surface of the transaxle housing.
Using the sling device and chain block, install the hybrid vehicle generator assembly to the hybrid vehicle motor assembly.
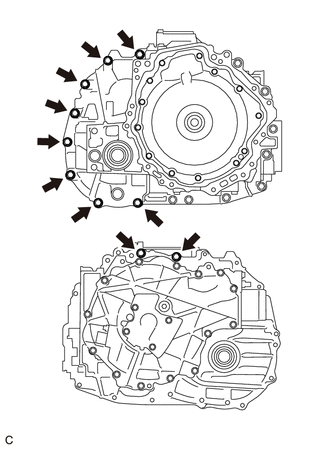
Install the 8 bolts to the hybrid vehicle generator assembly.
- Torque:
- 29 N*m (300 kgf*cm, 22 ft.*lbf)
Install the 2 bolts to the hybrid vehicle motor assembly.
- Torque:
- 29 N*m (300 kgf*cm, 22 ft.*lbf)
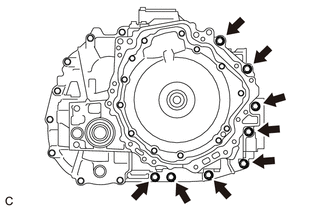
Install the 8 bolts to the hybrid vehicle generator assembly.
- Torque:
- 29 N*m (300 kgf*cm, 22 ft.*lbf)
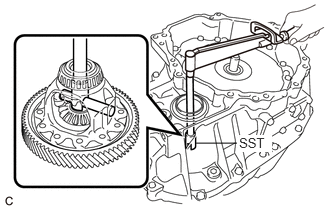
Using SST and a torque wrench, measure the starting torque of the differential case sub-assembly.
- SST
- 09564-33010
| Starting Torque | New tapered roller bearing | 1.3 to 2.9 N*m (13 to 30 kgf*cm, 12 to 26 in.*lbf) |
| Reused tapered roller bearing | 0.9 to 2.3 N*m (9 to 23 kgf*cm, 8 to 20 in.*lbf) |
- NOTICE:
- ·
Before measurement, turn the differential pinion shaft in both directions to settle the bearings.
·If the differential case RH shim or tapered roller bearing (RH side outer race) is deformed or damaged, replace it with a new one.
- HINT:
-
If the value is not as specified, replace the differential case RH shim with one of the correct thickness.
| Part No. | Thickness (mm (in.)) | Part No. | Thickness (mm (in.)) |
|---|---|---|---|
| 90564-64031 | 1.70 (0.0669) | 90564-64039 | 2.10 (0.0827) |
| 90564-64047 | 1.725 (0.0679) | 90564-64055 | 2.125 (0.0837) |
| 90564-64032 | 1.75 (0.0689) | 90564-64040 | 2.15 (0.0846) |
| 90564-64048 | 1.775 (0.0699) | 90564-64056 | 2.175 (0.0856) |
| 90564-64033 | 1.80 (0.0709) | 90564-64041 | 2.20 (0.0866) |
| 90564-64049 | 1.825 (0.0719) | 90564-64057 | 2.225 (0.0876) |
| 90564-64034 | 1.85 (0.0728) | 90564-64042 | 2.25 (0.0886) |
| 90564-64050 | 1.875 (0.0738) | 90564-64058 | 2.275 (0.0896) |
| 90564-64035 | 1.90 (0.0748) | 90564-64043 | 2.30 (0.0906) |
| 90564-64051 | 1.925 (0.0758) | 90564-64059 | 2.325 (0.0915) |
| 90564-64036 | 1.95 (0.0768) | 90564-64044 | 2.35 (0.0925) |
| 90564-64052 | 1.975 (0.0778) | 90564-64060 | 2.375 (0.0935) |
| 90564-64037 | 2.00 (0.0787) | 90564-64045 | 2.40 (0.0945) |
| 90564-64053 | 2.025 (0.0797) | 90564-64061 | 2.425 (0.0955) |
| 90564-64038 | 2.05 (0.0807) | 90564-64046 | 2.45 (0.0965) |
| 90564-64054 | 2.075 (0.0817) | - | - |
Remove the 18 bolts from the hybrid vehicle motor assembly and hybrid vehicle generator assembly.
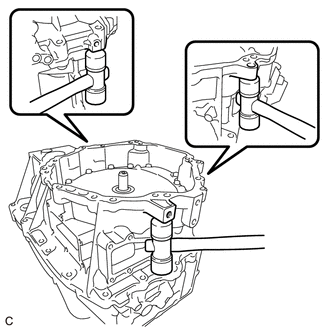
While lifting the hybrid vehicle generator assembly with a chain, tap the areas shown in the illustration with a plastic hammer and separate the hybrid vehicle generator assembly from the hybrid vehicle motor assembly.
While lifting the hybrid vehicle generator assembly with a chain, remove it from the hybrid vehicle motor assembly.
- NOTICE:
-
Lift the hybrid vehicle generator assembly straight up.
Remove the differential case sub-assembly from the hybrid vehicle motor assembly.
Remove the 2 bolts, washer, No. 1 engine hanger and No. 2 engine hanger from the hybrid vehicle generator assembly.
35563
9.INSTALL SHIFT CONTROL ACTUATOR SEAL
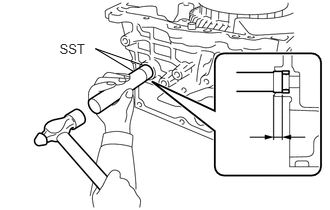
Using SST and hammer, install a new shift control actuator seal to the hybrid vehicle motor assembly.
- SST
- 09950-60010 (09951-00210)
09950-70010 (09951-07100)
- Standard Depth:
8.5 to 9.8 mm (0.335 to 0.386 in.)
Coat the lip of the shift control actuator seal with a small amount of MP grease.
30900B
10.INSTALL HYBRID VEHICLE TRANSAXLE ASSEMBLY TYPE T OIL SEAL (LH SIDE)
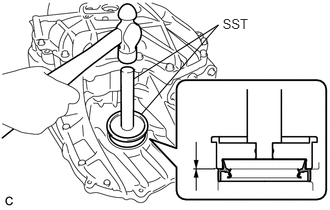
Using SST and hammer, install a new hybrid vehicle transaxle assembly type T oil seal (LH side) to the hybrid vehicle motor assembly.
- SST
- 09608-32010
09950-70010 (09951-07150)
- Standard Depth:
-0.5 to 0.5 mm (-0.0197 to 0.0197 in.)
- NOTICE:
- ·
Do not allow foreign matter to attach to the hybrid vehicle transaxle assembly type T oil seal (LH side) lip.
·Do not install the hybrid vehicle transaxle assembly type T oil seal (LH side) at an angle.
Coat the lip of the hybrid vehicle transaxle assembly type T oil seal (LH side) with a small amount of MP grease.
35395D
11.INSTALL TRANSMISSION OIL STRAINER
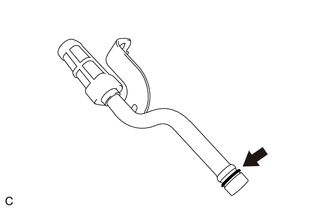
Coat a new O-ring with ATF and install it to the transmission oil strainer.
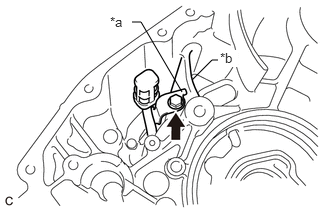
Install the transmission oil strainer to the hybrid vehicle motor assembly with the bolt.
| *a | Detent |
| *b | Rib |
- Torque:
- 15 N*m (153 kgf*cm, 11 ft.*lbf)
- NOTICE:
-
Place the detent of the transmission oil strainer to the rib.
12.INSTALL REAR PLANETARY SUN GEAR
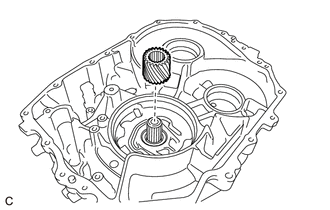
Install the rear planetary sun gear to the hybrid vehicle motor assembly.
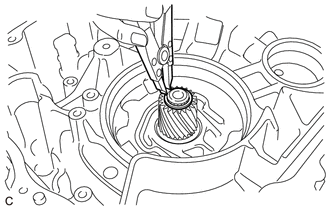
Using a snap ring expander, install a new rear planetary sun gear shaft snap ring to the hybrid vehicle motor assembly.
- NOTICE:
-
Do not expand the rear planetary sun gear shaft snap ring excessively.
- HINT:
-
Turn the transaxle case sideways, pull out the rotor shaft, and install the rear planetary sun gear shaft snap ring.
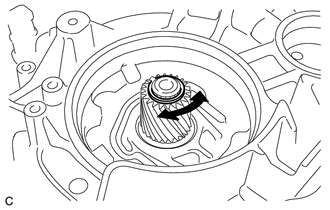
Turn the rear planetary sun gear shaft snap ring and check that it is not loose.
35760A
13.INSTALL NO. 1 REAR PLANETARY GEAR ASSEMBLY
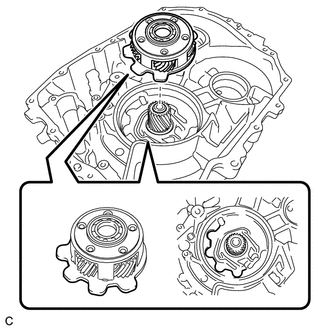
Install the No. 1 rear planetary gear assembly to the rear planetary sun gear.
14.INSTALL COUNTER DRIVE GEAR SUB-ASSEMBLY
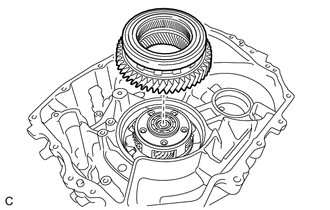
Install the counter drive gear sub-assembly to the No. 1 rear planetary gear assembly.
15.INSTALL COUNTER DRIVEN GEAR SUB-ASSEMBLY
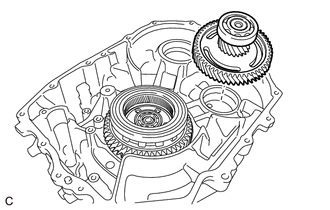
Install the counter driven gear sub-assembly to the hybrid vehicle motor assembly.
16.INSTALL DIFFERENTIAL CASE SUB-ASSEMBLY
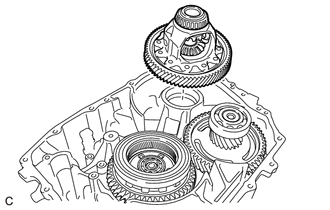
Install the differential case sub-assembly to the hybrid vehicle motor assembly.
17.INSTALL THRUST NEEDLE ROLLER BEARING
Apply ATF to the contact surfaces of the thrust needle roller bearing.
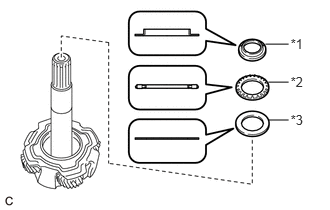
Install the No. 1 thrust bearing race, thrust needle roller bearing and thrust bearing race to the input shaft assembly.
| *1 | Thrust Bearing Race |
| *2 | Thrust Needle Roller Bearing |
| *3 | No. 1 Thrust Bearing Race |
35710
18.INSTALL INPUT SHAFT ASSEMBLY
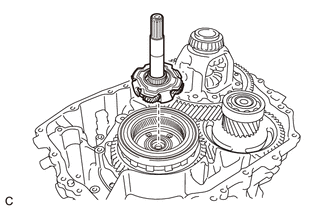
Install the input shaft assembly to the counter drive gear sub-assembly.
35719C
19.INSTALL PLANETARY SUN GEAR
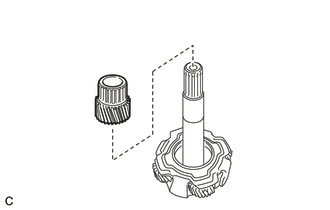
Install the planetary sun gear to the input shaft assembly.
Select a planetary sun gear snap ring.
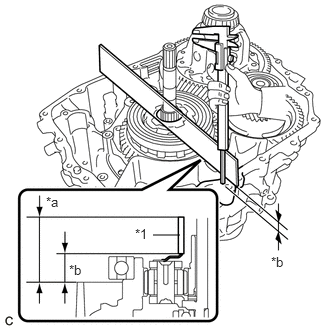
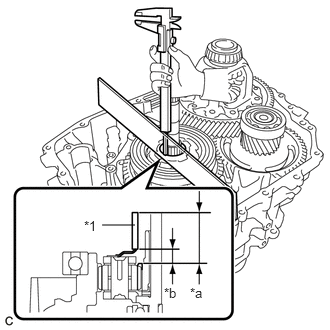
Using a straightedge and vernier caliper, measure dimension A shown in the illustration.
| *1 | Straightedge |
| *a | Measured area |
| *b | Dimension A |
- Dimension A:
Measured value - Straightedge thickness
Using a straightedge and vernier caliper, measure dimension B shown in the illustration.
| *1 | Straightedge |
| *a | Measured area |
| *b | Dimension B |
- Dimension B:
Measured value - Straightedge thickness
- NOTICE:
-
Measure the dimensions without a planetary sun gear snap ring installed.
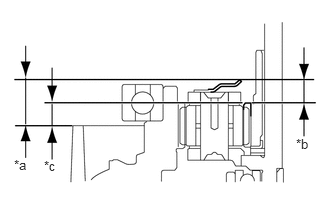
Measure the dimension C.
| *a | Dimension A |
| *b | Dimension B |
| *c | Dimension C |
- Dimension C:
Dimension A - Dimension B
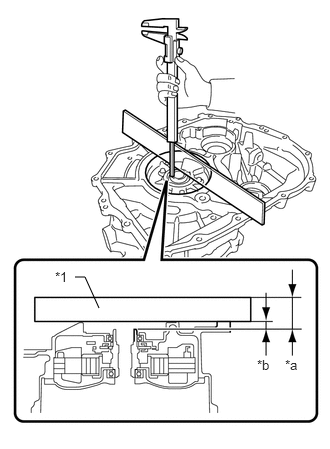
Using a straightedge and vernier caliper, measure dimension D shown in the illustration.
| *1 | Straightedge |
| *a | Measured area |
| *b | Dimension D |
- Dimension D:
Measured value - Straightedge thickness
Select a planetary sun gear snap ring.
- Standard Value:
Planetary sun gear snap ring thickness = (Dimension D - Dimension C) - (0.1 to 0.2 mm (0.00394 to 0.00787 in.))
- NOTICE:
-
There should be a clearance of 0.1 to 0.2 mm (0.00394 to 0.00787 in.) for the input shaft assembly. Therefore, use the above formula when selecting a planetary sun gear snap ring.
| Part No. | Thickness (mm (in.)) | Part No. | Thickness (mm (in.)) |
|---|---|---|---|
| 90520-31035 | 3.88 (0.153) | 90520-31050 | 4.33 (0.170) |
| 90520-31036 | 3.91 (0.154) | 90520-31051 | 4.36 (0.172) |
| 90520-31037 | 3.94 (0.155) | 90520-31052 | 4.39 (0.173) |
| 90520-31038 | 3.97 (0.156) | 90520-31053 | 4.42 (0.174) |
| 90520-31039 | 4.00 (0.157) | 90520-31054 | 4.45 (0.175) |
| 90520-31040 | 4.03 (0.159) | 90520-31055 | 4.48 (0.176) |
| 90520-31041 | 4.06 (0.160) | 90520-31056 | 4.51 (0.178) |
| 90520-31042 | 4.09 (0.161) | 90520-31057 | 4.54 (0.179) |
| 90520-31043 | 4.12 (0.162) | 90520-31058 | 4.57 (0.180) |
| 90520-31044 | 4.15 (0.163) | 90520-31059 | 4.60 (0.181) |
| 90520-31045 | 4.18 (0.165) | 90520-31060 | 4.63 (0.182) |
| 90520-31046 | 4.21 (0.166) | 90520-31061 | 4.66 (0.183) |
| 90520-31047 | 4.24 (0.167) | 90520-31062 | 4.69 (0.185) |
| 90520-31048 | 4.27 (0.168) | 90520-31063 | 4.72 (0.186) |
| 90520-31049 | 4.30 (0.169) | - | - |
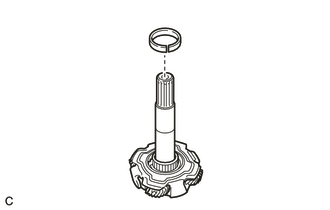
Install the planetary sun gear snap ring to the input shaft assembly.
35783J
20.INSTALL COUNTER DRIVEN GEAR SHIM
Select a counter driven gear shim.
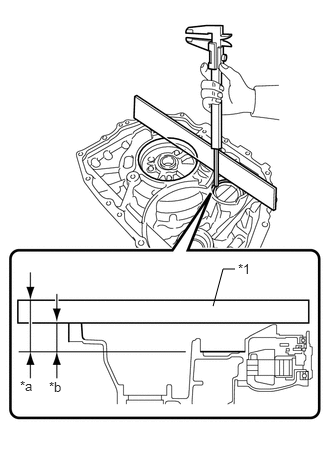
Using a straightedge and vernier caliper, measure dimension A shown in the illustration.
| *1 | Straightedge |
| *a | Measured area |
| *b | Dimension A |
- Dimension A:
Measured value - Straightedge thickness
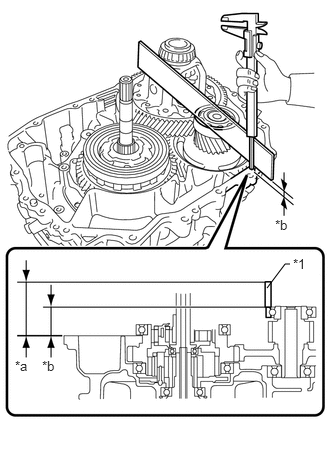
Using a straightedge and vernier caliper, measure dimension B shown in the illustration.
| *1 | Straightedge |
| *a | Measured area |
| *b | Dimension B |
- Dimension B:
Measured value - Straightedge thickness
Select a counter driven gear shim.
- Standard Value:
Counter driven gear shim thickness = (Dimension A - Dimension B) - (0 to 0.2 mm (0 to 0.00787 in.))
- NOTICE:
-
There should be a clearance of 0 to 0.2 mm (0 to 0.00787 in.) for the counter driven gear sub-assembly. Therefore, use the above formula when selecting a counter driven gear shim.
| Part No. | Thickness (mm (in.)) | Part No. | Thickness (mm (in.)) |
|---|---|---|---|
| 90564-50281 | 2.00 (0.0787) | 90564-50288 | 2.35 (0.0925) |
| 90564-50282 | 2.05 (0.0807) | 90564-50289 | 2.40 (0.0945) |
| 90564-50283 | 2.10 (0.0827) | 90564-50290 | 2.45 (0.0965) |
| 90564-50284 | 2.15 (0.0846) | 90564-50291 | 2.50 (0.0984) |
| 90564-50285 | 2.20 (0.0866) | 90564-50292 | 2.55 (0.100) |
| 90564-50286 | 2.25 (0.0886) | 90564-50293 | 2.60 (0.102) |
| 90564-50287 | 2.30 (0.0906) | - | - |
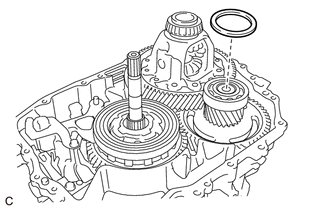
Install the counter driven gear shim to the counter driven gear sub-assembly.
33449F
21.INSTALL NO. 1 TRANSMISSION MAGNET
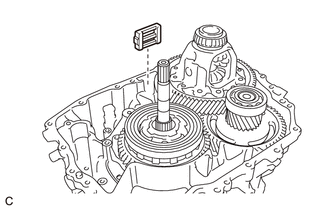
Install the No. 1 transmission magnet to the hybrid vehicle motor assembly.
22.INSTALL PARKING LOCK ROD SUB-ASSEMBLY
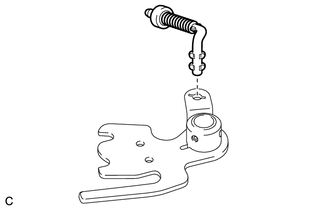
Align the slot with the notches on the No. 1 parking lock lever sub-assembly and install the parking lock rod sub-assembly.
23.INSTALL NO. 1 PARKING LOCK SHAFT
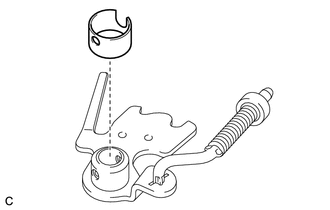
Install a new spacer to the No. 1 parking lock lever sub-assembly.
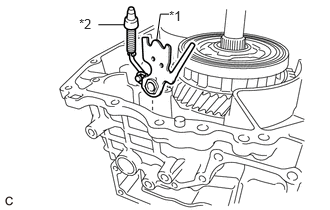
Install the No. 1 parking lock lever sub-assembly and parking lock rod sub-assembly to the hybrid vehicle motor assembly.
| *1 | No. 1 Parking Lock Lever Sub-assembly |
| *2 | Parking Lock Rod Sub-assembly |
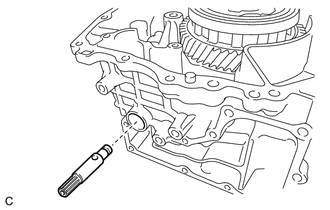
Install the No. 1 parking lock shaft to the hybrid vehicle motor assembly.
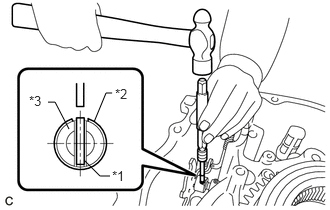
Using a 5 mm pin punch and hammer, drive in a new slotted spring pin to the No. 1 parking lock shaft.
| *1 | Slotted Spring Pin |
| *2 | Spacer |
| *3 | No. 1 Parking Lock Shaft |
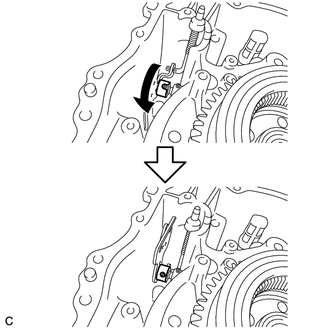
Turn the spacer as shown in the illustration.
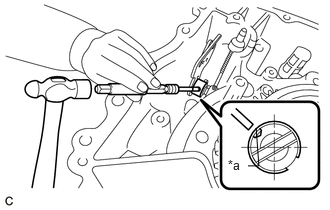
Using a 3 mm pin punch and hammer, stake the spacer.
| *a | Stake point |
- NOTICE:
-
After staking the spacer, make sure that it is firmly secured.
35556K
24.INSTALL RETAINER SPRING
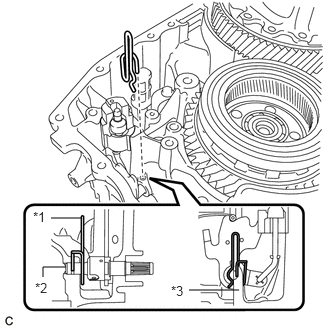
Install the retainer spring to the hybrid vehicle motor assembly and No. 1 parking lock shaft.
| *1 | Retainer Spring |
| *2 | No. 1 Parking Lock Shaft |
| *3 | Hybrid Vehicle Motor Assembly |
35409C
25.INSTALL MANUAL DETENT SPRING SUB-ASSEMBLY
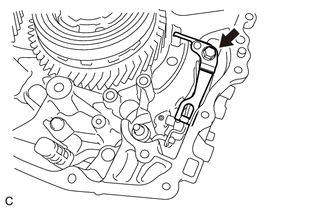
Install the manual detent spring sub-assembly to the hybrid vehicle motor assembly with the bolt.
- Torque:
- 25 N*m (250 kgf*cm, 18 ft.*lbf)
35598A
26.INSTALL PARKING LOCK SLEEVE
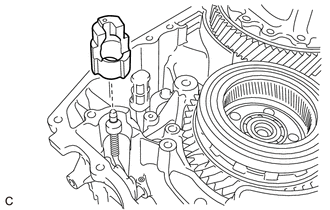
Install the parking lock sleeve to the hybrid vehicle motor assembly.
35556M
27.INSTALL TORSION SPRING
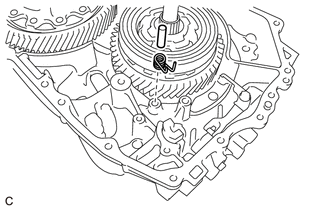
Install the parking lock pawl shaft and torsion spring to the hybrid vehicle motor assembly.
35596B
28.INSTALL PAWL STOPPER PLATE
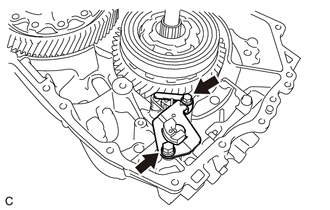
Install the pawl stopper plate to the hybrid vehicle motor assembly with the 2 bolts.
- Torque:
- 25 N*m (250 kgf*cm, 18 ft.*lbf)
35557B
29.INSTALL PARKING LOCK PAWL
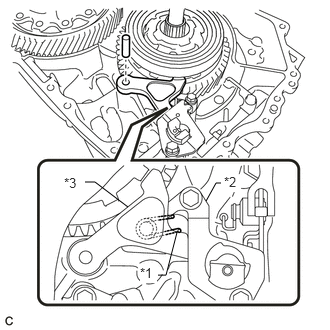
Install the parking lock pawl to the hybrid vehicle motor assembly with the parking lock pawl shaft.
| *1 | Torsion Spring |
| *2 | Pawl Stopper Plate |
| *3 | Parking Lock Pawl |
- NOTICE:
-
Make sure the torsion spring is attached to the parking lock pawl and pawl stopper plate.
35710A
30.INSTALL INPUT SHAFT TYPE T OIL SEAL
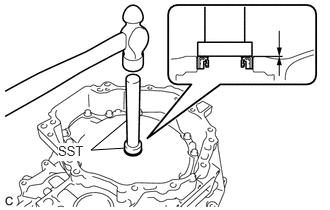
Using SST and hammer, install a new input shaft type T oil seal to the hybrid vehicle generator assembly.
- SST
- 09950-60010 (09951-00340)
09950-70010 (09951-07150)
- Standard Depth:
1.0 to 1.8 mm (0.0394 to 0.0709 in.)
- NOTICE:
- ·
Do not allow foreign matter to attach to the input shaft type T oil seal lip.
·Do not install the input shaft type T oil seal at an angle.
Coat the lip of the input shaft type T oil seal with a small amount of MP grease.
30900B
31.INSTALL HYBRID VEHICLE TRANSAXLE ASSEMBLY TYPE T OIL SEAL (RH SIDE)
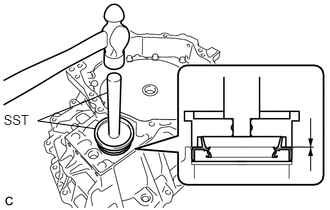
Using SST and hammer, install a new hybrid vehicle transaxle assembly type T oil seal (RH side) to the hybrid vehicle generator assembly.
- SST
- 09608-10010
09950-70010 (09951-07150)
- Standard Depth:
-0.5 to 0.5 mm (-0.0197 to 0.0197 in.)
- NOTICE:
- ·
Do not allow foreign matter to attach to the hybrid vehicle transaxle assembly type T oil seal (RH side) lip.
·Do not install the hybrid vehicle transaxle assembly type T oil seal (RH side) at an angle.
Coat the lip of the hybrid vehicle transaxle assembly type T oil seal (RH side) with a small amount of MP grease.
32.INSTALL TRANSAXLE HOUSING OIL SEPARATOR
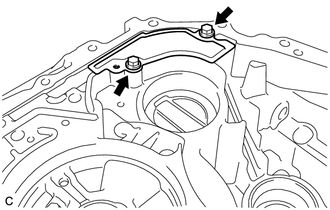
Install the transaxle housing oil separator to the hybrid vehicle generator assembly with the 2 bolts.
- Torque:
- 15 N*m (153 kgf*cm, 11 ft.*lbf)
33.INSTALL HYBRID VEHICLE GENERATOR ASSEMBLY
Clean the hybrid vehicle motor assembly installation surface of the hybrid vehicle generator assembly.
- NOTICE:
- ·
Do not allow any remaining seal packing to enter the hybrid vehicle generator assembly.
·Do not damage the installation surface.
Clean the hybrid vehicle generator assembly installation surface of the hybrid vehicle motor assembly.
- NOTICE:
- ·
Do not allow any remaining seal packing to enter the hybrid vehicle motor assembly.
·Do not damage the installation surface.
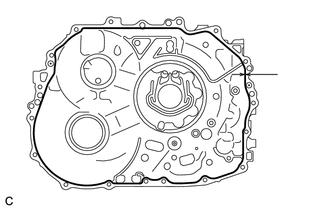
Apply seal packing to the hybrid vehicle motor assembly as shown in the illustration.

|
Seal Packing |
- Seal Packing:
Toyota Genuine Seal Packing 1281, Three Bond 1281 or equivalent
- Standard Seal Diameter:
1.5 mm (0.0591 in.)
- NOTICE:
- ·
Clean the installation surfaces.
·Check and clean the bolts and bolt holes.
·Install the hybrid vehicle generator assembly within 3 minutes and tighten the bolts within 10 minutes of applying the seal packing.
·Make sure to overlap the start and the end points of the seal packing.
·Do not add fluid for at least 2 hours after installing the hybrid vehicle generator assembly.
·Do not start the engine for at least 2 hours after installing the hybrid vehicle generator assembly.
Install the No. 1 engine hanger and No. 2 engine hanger with the 2 bolts and washer as shown in the illustration.
| *1 | No. 1 Engine Hanger | *2 | No. 2 Engine Hanger |
| *3 | Washer | - | - |
- Torque:
- 43 N*m (438 kgf*cm, 32 ft.*lbf)
| Part Name | Part No. |
|---|---|
| No. 1 engine hanger | 12281-37050 |
| No. 2 engine hanger | 12282-37040 |
| Bolt | 91552-81050 |
- HINT:
-
When installing the No. 1 engine hanger, use a washer with an appropriate thickness so that the No. 1 engine hanger will not interfere with the installation surface of the transaxle housing.
Using the sling device and chain block, install the hybrid vehicle generator assembly to the hybrid vehicle motor assembly.
- NOTICE:
- ·
Lift the hybrid vehicle generator assembly straight up.
·Do not damage the input shaft type T oil seal with the input shaft assembly.
·If it is difficult to install the hybrid vehicle generator assembly, turn the input shaft assembly left and right and engage the gears.
·Do not directly hold the splines of the input shaft assembly with a tool when turning it.
Remove the 2 bolts, washer, No. 1 engine hanger and No. 2 engine hanger from the hybrid vehicle generator assembly.
Install the 8 bolts to the hybrid vehicle generator assembly.
- Torque:
- 29 N*m (300 kgf*cm, 22 ft.*lbf)
Install the 2 bolts to the hybrid vehicle motor assembly.
- Torque:
- 29 N*m (300 kgf*cm, 22 ft.*lbf)
Install the 8 bolts to the hybrid vehicle generator assembly.
- Torque:
- 29 N*m (300 kgf*cm, 22 ft.*lbf)
34.INSTALL MOTOR WATER JACKET COVER ASSEMBLY
Clean the motor water jacket cover assembly installation surface of the hybrid vehicle transaxle assembly.
- NOTICE:
-
Do not allow any remaining seal packing to enter the coolant path.
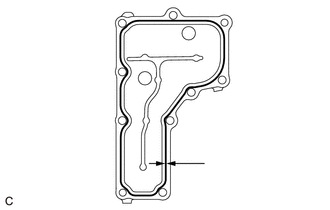
Apply seal packing to the motor water jacket cover assembly as shown in the illustration.
|
|
Seal Packing |
- Seal Packing:
Toyota Genuine Seal Packing 1282B, Three Bond 1282B or equivalent
- Standard Seal Diameter:
1.5 mm (0.0591 in.)
- NOTICE:
- ·
Clean and degrease the installation surface.
·Clean and degrease the bolt and bolt holes.
·Install the motor water jacket cover assembly within 3 minutes and tighten the bolts within 10 minutes of applying the seal packing.
·Make sure to overlap the start and the end points of the seal packing.
·Do not add coolant for at least 2 hours after installing the motor water jacket cover assembly.
·Do not turn the power switch on (READY) for at least 2 hours after installing the motor water jacket cover assembly.
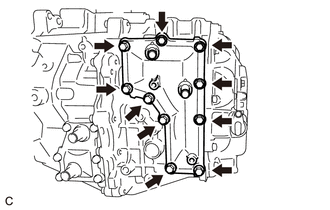
Install the motor water jacket cover assembly to the hybrid vehicle transaxle assembly with the 10 bolts.
- Torque:
- 18 N*m (184 kgf*cm, 13 ft.*lbf)
G1020A
35.INSTALL NO. 2 MOTOR WATER JACKET COVER ASSEMBLY
Clean the No. 2 motor water jacket cover assembly installation surface of the hybrid vehicle transaxle assembly.
- NOTICE:
-
Do not allow any remaining seal packing to enter the coolant path.
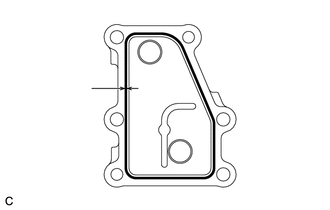
Apply seal packing to the No. 2 motor water jacket cover assembly as shown in the illustration.
|
|
Seal Packing |
- Seal Packing:
Toyota Genuine Seal Packing 1282B, Three Bond 1282B or equivalent
- Standard Seal Diameter:
1.5 mm (0.0591 in.)
- NOTICE:
- ·
Clean and degrease the installation surface.
·Clean and degrease the bolt and bolt holes.
·Install the No. 2 motor water jacket cover assembly within 3 minutes and tighten the bolts within 10 minutes of applying the seal packing.
·Make sure to overlap the start and the end points of the seal packing.
·Do not add coolant for at least 2 hours after installing the No. 2 motor water jacket cover assembly.
·Do not turn the power switch on (READY) for at least 2 hours after installing the No. 2 motor water jacket cover assembly.
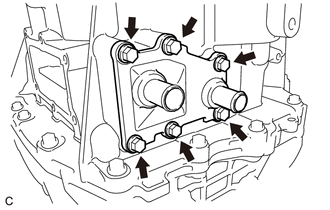
Install the No. 2 motor water jacket cover assembly to the hybrid vehicle transaxle assembly with the 6 bolts.
- Torque:
- 18 N*m (184 kgf*cm, 13 ft.*lbf)
G1020
36.INSTALL NO. 1 MOTOR WATER JACKET COVER ASSEMBLY
Clean the No. 1 motor water jacket cover assembly installation surface of the hybrid vehicle transaxle assembly.
- NOTICE:
-
Do not allow any remaining seal packing to enter the coolant path.
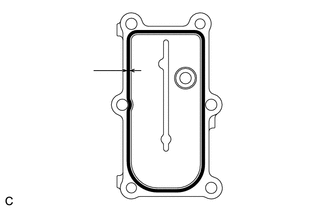
Apply seal packing to the No. 1 motor water jacket cover assembly as shown in the illustration.
|
|
Seal Packing |
- Seal Packing:
Toyota Genuine Seal Packing 1282B, Three Bond 1282B or equivalent
- Standard Seal Diameter:
1.5 mm (0.0591 in.)
- NOTICE:
- ·
Clean and degrease the installation surface.
·Clean and degrease the bolt and bolt holes.
·Install the No. 1 motor water jacket cover assembly within 3 minutes and tighten the bolts within 10 minutes of applying the seal packing.
·Make sure to overlap the start and the end points of the seal packing.
·Do not add coolant for at least 2 hours after installing the No. 1 motor water jacket cover assembly.
·Do not turn the power switch on (READY) for at least 2 hours after installing the No. 1 motor water jacket cover assembly.
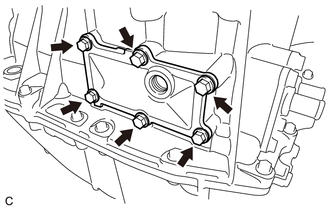
Install the No. 1 motor water jacket cover assembly to the hybrid vehicle transaxle assembly with the 6 bolts.
- Torque:
- 18 N*m (184 kgf*cm, 13 ft.*lbf)
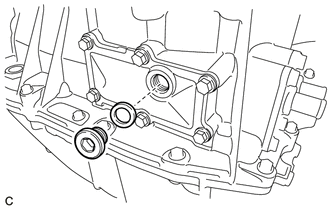
Using a 10 mm hexagon socket wrench, install the drain plug and a new gasket to the No. 1 motor water jacket cover assembly.
- Torque:
- 39 N*m (400 kgf*cm, 29 ft.*lbf)
37.INSTALL DRAIN PLUG
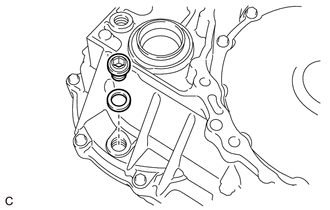
Using a 10 mm hexagon socket wrench, install the drain plug and a new gasket to the hybrid vehicle transaxle assembly.
- Torque:
- 50 N*m (510 kgf*cm, 37 ft.*lbf)
38.INSTALL FILLER PLUG
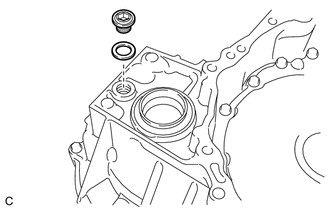
Using a 10 mm hexagon socket wrench, install the filler plug and a new gasket to the hybrid vehicle transaxle assembly.
- Torque:
- 50 N*m (510 kgf*cm, 37 ft.*lbf)
35371
39.INSTALL OIL PUMP DRIVE SHAFT
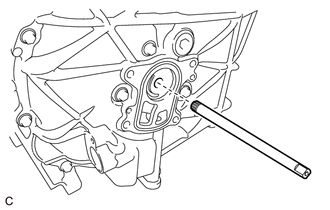
Install the oil pump drive shaft to the hybrid vehicle transaxle assembly.
35308D
40.INSTALL TRANSMISSION OIL PUMP COVER SUB-ASSEMBLY
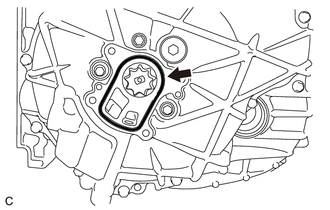
Coat a new O-ring with ATF and install it to the hybrid vehicle transaxle assembly.
- NOTICE:
-
Be careful not to damage the O-ring.
Apply ATF to the transaxle oil pump drive rotor and transmission oil pump driven rotor.
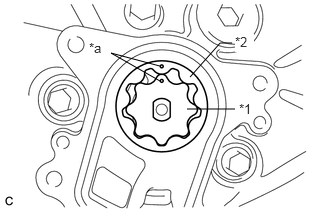
Install the transaxle oil pump drive rotor and transmission oil pump driven rotor to the hybrid vehicle transaxle assembly.
| *1 | Transaxle Oil Pump Drive Rotor |
| *2 | Transmission Oil Pump Driven Rotor |
| *a | Matchmark |
- NOTICE:
- ·
Align the matchmarks on the transmission oil pump drive rotor and the transmission oil pump driven rotor.
·If the transaxle oil pump drive rotor or oil pump driven rotor has been replaced, inspect the fluid pressure of the transmission oil pump cover.
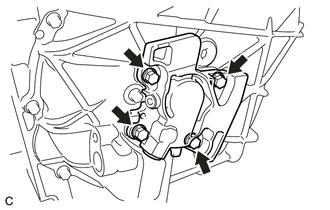
Install the transmission oil pump cover sub-assembly to the hybrid vehicle transaxle assembly with the 4 bolts.
- Torque:
- 11 N*m (112 kgf*cm, 8 ft.*lbf)
- NOTICE:
-
Do not pinch the O-ring.
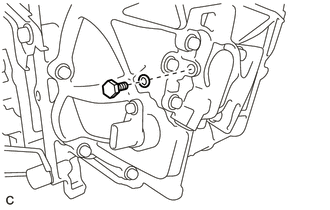
Coat a new O-ring with ATF and install it to the fluid pump cover plug.
Install the fluid pump cover plug to the transmission oil pump cover sub-assembly.
- Torque:
- 8.0 N*m (82 kgf*cm, 71 in.*lbf)
41.INSTALL WITH HEAD STRAIGHT SCREW PLUG
Clean and degrease the bolt holes.
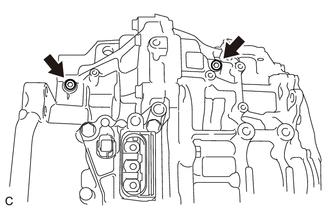
Using a 6 mm hexagon socket wrench, install 2 new with head straight screw plugs to the hybrid vehicle transaxle assembly.
- Torque:
- 18 N*m (180 kgf*cm, 13 ft.*lbf)
30900N
42.INSTALL TRANSAXLE BREATHER PLUG
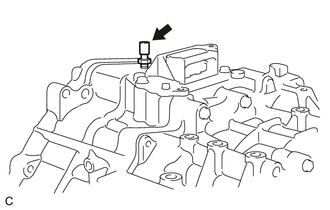
Using a union nut wrench, install the transaxle breather plug to the hybrid vehicle transaxle assembly.
- Torque:
- 11 N*m (115 kgf*cm, 8 ft.*lbf)
- NOTICE:
-
Be careful not to damage the transaxle breather plug.
35580
43.INSTALL SHIFT CONTROL ACTUATOR ASSEMBLY
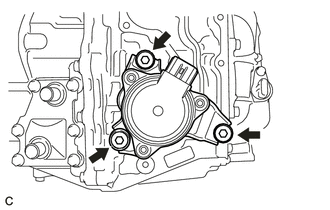
Install the shift control actuator assembly to the hybrid vehicle transaxle assembly with 3 new shift control actuator bolts.
- Torque:
- 9.5 N*m (97 kgf*cm, 84 in.*lbf)
- HINT:
- ·
Do not tap the shift control actuator assembly with a plastic hammer or similar tool when installing it.
·As the position of the shift control actuator assembly is detected automatically, initialization is not necessary after disconnecting and reconnecting the cable to the auxiliary battery negative (-) terminal.
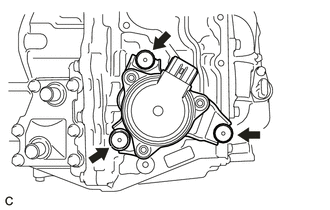
Install 3 new shift control actuator bolt caps to the shift control actuator bolts.
- NOTICE:
-
Push in each shift control actuator bolt cap firmly until the claw of the shift control actuator bolt cap engages with the shift control actuator bolt.
G1148
44.INSTALL MOTOR CABLE
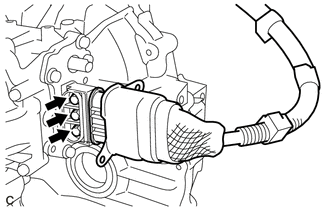
Install the motor cable to the hybrid vehicle transaxle assembly with the 3 bolts.
- Torque:
- 10 N*m (102 kgf*cm, 7 ft.*lbf)
- NOTICE:
- ·
Keep foreign matter, water, etc. away from the motor cable terminals and their installation area.
·Insert the terminals straight in when installing the motor cable.
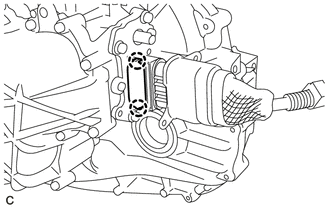
Engage the 2 claws to install a new terminal cap to the hybrid vehicle transaxle assembly.
- NOTICE:
- ·
Keep foreign matter, water, etc. away from the terminal cap and its installation area.
·Do not pinch the O-ring.
·Check that the terminal cap is securely installed.
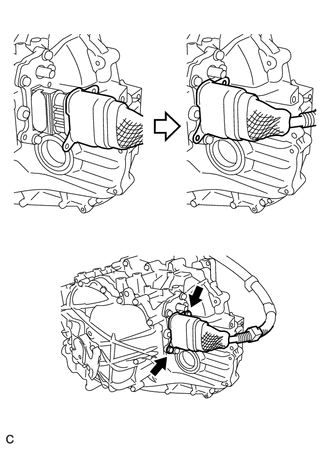
Place the motor cable connector shell in position and install it with the 2 bolts.
- Torque:
- 10 N*m (102 kgf*cm, 7 ft.*lbf)
G2148
45.INSTALL GENERATOR CABLE
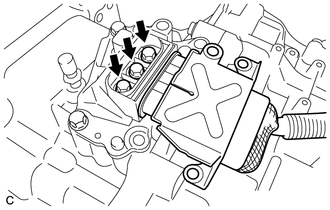
Install the generator cable to the hybrid vehicle transaxle assembly with the 3 bolts.
- Torque:
- 10 N*m (102 kgf*cm, 7 ft.*lbf)
- NOTICE:
- ·
Keep foreign matter, water, etc. away from the generator cable terminals and their installation area.
·Insert the terminals straight in when installing the generator cable.
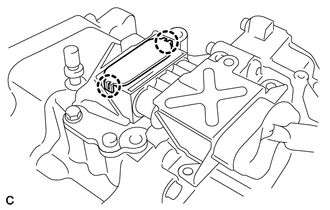
Engage the 2 claws to install a new terminal cap to the hybrid vehicle transaxle assembly.
- NOTICE:
- ·
Keep foreign matter, water, etc. away from the terminal cap and its installation area.
·Do not pinch the O-ring.
·Check that the terminal cap is securely installed.
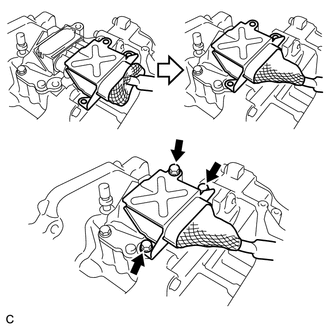
Place the generator cable connector shell in position and install it with the 3 bolts.
- Torque:
- 20 N*m (204 kgf*cm, 15 ft.*lbf)
46.INSPECT PARKING LOCK
- NOTICE:
-
Confirm the safety of the working environment, then start the inspection.
- HINT:
-
Perform this inspection on a level surface after installing the hybrid vehicle transaxle assembly to the vehicle.
Turn the power switch on (IG).*1
Depress the brake pedal and release the parking brake.*2
Check that park (P) is selected.*3
Push the vehicle forward by hand and check that it moves slightly and stops.*4
Move the shift lever to neutral (N).*5
Push the vehicle forward by hand and check that it moves.*6
Press the P position switch and check that park (P) is selected.*7
Push the vehicle forward by hand and check that it moves slightly and stops.*8
Perform steps *3 to *8 again, pushing the vehicle rearward this time.