AUDIO / VIDEO INSTRUMENT PANEL SPEAKER REMOVAL
PROCEDURE

 1. PRECAUTION (for Driver Side)
- NOTICE:
-
After turning the power switch off, waiting time may be required before disconnecting the cable from the negative (-) auxiliary battery terminal. Therefore, make sure to read the disconnecting the cable from the negative (-) auxiliary battery terminal notices before proceeding with work (See page General>INTRODUCTION>REPAIR INSTRUCTION>PRECAUTION).
58410B
2.REMOVE DECK BOARD ASSEMBLY (for Driver Side)
58411A
3.REMOVE NO. 1 DECK BOARD (for Driver Side)
58412A
4.REMOVE NO. 2 DECK BOARD (for Driver Side)
64993
5.REMOVE REAR DECK FLOOR BOX (for Driver Side)
64995
6.REMOVE DECK FLOOR BOX RH (for Driver Side)
7.DISCONNECT CABLE FROM NEGATIVE AUXILIARY BATTERY TERMINAL (for Driver Side)
- NOTICE:
-
When disconnecting the cable, some systems need to be initialized after the cable is reconnected (See page General>INTRODUCTION>REPAIR INSTRUCTION>INITIALIZATION).
8.REMOVE INTEGRATION CONTROL AND PANEL (for Driver Side)
55431B
9.REMOVE UPPER INSTRUMENT PANEL FINISH PANEL (for Driver Side)
55480D
10.REMOVE LOWER INSTRUMENT PANEL FINISH PANEL ASSEMBLY (for Driver Side)
55044B
11.REMOVE UPPER INSTRUMENT PANEL FINISH PANEL SUB-ASSEMBLY (for Driver Side)
12.REMOVE NO. 1 INSTRUMENT PANEL REGISTER ASSEMBLY (for Driver Side)
62312B
13.DISCONNECT FRONT DOOR OPENING TRIM WEATHERSTRIP (for Driver Side)
62212
14.REMOVE FRONT PILLAR GARNISH (for Driver Side)
62226
15.REMOVE LOWER FRONT PILLAR GARNISH (for Driver Side)
55408F
16.REMOVE NO. 1 INSTRUMENT PANEL SPEAKER PANEL SUB-ASSEMBLY (for Driver Side)
55440D
17.REMOVE INSTRUMENT PANEL BOX ASSEMBLY (for Front Passenger Side)
18.REMOVE NO. 2 INSTRUMENT PANEL REGISTER ASSEMBLY (for Front Passenger Side)
62311B
19.DISCONNECT FRONT DOOR OPENING TRIM WEATHERSTRIP (for Front Passenger Side)
- HINT:
-
Use the same procedure for the RH side and LH side.
62211
20.REMOVE FRONT PILLAR GARNISH (for Front Passenger Side)
- HINT:
-
Use the same procedure for the RH side and LH side.
62225A
21.REMOVE LOWER FRONT PILLAR GARNISH (for Front Passenger Side)
55409F
22.REMOVE NO. 2 INSTRUMENT PANEL SPEAKER PANEL SUB-ASSEMBLY (for Front Passenger Side)
86160P
23.REMOVE FRONT NO. 2 SPEAKER ASSEMBLY
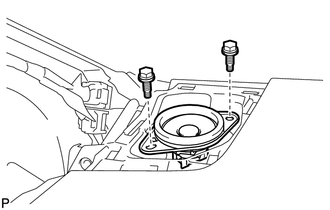
Remove the 2 bolts.
Lift the front No. 2 speaker assembly and disconnect the connector to remove the speaker.
- NOTICE:
-
Do not touch the cone part of the speaker.
- HINT:
-
Use the same procedure for the RH side and LH side.