PARK ASSIST / MONITORING INTELLIGENT PARKING ASSIST SYSTEM Vehicle does not Move to Set Parking Position
CAUTION / NOTICE / HINT
- NOTICE:
- ·
When the "System initializing" message is displayed on the navigation ECU sub-assembly after the auxiliary battery cable has been disconnected, correct the steering angle neutral point (See page Audio / Visual / Telematics>PARK ASSIST / MONITORING>INTELLIGENT PARKING ASSIST SYSTEM>INITIALIZATION).
·Depending on the parts that are replaced or operations that are performed during vehicle inspection or maintenance, calibration of other systems as well as the intelligent parking assist system may be needed (See page Audio / Visual / Telematics>PARK ASSIST / MONITORING>INTELLIGENT PARKING ASSIST SYSTEM>CALIBRATION).
·If initialization is necessary while performing an inspection, perform initialization first and then proceed to the next step.
PROCEDURE
Check that the tire pressure and tire size are as specified. Check that there is no excessive wear on the tires.
- Result:
Result Proceed to Tire size is as specified and there is no excessive wear A Tire size is as specified but there is excessive wear B Tire size is not as specified but there is no excessive wear A Tire size is not as specified and there is excessive wear B Tire size is totally different from specified size B
A
B
Check tire movement distance.
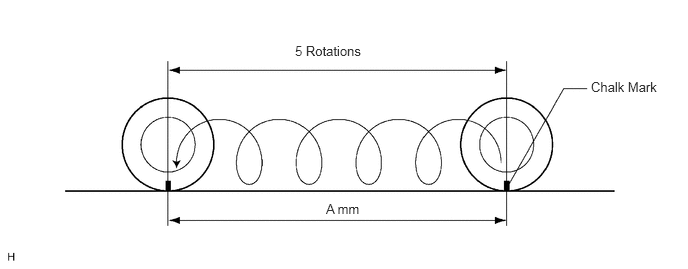
On a level surface, center the steering wheel and stop the vehicle.
Apply chalk to a point on the tire and on the ground.
Drive the vehicle straight ahead, and stop the vehicle after the tire rotates 5 times.
Mark the vehicle stop position on the ground, and measure the movement distance A mm (ft.). Check that the measured distance is within the standard range.
- Standard:
9646 to 10142 mm (31.65 to 33.27 ft.)
OK
NG
Parallel parking
Move the vehicle to a level area with parking spaces.
Using the intelligent parking assist system, perform parallel parking. Check how the vehicle deviates from the set parking position.
- HINT:
-
Begin the check with the vehicle at a 45° angle to the parking space. Perform the check from the right and left side of the parking space.
Select the case below that is most similar to the problem, and follow the instructions.
Deviation examples
Case 1
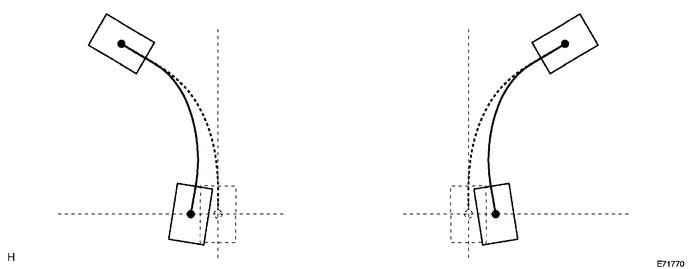
| Case | Type of Deviation | Cause | Proceed to |
|---|---|---|---|
| 1 | Vehicle deviates toward inner side (steering wheel is turned too much) | ·
Actual turning radius is small ·
Television camera adjustment value deviated |
A |
Case 2
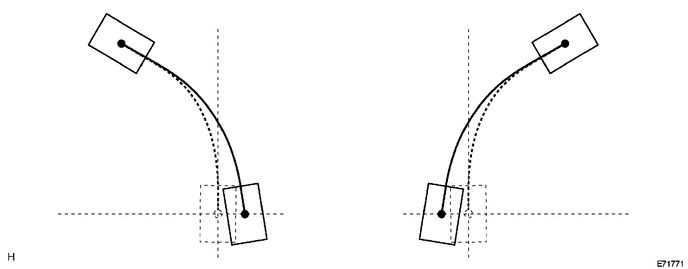
| Case | Type of Deviation | Cause | Proceed to |
|---|---|---|---|
| 2 | Vehicle deviates toward outer side (steering wheel is turned too little) | ·
Actual turning radius is large ·
Television camera adjustment value deviated |
B |
Case 3
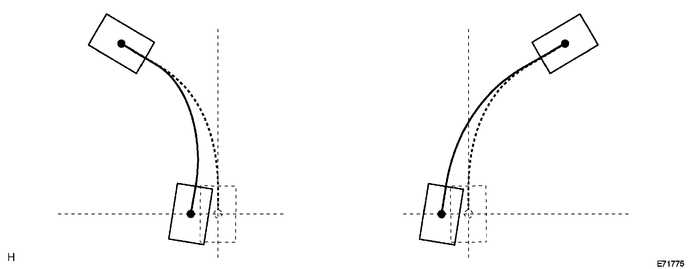
| Case | Type of Deviation | Cause | Proceed to |
|---|---|---|---|
| 3 | Regardless of side in which parking is performed, vehicle front deviates to left | ·
Steering angle memorized value deviated ·
Television camera adjustment value deviated |
C |
Case 4
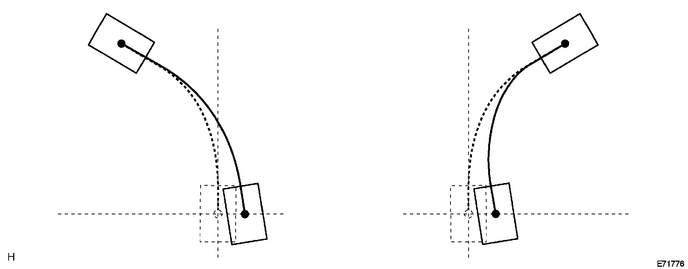
| Case | Type of Deviation | Cause | Proceed to |
|---|---|---|---|
| 4 | Regardless of side in which parking is performed, vehicle front deviates to right | ·
Steering angle memorized value deviated ·
Television camera adjustment value deviated |
C |
Case 5
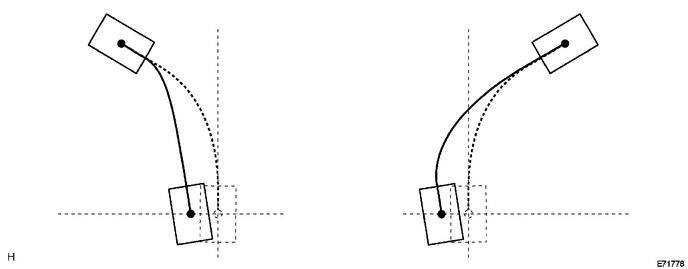
| Case | Type of Deviation | Cause | Proceed to |
|---|---|---|---|
| 5 | Regardless of side in which parking is performed, entire vehicle deviates to left | ·
Steering angle memorized value deviated ·
Television camera adjustment value deviated |
C |
Case 6
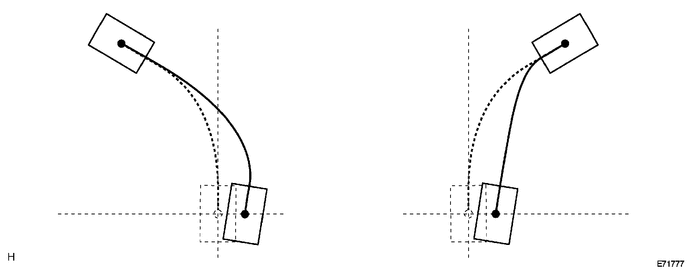
| Case | Type of Deviation | Cause | Proceed to |
|---|---|---|---|
| 6 | Regardless of side in which parking is performed, entire vehicle deviates to right | ·
Steering angle memorized value deviated ·
Television camera adjustment value deviated |
C |
A
B
C
Perform the height control sensor vehicle height difference setting (See page Audio / Visual / Telematics>PARK ASSIST / MONITORING>INTELLIGENT PARKING ASSIST SYSTEM>CALIBRATION).
Perform the rear television camera optical axis adjustment (See page Audio / Visual / Telematics>PARK ASSIST / MONITORING>INTELLIGENT PARKING ASSIST SYSTEM>CALIBRATION).
Check deviation
Operate the intelligent parking assist system and check if the malfunction reoccurs.
- OK:
Returns to normal
OK
NG
Perform the front wheel alignment inspection (See page Suspension>ALIGNMENT / HANDLING DIAGNOSIS>FRONT WHEEL ALIGNMENT>ADJUSTMENT).
- HINT:
-
For alignment inspection, follow the toe-in and camber specifications.
- OK:
Alignment is within specifications
- HINT:
-
For alignment adjustment, follow the toe-in and camber specifications.
OK
NG
Perform the rear wheel alignment inspection (See page Suspension>ALIGNMENT / HANDLING DIAGNOSIS>REAR WHEEL ALIGNMENT>INSPECTION).
- HINT:
-
For alignment inspection, follow the toe-in and camber specifications.
- OK:
Alignment is within specifications
- HINT:
-
For alignment adjustment, follow the toe-in and camber specifications.
OK
NG
Perform the front wheel alignment inspection (See page Suspension>ALIGNMENT / HANDLING DIAGNOSIS>FRONT WHEEL ALIGNMENT>ADJUSTMENT).
- HINT:
-
For alignment inspection, follow the toe-in and camber specifications.
- OK:
Alignment is within specifications
- HINT:
-
For alignment adjustment, follow the toe-in and camber specifications.
OK
NG
Perform the rear wheel alignment inspection (See page Suspension>ALIGNMENT / HANDLING DIAGNOSIS>REAR WHEEL ALIGNMENT>INSPECTION).
- HINT:
-
For alignment inspection, follow the toe-in and camber specifications.
- OK:
Alignment is within specifications
- HINT:
-
For alignment adjustment, follow the toe-in and camber specifications.
OK
NG
Perform the height control sensor vehicle height difference setting (See page Audio / Visual / Telematics>PARK ASSIST / MONITORING>INTELLIGENT PARKING ASSIST SYSTEM>CALIBRATION).
Perform the rear television camera optical axis adjustment (See page Audio / Visual / Telematics>PARK ASSIST / MONITORING>INTELLIGENT PARKING ASSIST SYSTEM>CALIBRATION).
Check deviation
Operate the intelligent parking assist system and check if the malfunction reoccurs.
- OK:
Returns to normal
OK
NG
Perform the steering angle setting (See page Audio / Visual / Telematics>PARK ASSIST / MONITORING>INTELLIGENT PARKING ASSIST SYSTEM>DIAGNOSIS SYSTEM).
Check deviation
Operate the intelligent parking assist system and check if the malfunction reoccurs.
- OK:
Returns to normal
OK
NG
Perform the height control sensor vehicle height difference setting (See page Audio / Visual / Telematics>PARK ASSIST / MONITORING>INTELLIGENT PARKING ASSIST SYSTEM>CALIBRATION).
Perform the rear television camera optical axis adjustment (See page Audio / Visual / Telematics>PARK ASSIST / MONITORING>INTELLIGENT PARKING ASSIST SYSTEM>CALIBRATION).
Check deviation
Operate the intelligent parking assist system and check if the malfunction reoccurs.
- OK:
Returns to normal
OK
NG
Perform the front wheel alignment inspection (See page Suspension>ALIGNMENT / HANDLING DIAGNOSIS>FRONT WHEEL ALIGNMENT>ADJUSTMENT).
- HINT:
-
For alignment inspection, follow the toe-in and camber specifications.
- OK:
Alignment is within specifications
- HINT:
-
For alignment adjustment, follow the toe-in and camber specifications.
OK
NG
Perform the rear wheel alignment inspection (See page Suspension>ALIGNMENT / HANDLING DIAGNOSIS>REAR WHEEL ALIGNMENT>INSPECTION).
- HINT:
-
For alignment inspection, follow the toe-in and camber specifications.
- OK:
Alignment is within specifications
- HINT:
-
For alignment adjustment, follow the toe-in and camber specifications.
OK
NG