METER / GAUGE / DISPLAY METER / GAUGE SYSTEM Fuel Receiver Gauge Malfunction
DESCRIPTION
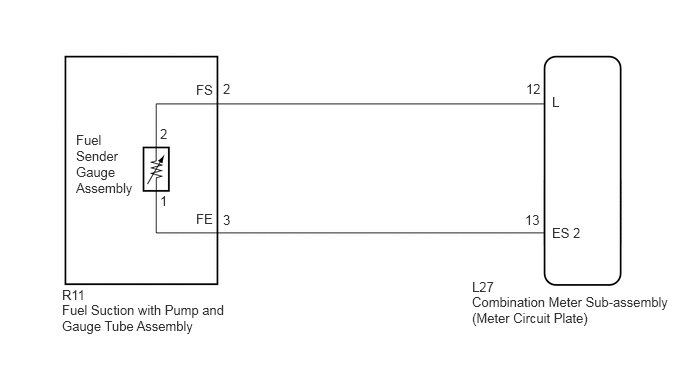
The combination meter sub-assembly uses the fuel sender gauge assembly to determine the level of the fuel in the fuel tank. The resistance of the fuel sender gauge will vary between approximately 15 Ω with the float at the full position, and 410 Ω with the float at the empty position. The meter outputs auxiliary battery voltage through two resistors that are mounted inside the combination meter sub-assembly. The combination meter sub-assembly measures the voltage between the variable resistor in the fuel sender gauge and the two resistors mounted in the meter. Voltage measured at this point will vary as the float of the fuel sender gauge is moved. The highest voltage observed should be approximately half of the auxiliary battery voltage.
- HINT:
-
The fuel level warning light will come on when the fuel level is below 6.0 liters (6.3 US qts, 5.2 Imp.qts).
WIRING DIAGRAM
PROCEDURE
Connect the GTS to the DLC3.
Turn the power switch on (IG).
Turn the GTS on.
Enter following menus: Body Electrical / Combination Meter / Active Test.
Check the operation by referring to the table below.
| Tester Display | Test Part | Control Range | Diagnostic Note |
|---|---|---|---|
| Fuel Meter Operation | Fuel receiver gauge | Empty, 1/4, 1/2, 3/4, Full | - |
- OK:
Fuel receiver gauge indication is normal.
OK
NG
Connect the GTS to the DLC3.
Turn the power switch on (IG).
Turn the GTS on.
Enter following menus: Body Electrical / Combination Meter / Data List.
Check the values by referring to the table below.
| Tester Display | Measurement Item/Range | Normal Condition | Diagnostic Note |
|---|---|---|---|
| Fuel Input | Fuel input/Min.: 0, Max.: 127.5 | 10th segment comes on:
39.8 to 45.0 |
Unit: Liter |
| 9th segment comes on:
36.2 to 39.8 |
|||
| 8th segment comes on:
32.6 to 36.2 |
|||
| 7th segment comes on:
28.6 to 32.6 |
|||
| 6th segment comes on:
24.4 to 28.6 |
|||
| 5th segment comes on:
20.1 to 24.4 |
|||
| 4th segment comes on:
16.0 to 20.1 |
|||
| 3rd segment comes on:
12.5 to 16.0 |
|||
| 2nd segment comes on:
8.6 to 12.5 |
|||
| 1st segment comes on:
4.8 to 8.6 |
- Result:
Result Proceed to Fuel level displayed on the GTS is almost the same as fuel receiver gauge indication. A Fuel level displayed on the GTS differs from the fuel receiver gauge indication. B
A
B
Disconnect the L27 combination meter sub-assembly connector.
Disconnect the R11 fuel suction with pump and gauge tube assembly connector.
Measure the resistance according to the value(s) in the table below.
- Standard Resistance:
Tester Connection Condition Specified Condition L27-12 (L) - R11-2 (FS) Always Below 1 Ω L27-13 (ES 2) - R11-3 (FE) Always Below 1 Ω L27-12 (L) - Body ground Always 10 kΩ or higher L27-13 (ES 2) - Body ground Always 10 kΩ or higher
OK
NG
Remove the fuel sender gauge assembly (See page Engine / Hybrid System>2ZR-FXE (FUEL)>FUEL SENDER GAUGE ASSEMBLY>REMOVAL).
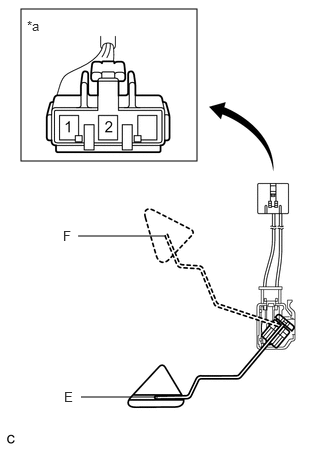
Check that the float moves smoothly between F and E.
Check if the fuel sender gauge arm is deformed.
Measure the resistance according to the value(s) in the table below.
- Standard Resistance:
Tester Connection Condition Specified Condition 1 - 2 Float level is F (upper) 12 to 18 Ω 1 - 2 Float level is between F (upper) and E (lower) 12 to 415 Ω (Gradually changes) 1 - 2 Float level is E (lower) 405 to 415 Ω
| *a | Front view of wire harness connector
(to Fuel Sender Gauge Assembly) |
OK
NG