METER / GAUGE / DISPLAY HEADUP DISPLAY SWITCH REMOVAL
PROCEDURE

 1. PRECAUTION
- NOTICE:
-
After turning the power switch off, waiting time may be required before disconnecting the cable from the auxiliary battery negative (-) terminal. Therefore, make sure to read the disconnecting the cable from the auxiliary battery negative (-) terminal notices before proceeding with work (See page General>INTRODUCTION>REPAIR INSTRUCTION>PRECAUTION).
58410B
2.REMOVE DECK BOARD ASSEMBLY
58411A
3.REMOVE NO. 1 DECK BOARD
58412A
4.REMOVE NO. 2 DECK BOARD
64993
5.REMOVE REAR DECK FLOOR BOX
64995
6.REMOVE DECK FLOOR BOX RH
7.DISCONNECT CABLE FROM NEGATIVE AUXILIARY BATTERY TERMINAL
- NOTICE:
-
When disconnecting the cable, some systems need to be initialized after the cable is reconnected (See page General>INTRODUCTION>REPAIR INSTRUCTION>INITIALIZATION).
8.REMOVE INTEGRATION CONTROL AND PANEL
55431B
9.REMOVE UPPER INSTRUMENT PANEL FINISH PANEL
55480D
10.REMOVE LOWER INSTRUMENT PANEL FINISH PANEL ASSEMBLY
55044B
11.REMOVE UPPER INSTRUMENT PANEL FINISH PANEL SUB-ASSEMBLY
12.REMOVE NO. 1 INSTRUMENT PANEL REGISTER ASSEMBLY
84120
13.REMOVE HEADUP DISPLAY SWITCH ASSEMBLY
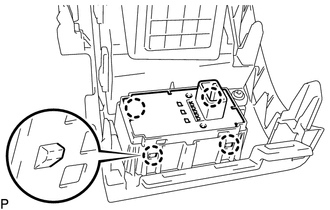
Disengage the 4 claws and remove the headup display switch assembly.