Home › Vehicle Exterior › MIRROR (EXT) › POWER MIRROR CONTROL SYSTEM › 2013.08–2014.11
RM2070E _59 Vehicle Exterior _061951 MIRROR (EXT) _0301886 POWER MIRROR CONTROL SYSTEM J

MIRROR (EXT)  POWER MIRROR CONTROL SYSTEM  Mirror Heater does not Operate with Rear Defogger Switch  


DESCRIPTION

When the mirror heater switch (rear window defogger switch) on the air conditioning control assembly (center cluster module circuit) is pressed, the operation signal is transmitted to the air conditioning amplifier assembly through a LIN communication line. When the air conditioning amplifier assembly receives the signal, it turns on the No. 1 integration relay to operate the mirror heater.

WIRING DIAGRAM
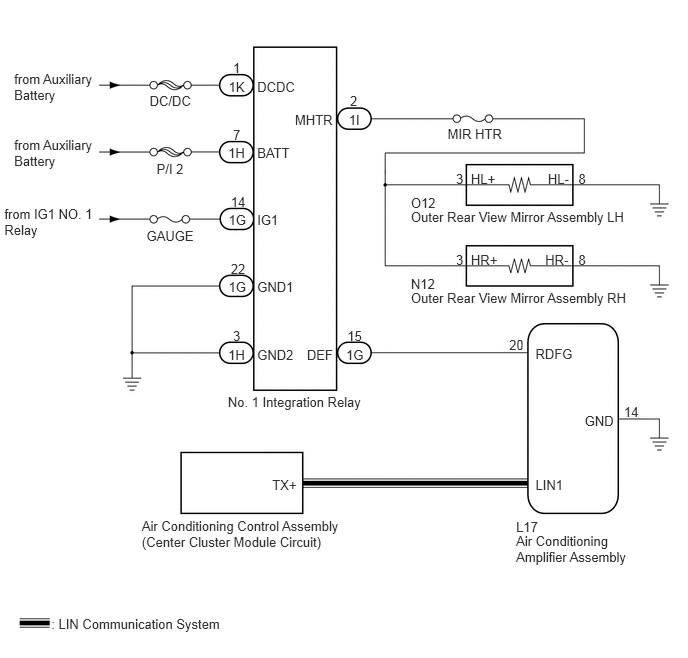
B285674E02
5.376,5.553 6.576,5.857 1.200,0.304 10 Air Conditioning Amplifier Assembly 2.373,4.107 3.812,4.245 1.438,0.137 10 No. 1 Integration Relay 4.28,2.176 6.617,2.318 2.336,0.142 10 Outer Rear View Mirror Assembly LH 4.28,3.024 6.624,3.166 2.343,0.142 10 Outer Rear View Mirror Assembly RH 1.558,0.972 2.016,1.109 0.458,0.137 10 DC/DC 2.679,0.822 3.098,0.959 0.419,0.137 10 DCDC 3.072,1.168 3.491,1.305 0.419,0.137 10 MHTR 4.662,1.311 5.259,1.449 0.597,0.137 10 MIR HTR 3.197,3.61 3.492,3.747 0.295,0.137 10 DEF 2.381,0.822 2.571,0.959 0.190,0.137 10 1K 2.427,0.624 2.522,0.761 0.095,0.137 10 1 3.633,1.168 3.813,1.305 0.180,0.137 10 1I 3.646,0.974 3.741,1.112 0.095,0.137 10 2 4.75,1.78 4.844,1.917 0.095,0.137 10 3 4.905,1.78 5.227,1.917 0.322,0.137 10 HL+ 5.707,1.78 5.953,1.917 0.246,0.137 10 HL- 4.905,2.624 5.227,2.761 0.322,0.137 10 HR+ 5.679,2.624 5.953,2.761 0.274,0.137 10 HR- 6.025,1.78 6.119,1.917 0.095,0.137 10 8 4.75,2.624 4.844,2.761 0.095,0.137 10 3 6.025,2.624 6.119,2.761 0.095,0.137 10 8 2.679,1.515 3.053,1.652 0.374,0.137 10 BATT 2.377,1.515 2.571,1.652 0.195,0.137 10 1H 2.427,1.325 2.522,1.462 0.095,0.137 10 7 2.679,3.61 3.083,3.747 0.403,0.137 10 GND2 2.835,4.968 3.112,5.105 0.277,0.137 10 TX+ 5.578,4.968 5.895,5.105 0.317,0.137 10 LIN1 5.578,3.609 5.994,3.746 0.416,0.137 10 RDFG 6.09,4.302 6.416,4.439 0.326,0.137 10 GND 2.377,3.61 2.571,3.747 0.195,0.137 10 1H 2.427,3.42 2.522,3.558 0.095,0.137 10 3 3.605,3.61 3.808,3.747 0.203,0.137 10 1G 4.28,2.036 4.576,2.174 0.296,0.137 10 O12 4.28,2.877 4.559,3.014 0.279,0.137 10 N12 3.618,3.42 3.790,3.558 0.172,0.137 10 15 5.304,3.514 5.476,3.651 0.172,0.137 10 20 6.499,4.205 6.671,4.342 0.172,0.137 10 14 2.679,2.213 2.921,2.350 0.242,0.137 10 IG1 2.381,2.213 2.585,2.350 0.203,0.137 10 1G 2.404,2.022 2.576,2.159 0.172,0.137 10 14 2.679,2.91 3.085,3.047 0.405,0.137 10 GND1 2.381,2.91 2.585,3.047 0.203,0.137 10 1G 2.404,2.719 2.576,2.856 0.172,0.137 10 22 1.631,1.679 1.936,1.816 0.305,0.137 10 P/I 2 1.526,2.373 2.050,2.510 0.525,0.137 10 GAUGE 0.147,0.735 1.007,1.039 0.860,0.304 10 from Auxiliary Battery 0.147,1.426 1.007,1.730 0.860,0.304 10 from Auxiliary Battery 0.045,2.148 1.006,2.452 0.960,0.304 10 from IG1 NO. 1 Relay 5.376,5.408 5.627,5.547 0.250,0.139 10 L17 1.477,5.399 3.605,5.707 2.128,0.309 10 Air Conditioning Control Assembly (Center Cluster Module Circuit) 0.534,6.416 2.350,6.553 1.816,0.137 10 : LIN Communication System

CAUTION / NOTICE / HINT

NOTICE:
·

Inspect the fuses for circuits related to this system before performing the following inspection procedure.

·

If the auxiliary battery voltage becomes low, mirror heater operation is canceled to prioritize supplying power to the power steering system.


PROCEDURE

1.CHECK WINDOW DEFOGGER SYSTEM
a.

Check the rear window defogger operation.

OK:

The rear window defogger operates normally.


OK

2.PERFORM ACTIVE TEST USING GTS

NG

2.PERFORM ACTIVE TEST USING GTS
a.

Connect the GTS to the DLC3.


b.

Turn the power switch on (IG).


c.

Turn the GTS on.


d.

Enter the following menus: Body Electrical /Air Conditioner / Active Test.


e.

Perform an Active Test according to the display on the GTS.

Air Conditioner (Air Conditioning Amplifier Assembly)
Tester Display Test Part Control Range Diagnostic Note
Defogger Relay (Rear) Mirror heater OFF/ON Operate with power switch on (IG)

Result:
Result Proceed to
Mirror heater operation on both mirrors is normal A
Mirror heater operation on both mirrors is not normal B
Mirror heater operation on RH mirror is not normal C
Mirror heater operation on LH mirror is not normal D


A

B

3.CHECK HARNESS AND CONNECTOR (NO. 1 INTEGRATION RELAY - OUTER REAR VIEW MIRROR ASSEMBLY LH)

C

4.CHECK HARNESS AND CONNECTOR (NO. 1 INTEGRATION RELAY - OUTER REAR VIEW MIRROR RH - BODY GROUND)

D

5.CHECK HARNESS AND CONNECTOR (NO. 1 INTEGRATION RELAY - OUTER REAR VIEW MIRROR LH - BODY GROUND)
3.CHECK HARNESS AND CONNECTOR (NO. 1 INTEGRATION RELAY - OUTER REAR VIEW MIRROR ASSEMBLY LH)
a.

Remove the No. 1 integration relay (See page Power Source / Network>POWER DISTRIBUTION>INTEGRATION RELAY>REMOVAL).


b.

Disconnect the O12 outer rear view mirror assembly LH connector.


c.

Disconnect the N12 outer rear view mirror assembly RH connector.


d.

Measure the resistance according to the value(s) in the table below

Standard Resistance:
Tester Connection Condition Specified Condition
1I-2 (MHTR) - O12-3 (HL+) Always Below 1 Ω
1I-2 (MHTR) - Body ground Always 10 kΩ or higher


OK

NG

REPAIR OR REPLACE HARNESS OR CONNECTOR

4.CHECK HARNESS AND CONNECTOR (NO. 1 INTEGRATION RELAY - OUTER REAR VIEW MIRROR RH - BODY GROUND)
a.

Remove the No. 1 integration relay (See page Power Source / Network>POWER DISTRIBUTION>INTEGRATION RELAY>REMOVAL).


b.

Disconnect the O12 outer rear view mirror assembly LH connector.


c.

Disconnect the N12 outer rear view mirror assembly RH connector.


d.

Measure the resistance according to the value(s) in the table below

Standard Resistance:
Tester Connection Condition Specified Condition
1I-2 (MHTR) - N12-3 (HR+) Always Below 1 Ω
1I-2 (MHTR) - Body ground Always 10 kΩ or higher
N12-8 (HR-) - Body ground Always Below 1 Ω


OK

REPLACE OUTER REAR VIEW MIRROR ASSEMBLY RH

NG

REPAIR OR REPLACE HARNESS OR CONNECTOR

5.CHECK HARNESS AND CONNECTOR (NO. 1 INTEGRATION RELAY - OUTER REAR VIEW MIRROR LH - BODY GROUND)
a.

Remove the No. 1 integration relay (See page Power Source / Network>POWER DISTRIBUTION>INTEGRATION RELAY>REMOVAL).


b.

Disconnect the O12 outer rear view mirror assembly LH connector.


c.

Disconnect the N12 outer rear view mirror assembly RH connector.


d.

Measure the resistance according to the value(s) in the table below

Standard Resistance:
Tester Connection Condition Specified Condition
1I-2 (MHTR) - O12-3 (HL+) Always Below 1 Ω
1I-2 (MHTR) - Body ground Always 10 kΩ or higher
O12-8 (HL-) - Body ground Always Below 1 Ω


OK

REPLACE OUTER REAR VIEW MIRROR ASSEMBLY LH

NG

REPAIR OR REPLACE HARNESS OR CONNECTOR