LIGHTING (EXT) HEADLIGHT ASSEMBLY REASSEMBLY
PROCEDURE

 81112B
1.INSTALL COVER RING (for LED Headlight)
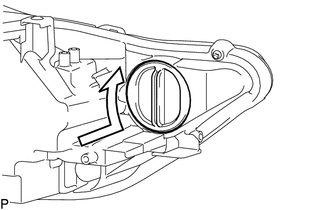
Turn the cover ring as shown in the illustration to install it.
52126E
2.INSTALL FRONT BUMPER REINFORCEMENT EXTENSION
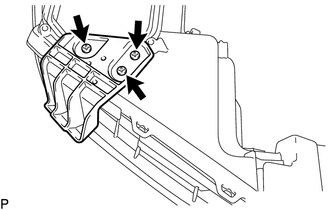
Install the front bumper reinforcement extension with the 3 screws.
85669
3.INSTALL HEADLIGHT LEVELING MOTOR BASE PACKING
Install a new headlight leveling motor base packing.
85662
4.INSTALL HEADLIGHT LEVELING MOTOR
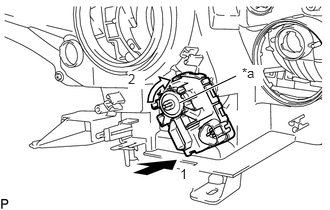
Insert the headlight leveling motor in the direction indicated by the arrow (1) shown in the illustration.
| *a | Aiming Screw |
Turn the aiming screw of the headlight leveling motor in the direction indicated by the arrow (2) shown in the illustration to engage the shaft.
- HINT:
-
Turn the aiming screw the same number of times as it was turned during removal.
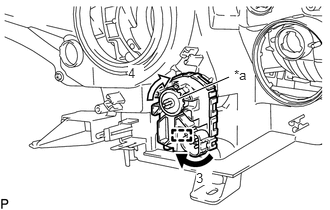
Turn the headlight leveling motor in the direction indicated by the arrow (3) shown in the illustration and engage the pin to install the headlight leveling motor to the headlight assembly.
| *a | Aiming Screw |
- HINT:
-
When installing the headlight leveling motor of the headlight assembly RH, turn the headlight leveling motor in the opposite direction of the arrow (3) shown in the illustration.
Turn the aiming screw of the headlight leveling motor in the direction indicated by the arrow (4) shown in the illustration.
- HINT:
-
Turn the aiming screw the same number of times as it was turned during removal.
for LED Headlight:
Connect the connector.
81125
5.INSTALL HEADLIGHT CORD (for Halogen Headlight)
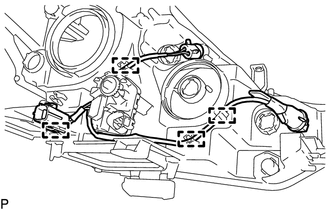
Engage each clamp to install the headlight cord.
81125
6.INSTALL HEADLIGHT CORD (for LED Headlight)
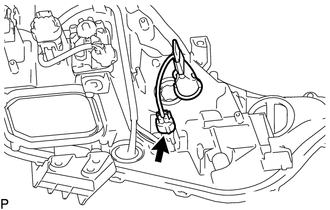
Connect the connector to install the headlight cord.
81510C
7.INSTALL FRONT TURN SIGNAL LIGHT BULB
Install the front turn signal light bulb to the headlight cord.
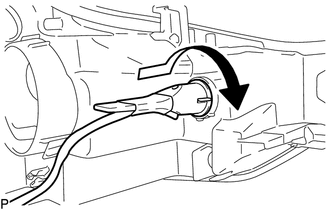
Turn the headlight cord with the front turn signal light bulb as shown in the illustration to connect them as a unit.
81610F
8.INSTALL CLEARANCE LIGHT BULB (for Halogen Headlight)
Install the clearance light bulb to the headlight cord.
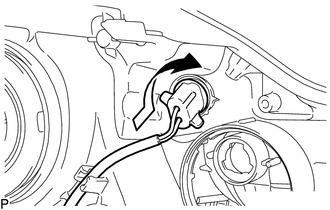
Turn the headlight cord with the clearance light bulb as shown in the illustration to connect them as a unit.
81179
9.INSTALL HEADLIGHT SOCKET COVER (for Halogen Headlight)
Install the headlight socket cover.
81110B
10.INSTALL NO. 1 HEADLIGHT BULB (for Halogen Headlight)
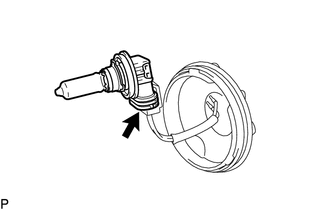
Connect the connector to install the No. 1 headlight bulb to the headlight back cover.
- NOTICE:
-
Do not touch the bulb glass.
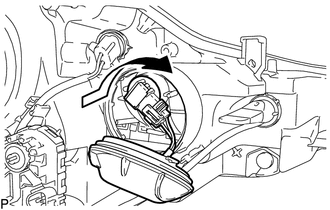
Turn the No. 1 headlight bulb as shown in the illustration to install it with the headlight back cover.
- NOTICE:
-
Do not touch the bulb glass.
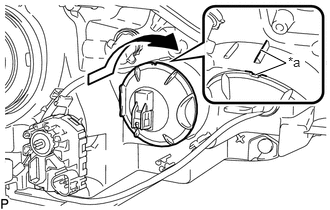
Turn the headlight back cover until the lock marks are aligned to install it.
| *a | Lock Mark |
81110D
11.INSTALL NO. 2 HEADLIGHT BULB (for Halogen Headlight)
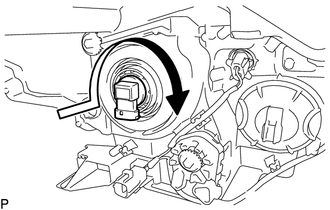
Turn the No. 2 headlight bulb as shown in the illustration to install it.
- NOTICE:
-
Do not touch the bulb glass.