EXTERIOR PANELS / TRIM NAME PLATE INSTALLATION
CAUTION / NOTICE / HINT
- HINT:
-
When installing new name plates or emblems, heat the vehicle body and name plates using a heat light.
| Item | Temperature |
|---|---|
| Vehicle Body | 40 to 60°C (104 to 140°F) |
| Name Plate or Emblem | 20 to 30°C (68 to 86°F) |
- NOTICE:
-
Do not heat the vehicle body, name plates or emblems excessively.
PROCEDURE

 75431A
1.INSTALL NO. 1 BACK DOOR EMBLEM
Engage the pin and 3 claws to install the No. 1 back door emblem.
Install the back door outside garnish sub-assembly (See page Vehicle Exterior>EXTERIOR PANELS / TRIM>BACK DOOR OUTSIDE GARNISH>INSTALLATION).
75442A
2.INSTALL NO. 2 BACK DOOR NAME PLATE
Clean the vehicle body surface.
Using a heat light, heat the vehicle body surface.
Remove any double-sided tape from the vehicle body.
Wipe off any tape adhesive residue with cleaner.
Clean the No. 2 back door name plate (if reusing the No. 2 back door name plate).
Using a heat light, heat the No. 2 back door name plate.
Remove the double-sided tape from the No. 2 back door name plate.
Wipe off any tape adhesive residue with cleaner.
Apply new double-sided tape to the No. 2 back door name plate.
Install the No. 2 back door name plate.
Using a heat light, heat the vehicle body and the No. 2 back door name plate.
Remove the release paper from the No. 2 back door name plate.
- HINT:
-
After removing the release paper, keep the exposed adhesive free from foreign matter.
Install the No. 2 back door name plate as shown in the illustration.
Type A:
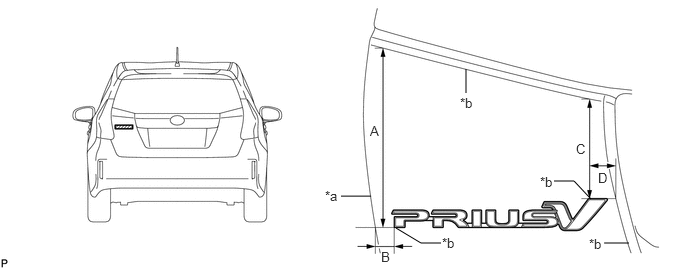
| *a | Profile of Back Door Panel | *b | Edge of Curved Surface |
- Reference Measurement:
Area Measurement A 168.7 mm (6.64 in.) B 17.2 mm (0.677 in.) C 95.1 mm (3.74 in.) D 23.0 mm (0.906 in.)
Type B:
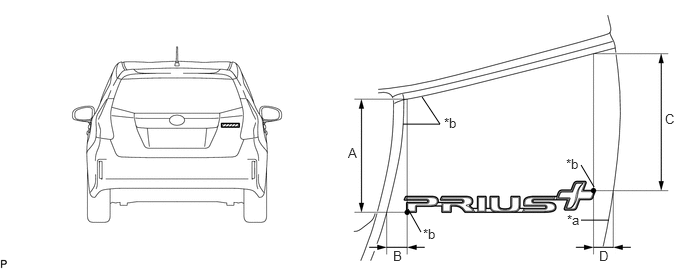
| *a | Profile of Back Door Panel | *b | Edge of Curved Surface |
- Reference Measurement:
Area Measurement A 119.9 mm (4.72 in.) B 20.5 mm (0.807 in.) C 145.6 mm (5.73 in.) D 18.5 mm (0.728 in.)
75441E
3.INSTALL NO. 1 BACK DOOR NAME PLATE
Clean the vehicle body surface.
Using a heat light, heat the vehicle body surface.
Remove any double-sided tape from the vehicle body.
Wipe off any tape adhesive residue with cleaner.
Clean the No. 1 back door name plate (if reusing the No. 1 back door name plate).
Using a heat light, heat the No. 1 back door name plate.
Remove the double-sided tape from the No. 1 back door name plate.
Wipe off any tape adhesive residue with cleaner.
Apply new double-sided tape to the No. 1 back door name plate.
Install the No. 1 back door name plate.
Using a heat light, heat the vehicle body and the No. 1 back door name plate.
Remove the release paper from the No. 1 back door name plate.
- HINT:
-
After removing the release paper, keep the exposed adhesive free from foreign matter.
Install the No. 1 back door name plate as shown in the illustration.
for Hybrid Plate (Type A):
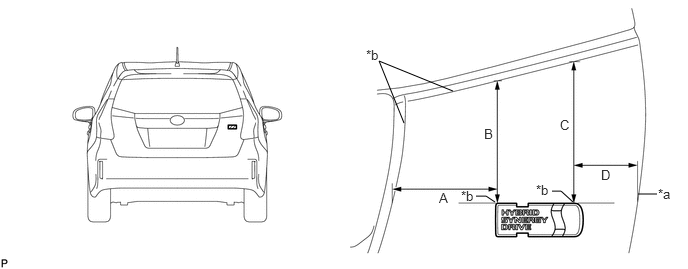
| *a | Profile of Back Door Panel | *b | Edge of Curved Surface |
- Reference Measurement:
Area Measurement A 96.2 mm (3.79 in.) B 114.5 mm (4.51 in.) C 132.2 mm (5.20 in.) D 58.7 mm (2.31 in.)
for TOYOTA Plate (Type B):
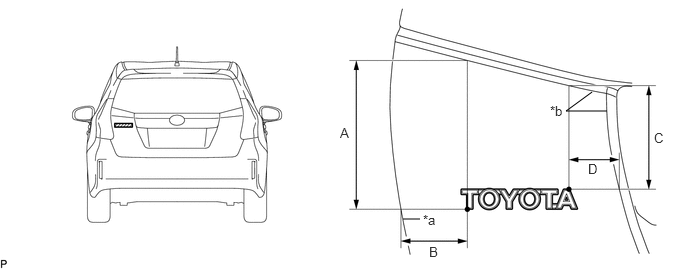
| *a | Profile of Back Door Panel | *b | Edge of Curved Surface |
- Reference Measurement:
Area Measurement A 154.8 mm (6.09 in.) B 68.0 mm (2.68 in.) C 107.2 mm (4.22 in.) D 51.3 mm (2.02 in.)
for Hybrid Plate (Type B):
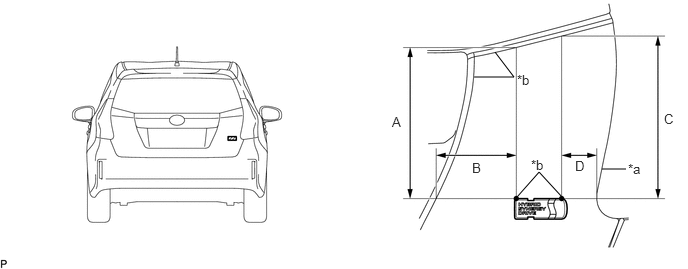
| *a | Profile of Back Door Panel | *b | Edge of Curved Surface |
- Reference Measurement:
Area Measurement A 242.4 mm (9.54 in.) B 125.9 mm (4.96 in.) C 259.9 mm (10.2 in.) D 55.4 mm (2.18 in.)
75374
4.INSTALL SIDE PANEL EMBLEM (for LH Side)
Clean the vehicle body surface.
Using a heat light, heat the vehicle body surface.
Remove any double-sided tape from the vehicle body.
Wipe off any tape adhesive residue with cleaner.
Install the side panel emblem.
Using a heat light, heat the vehicle body and a new side panel emblem.
Remove the release paper from the side panel emblem.
- HINT:
-
After removing the release paper, keep the exposed adhesive free from foreign matter.
w/ Location Pin:
Engage the 2 pins to install the side panel emblem as shown in the illustration.
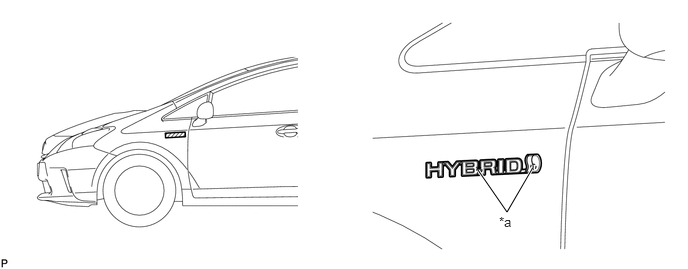
| *a | Location Pin | - | - |
w/o Location Pin:
Install the side panel emblem as shown in the illustration.
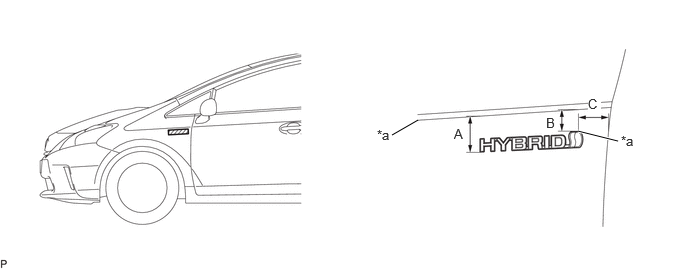
| *a | R End | - | - |
- Standard Measurement:
Area Measurement Area Measurement A 53.6 mm (2.11 in.) B 31.5 mm (1.24 in.) C 44.4 mm (1.75 in.) - -
- NOTICE:
-
Press the side panel emblem firmly to install it.
75374
5.INSTALL SIDE PANEL EMBLEM (for RH Side)
Clean the side panel surface.
Using a heat light, heat the side panel surface.
Remove any remaining double-sided tape from the side panel.
Wipe off any tape adhesive residue with cleaner.
Install the side panel emblem.
Using a heat light, heat the vehicle body and a new side panel emblem.
Remove the release paper from the side panel emblem.
- HINT:
-
After removing the release paper, keep the exposed adhesive free from foreign matter.
w/ Location Pin:
Engage the 2 pins to install the side panel emblem as shown in the illustration.
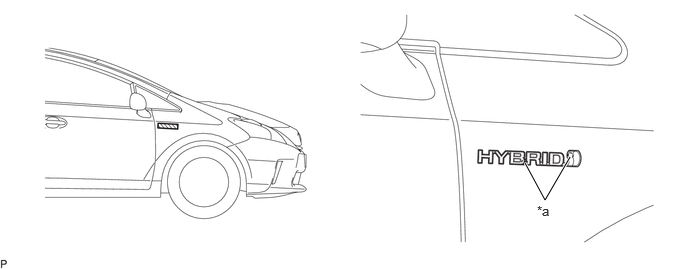
| *a | Location Pin | - | - |
w/o Location Pin:
Install the side panel emblem as shown in the illustration.
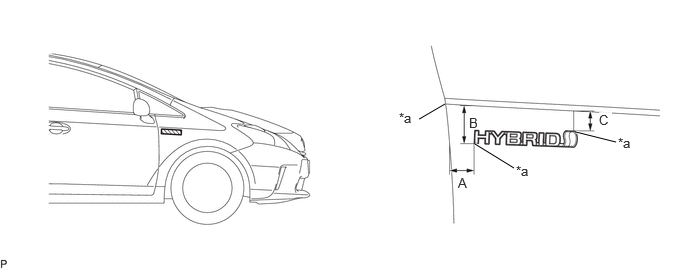
| *a | R End | - | - |
- Standard Measurement:
Area Measurement Area Measurement A 36.2 mm (1.43 in.) B 55.8 mm (2.10 in.) C 29.7 mm (1.17 in.) - -
- NOTICE:
-
Press the side panel emblem firmly to install it.