Home › Drivetrain › P510 HYBRID TRANSMISSION / TRANSAXLE › SHIFT LEVER POSITION SENSOR

SHIFT LEVER POSITION SENSOR > INSTALLATION

for Preparation Click here


1. INSTALL SHIFT LEVER POSITION SENSOR


    C251615E01
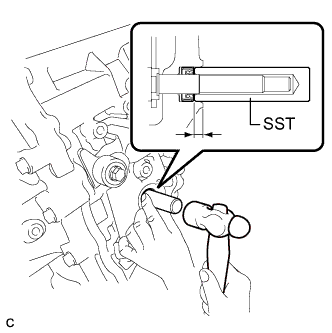
  1. Using SST and a hammer, tap in a new shift lever position sensor seal.

    SST
    09350-30020   (09350-07110)

    Oil seal installation depth:
    5.5 to 6.4 mm (0.217 to 0.252 in.)

    NOTICE:
    1. It is not always necessary to replace or remove/install the shift lever position sensor seal at the same time when replacing the shift lever position sensor.
    2. When removing the shift lever position sensor seal, be sure not to damage the case or manual shaft with the screwdriver.

    HINT:
    Remove/install the shift lever position sensor seal only if oil leaks from the shift lever position sensor seal or other faults are found when the shift lever position sensor is removed.
  1. Install the shift lever position sensor to the manual valve shaft.

    NOTICE:
    1. Do not reuse the shift lever position sensor if it has been dropped or subjected to a severe impact.
    2. Do not allow moisture to adhere to the connector terminal.

  1. Temporarily install the 2 bolts.

  1. Install the lock plate and tighten the nut.

    Torque:
    6.9 N*m{ 70 kgf*cm , 61 in.*lbf }

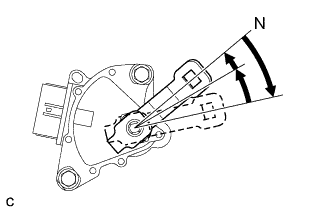
  1. Temporarily install the control shaft lever to the manual valve shaft.


    C250073E01
  1. Turn the lever clockwise until it stops, then turn it counterclockwise 2 notches.

  1. Remove the control shaft lever from the manual valve shaft.


    C256277E01
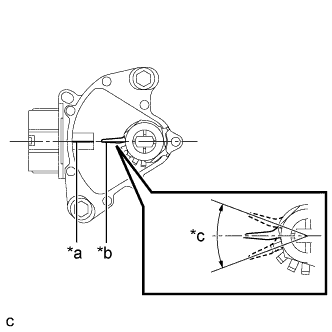
  1. Align the protruding part with the neutral basic line.
    Text in Illustration 
    *a
    Neutral Basic Line
    *b
    Protruding
    *c
    Range of Play

    NOTICE:
    There is play on the nut stopper side (protruding part). Align the center point of the range of the play with the neutral basic line.


    C256278E01
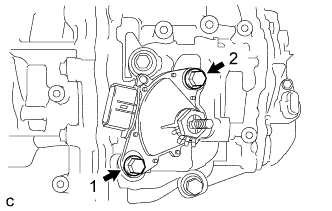
  1. Tighten the 2 bolts in the order shown in the illustration.

    Torque:
    13 N*m{ 133 kgf*cm , 10 ft.*lbf }

  1. Using a screwdriver, secure the nut with the lock plate.

  1. Install the control shaft lever, washer, and nut to the manual valve shaft.

    Torque:
    13 N*m{ 130 kgf*cm , 9 ft.*lbf }

  1. Connect the connector to the shift lever position sensor.


2. CONNECT TRANSMISSION CONTROL CABLE ASSEMBLY
  1. Install the transmission control cable assembly to the No. 1 transmission control cable bracket with a new clip.

  1. Install the transmission control cable assembly to the control shaft lever with the nut.

    Torque:
    12 N*m{ 122 kgf*cm , 9 ft.*lbf }


3. INSPECT SHIFT LEVER POSITION SENSOR POSITION
  1. Apply the parking brake.

  1. Lock the wheels with chocks to secure the vehicle.

  1. Turn the ignition switch on (READY).

  1. Move the shift lever to D and release the brake.

    NOTICE:
    Be sure to apply the parking brake and lock the wheels with chocks to secure the vehicle.


    C250075E01
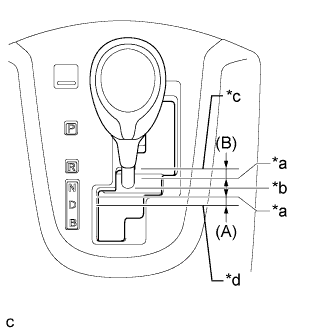
  1. Slowly move the shift lever to N and measure moving distance (A) of the shift lever from the original point to the gear disengagement point.
    Text in Illustration 
    *a
    Gear Disengagement Point
    *b
    N Position
    *c
    R Position
    *d
    D Position

    NOTICE:
    Be sure to move the shift lever slowly.

  1. Move the shift lever to R and release the brake.

    NOTICE:
    Be sure to apply the parking brake and lock the wheels with chocks to secure the vehicle.

  1. Slowly move the shift lever to N and measure moving distance (B) of the shift lever from the original point to the gear disengagement point.

    NOTICE:
    Be sure to move the shift lever slowly.

  1. Check that moving distances (A) and (B) shown in the illustration are almost the same.

    HINT:
    1. If moving distances (A) and (B) are almost the same, adjustment of the shift lever position is not necessary.
    2. If moving distance (A) is shorter than (B), perform adjustment of the shift lever position [*1].
    3. If moving distance (B) is shorter than (A), perform adjustment of the shift lever position [*2].


4. ADJUST SHIFT LEVER POSITION SENSOR POSITION


  1. If moving distance (A) is shorter than (B).[*1]

    1. Move the shift lever to N.


    2. C256278
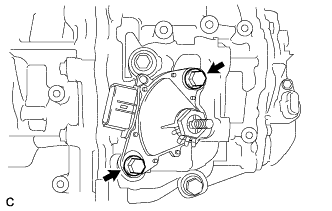
    3. Loosen the 2 bolts.


    4. C256279
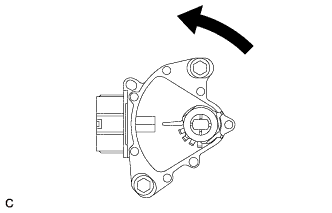
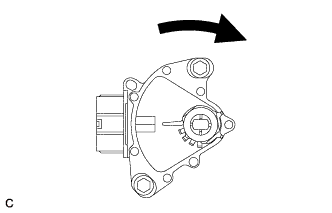
    5. Slightly turn the shift lever position sensor counterclockwise.

      HINT:
      If the shift lever is moved from R to N, the moving distance of the shift lever from the original point to the gear disengagement point becomes longer.


    6. C256278E01
    7. Tighten the 2 bolts in the order shown in the illustration.

      Torque:
      13 N*m{ 133 kgf*cm , 10 ft.*lbf }

    8. Recheck the shift lever position sensor.


  1. If moving distance (B) is shorter than (A) [*2]

    1. Move the shift lever to N.


    2. C256278
    3. Loosen the 2 bolts.


    4. C256280
    5. Slightly turn the shift lever position sensor clockwise.

      HINT:
      If the shift lever is moved from D to N, the moving distance of the shift lever from the original point to the gear disengagement point becomes longer.


    6. C256278E01
    7. Tighten the 2 bolts in the order shown in the illustration.

      Torque:
      13 N*m{ 133 kgf*cm , 10 ft.*lbf }

    8. Recheck the shift lever position sensor.


5. INSPECT SHIFT LEVER POSITION
  1. While moving the shift lever from N to each position, check that the lever moves smoothly and that the shift position indicator comes on properly according to the shift lever position.

  1. Turn the ignition switch to on (READY) and check the following:

    1. When the shift lever is moved to D, the vehicle moves forward.

    2. When the shift lever is moved to R, the vehicle moves in reverse.

      NOTICE:
      The vehicle should not move when the shift position indicator is off.


6. ADJUST SHIFT LEVER POSITION
  1. Apply the parking brake and move the shift lever to N.

  1. Remove the rear console box assembly (Click here).


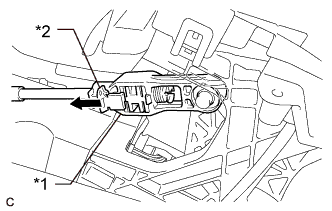
    C258106E01
  1. Slide the adjuster case cover in the direction shown by the arrow.
    Text in Illustration 
    *1
    Adjuster Case
    *2
    Adjuster Case Cover


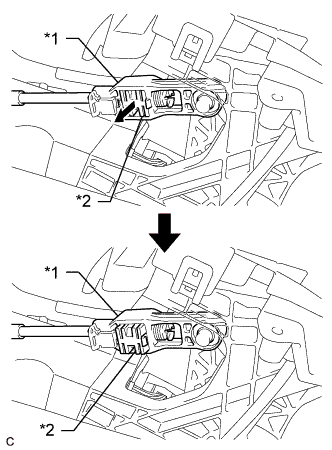
    C258107E01
  1. Using a precision screwdriver, pull out the lock piece of the adjuster case.
    Text in Illustration 
    *1
    Adjuster Case
    *2
    Lock Piece

  1. Using your fingers, gently pull the cable rod towards the rear of the vehicle to remove backlash.


    C258108E01
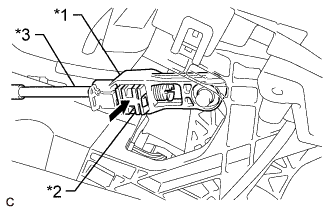
  1. Push in the lock piece of the adjuster case to lock it.
    Text in Illustration 
    *1
    Adjuster Case
    *2
    Lock Piece
    *3
    Cable Rod


    C258109E01
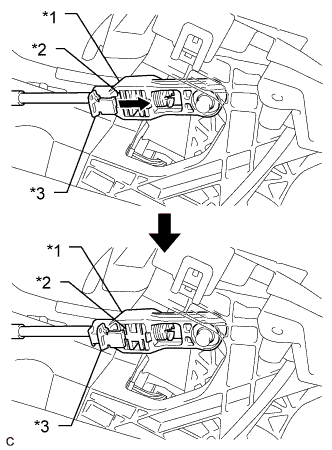
  1. Move the adjuster case cover in the direction shown by the arrow.
    Text in Illustration 
    *1
    Adjuster Case
    *2
    Lock Piece
    *3
    Adjuster Case Cover

    NOTICE:
    If the adjuster case cover is not moved far enough so that the adjuster case cover engages the lock piece, the cable will not be able to lock, and reliable shift operation will not be possible.

  1. Install the rear console box assembly (Click here).


7. INSTALL ENGINE UNDER COVER LH