 |
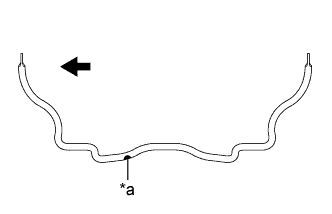
Install the front stabilizer bar to the front suspension crossmember sub-assembly so that the identification mark is positioned on the left side of the vehicle.
| *a | Identification Mark |
 | Left Side of the Vehicle |
FRONT SUSPENSION MEMBER > INSTALLATION |
| 1. INSTALL ENGINE MOVING CONTROL ROD |
Install the engine moving control rod to the front suspension crossmember sub-assembly with the bolt.
| 2. INSTALL ENGINE MOVING CONTROL ROD COVER (for Cold Area Specification Vehicles) |
Install the engine moving control rod cover to the front suspension crossmember sub-assembly with the 2 clips.
| 3. TEMPORARILY TIGHTEN FRONT LOWER NO. 1 SUSPENSION ARM SUB-ASSEMBLY LH |
Temporarily tighten the front lower No. 1 suspension arm sub-assembly LH to the front suspension crossmember sub-assembly with the bolt.
| 4. TEMPORARILY TIGHTEN FRONT LOWER NO. 1 SUSPENSION ARM SUB-ASSEMBLY RH |
| 5. INSTALL FRONT STABILIZER BAR |
|
Install the front stabilizer bar to the front suspension crossmember sub-assembly so that the identification mark is positioned on the left side of the vehicle.
| *a | Identification Mark |
| Left Side of the Vehicle |
| 6. INSTALL FRONT NO. 1 STABILIZER BRACKET LH |
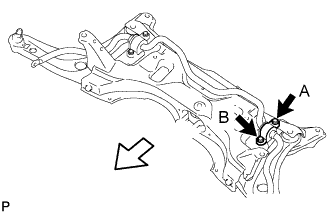 |
Install the front No. 1 stabilizer bracket LH to the front suspension crossmember sub-assembly with the 2 bolts.
 | Front of the Vehicle |
| 7. INSTALL FRONT NO. 1 STABILIZER BRACKET RH |
| 8. INSTALL STEERING LINK ASSEMBLY |
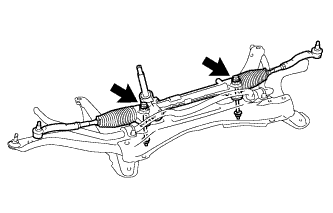 |
Install the steering link assembly to the front suspension crossmember sub-assembly with the 2 bolts and 2 nuts.
| 9. INSTALL FRONT SUSPENSION CROSSMEMBER SUB-ASSEMBLY |
Support the front suspension crossmember sub-assembly with an engine lifter using 4 attachments or equivalent tools.
Temporarily tighten the front suspension crossmember sub-assembly to the body with the 6 bolts.
Tighten the 2 bolts A and 2 bolts C on the left and right sides while alternately inserting SST into the left and right side reference holes in the front suspension crossmember sub-assembly.
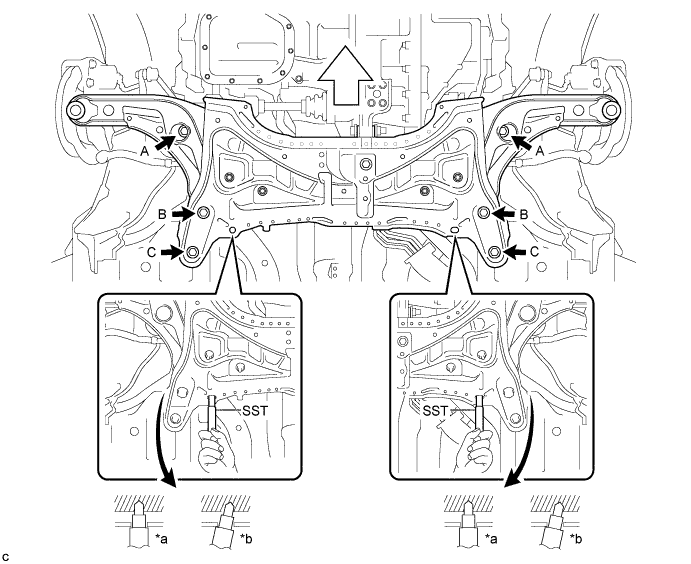
| *a | OK | *b | NG |
| Front of the Vehicle | - | - |
Lower the engine lifter.
Install the engine moving control rod with the bolt.
| 10. CONNECT FRONT LOWER NO. 1 SUSPENSION ARM SUB-ASSEMBLY LH |
Install the front lower No. 1 suspension arm sub-assembly LH to the steering knuckle with a new nut.
Install a new clip.
| 11. CONNECT FRONT LOWER NO. 1 SUSPENSION ARM SUB-ASSEMBLY RH |
| 12. CONNECT TIE ROD END SUB-ASSEMBLY LH |
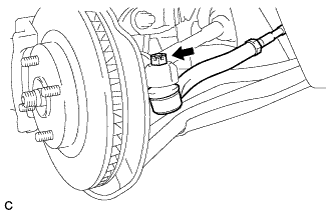 |
Connect the tie rod end sub-assembly LH to the steering knuckle with a new nut.
Install a new cotter pin.
| 13. CONNECT TIE ROD END SUB-ASSEMBLY RH |
| 14. INSTALL FRONT STABILIZER LINK ASSEMBLY LH |
Install the front stabilizer link assembly LH to the front stabilizer bar with the nut.
| 15. INSTALL FRONT STABILIZER LINK ASSEMBLY RH |
| 16. CONNECT NO. 1 STEERING COLUMN HOLE COVER SUB-ASSEMBLY |
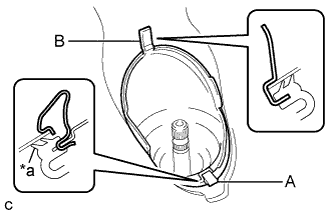 |
Place clip A as shown in the illustration and engage clip B to the body to connect the No. 1 steering column hole cover sub-assembly.
| *a | Lip |
| 17. CONNECT STEERING SLIDING YOKE SUB-ASSEMBLY |
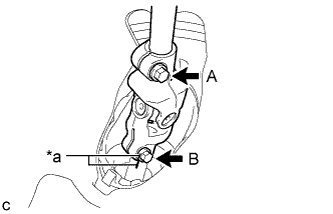 |
Install the steering sliding yoke sub-assembly to the steering gear assembly.
| *a | Matchmark |
Install bolt B.
Tighten bolt A.
| 18. INSTALL COLUMN HOLE COVER SILENCER SHEET |
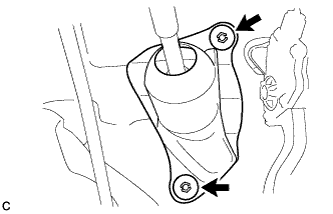 |
Install the column hole cover silencer sheet with the 2 clips.
Install the floor carpet.
| 19. INSTALL FRONT WHEEL |
| 20. STABILIZE SUSPENSION |
Lower the vehicle.
Bounce the vehicle up and down several times to stabilize the suspension.
| 21. FULLY TIGHTEN FRONT LOWER NO. 1 SUSPENSION ARM SUB-ASSEMBLY LH |
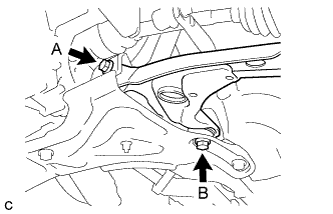 |
Fully tighten the 2 bolts.
| 22. FULLY TIGHTEN FRONT LOWER NO. 1 SUSPENSION ARM SUB-ASSEMBLY RH |
| 23. INSPECT AND ADJUST FRONT WHEEL ALIGNMENT |