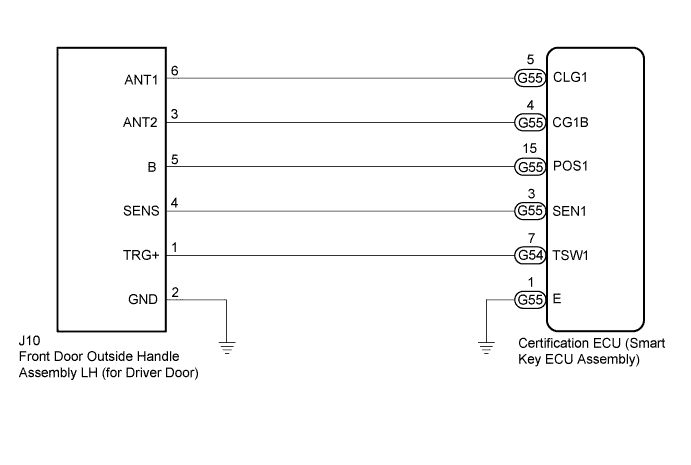
SMART KEY SYSTEM (for Entry Function) > Driver Side Door Entry Lock and Unlock Functions do not Operate |
| Parameter Name | Cause of Problem and Countermeasure |
| Lock / Key RF Signal Interference | When entry lock operation was performed, the electrical key transmitter sub-assembly could not be confirmed due to wave interference. If the cause of the malfunction has not been stored but the car has been moved and an entry lock operation has been successfully performed, the possibility of wave interference is high. |
| Unlock / Key RF Signal Interference | When entry unlock operation was performed, the electrical key transmitter sub-assembly could not be confirmed due to wave interference. If the cause of the malfunction has not been stored but the car has been moved and an entry unlock operation has been successfully performed, the possibility of wave interference is high. |
| 1.CHECK POWER DOOR LOCK CONTROL SYSTEM |
When the door control switch on the multiplex network master switch assembly is operated, check that the doors unlock and lock according to the switch operation (Click here).
|
| ||||
| OK | |
 |
| 2.CHECK WAVE ENVIRONMENT |
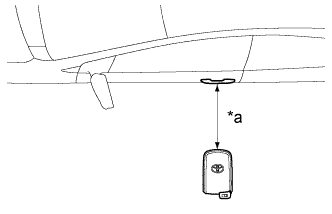 |
Bring the electrical key transmitter sub-assembly approximately 0.3 m (0.984 ft.) from the front door outside handle assembly LH (for driver door) and perform an entry function check (Click here).
| *a | Approximately 0.3 m (0.984 ft.) |
| Result | Proceed to |
| Entry function does not operate normally. | A |
| Entry function operates normally. | B |
|
| ||||
| A | |
|
| 3.CHECK HARNESS AND CONNECTOR (FRONT DOOR OUTSIDE HANDLE ASSEMBLY LH - CERTIFICATION ECU) |
Disconnect the J10 front door outside handle assembly LH (for driver door) connector.
Disconnect the G55 certification ECU (smart key ECU assembly) connector.
Measure the resistance according to the value(s) in the table below.
| Tester Connection | Condition | Specified Condition |
| J10-3 (ANT2) - G55-4 (CG1B) | Always | Below 1 Ω |
| J10-6 (ANT1) - G55-5 (CLG1) | Always | Below 1 Ω |
| J10-5 (B) - G55-15 (POS1) | Always | Below 1 Ω |
| J10-2 (GND) - Body ground | Always | Below 1 Ω |
| J10-3 (ANT2) or G55-4 (CG1B) - Body ground | Always | 10 kΩ or higher |
| J10-6 (ANT1) or G55-5 (CLG1) - Body ground | Always | 10 kΩ or higher |
| J10-5 (B) or G55-15 (POS1) - Body ground | Always | 10 kΩ or higher |
|
| ||||
| OK | |
|
| 4.CHECK CERTIFICATION ECU (SMART KEY ECU ASSEMBLY) (OUTPUT TO DRIVER DOOR ELECTRICAL KEY ANTENNA) |
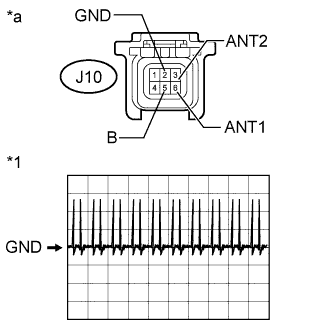 |
Disconnect the J10 front door outside handle assembly LH (for driver door) connector.
Connect the G55 certification ECU (smart key ECU assembly) connector.
Measure the voltage according to the value(s) in the table below.
| Tester Connection | Condition | Specified Condition |
| J10-5 (B) - J10-2 (GND) | Power switch off → on (IG) | 9 to 12 V → Below 2 V |
Using an oscilloscope, check the waveform.
| Tester Connection | Switch Condition | Tool Setting | Specified Condition |
| J10-3 (ANT2) - J10-6 (ANT1) | Procedure:
| 2 V/DIV., 500 ms/DIV. | Pulse generation (See waveform) |
| *1 | Waveform |
| *a | Front view of wire harness connector (to Front Door Outside handle assembly LH (for driver door)) |
|
| ||||
| OK | |
|
| 5.REPLACE FRONT DOOR OUTSIDE HANDLE ASSEMBLY LH (FOR DRIVER DOOR) |
Temporarily replace the front door outside handle assembly LH (for driver door) with a new or known good one (Click here).
| NEXT | |
|
| 6.CHECK FRONT DOOR OUTSIDE HANDLE ASSEMBLY LH (FOR DRIVER DOOR) (OPERATION) |
Check that the entry functions operate normally (Click here).
|
| ||||
| OK | ||
 | ||
| ||
