Home › Engine / Hybrid System › HYBRID / BATTERY CONTROL › HYBRID CONTROL SYSTEM

DTC    P0A09-265    DC / DC Converter Status Circuit Low Input

for Preparation Click here


DESCRIPTION

Refer to the description for DTC P0A08-264 .
If the power management control ECU detects a malfunction related to the DC/DC converter, it uses the NODD signal line to transmit a stop command to the DC/DC converter. The power management control ECU also receives signals indicating a normal or abnormal condition of the 12 V charging system from the inverter with converter assembly.
If the vehicle is being driven with an inoperative DC/DC converter, the voltage of the auxiliary battery will drop, which will prevent the continued operation of the vehicle. Therefore, the power management control ECU monitors the operation of the DC/DC converter and alerts the driver if it detects a malfunction.

DTC No.
INF Code
DTC Detection Condition
Trouble Area
P0A09
265
Open or GND short in NODD signal circuit of DC/DC converter
(1 trip detection logic)
  1. Wire harness or connector
  2. Inverter with converter assembly
  3. Power management control ECU

WIRING DIAGRAM

Refer to the wiring diagram for DTC P0A08-264 .

INSPECTION PROCEDURE

CAUTION:
  1. Before inspecting the high-voltage system or disconnecting the low voltage connector of the inverter with converter assembly, take safety precautions such as wearing insulated gloves and removing the service plug grip to prevent electrical shocks. After removing the service plug grip, put it in your pocket to prevent other technicians from accidentally reconnecting it while you are working on the high-voltage system.
  2. After removing the service plug grip, wait for at least 10 minutes before touching any of the high-voltage connectors or terminals. After waiting for 10 minutes, check the voltage at the terminals in the inspection point in the inverter with converter assembly. The voltage should be 0 V before beginning work (Click here).

    HINT:
    Waiting for at least 10 minutes is required to discharge the high-voltage capacitor inside the inverter with converter assembly.

NOTICE:
After turning the ignition switch off, waiting time may be required before disconnecting the cable from the negative (-) auxiliary battery terminal. Therefore, make sure to read the disconnecting the cable from the negative (-) auxiliary battery terminal notices before proceeding with work (Click here).

HINT:
  1. After the repair, clear the DTCs and perform the following procedure to check that DTCs are not output.
    1. Turn the ignition switch to ON (IG) and wait for 10 seconds or more.
  2. When the NODD signal line is short to ground, DC/DC converter control is prohibited and the auxiliary battery voltage will be approximately 12 V (or less).
  3. When the transistor of the power management control ECU turns on, a signal is sent to the inverter to prohibit DC/DC converter control. The inverter with converter assembly sends a malfunction signal to the power management control ECU when the inverter side transistor is on.

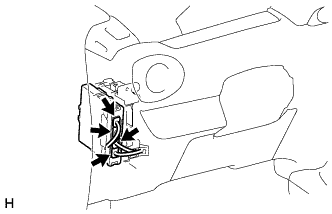
1.CHECK CONNECTOR CONNECTION CONDITION (POWER MANAGEMENT CONTROL ECU CONNECTOR)


    A269501
  1. Check the connector connections and contact pressure of the relevant terminals for the power management control ECU connectors (Click here).

    OK:
    The connectors are connected securely and there are no contact pressure problems.


NG
CONNECT SECURELY
OK


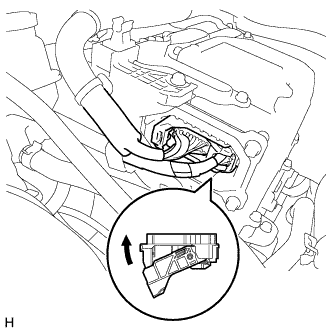
2.CHECK CONNECTOR CONNECTION CONDITION (INVERTER WITH CONVERTER ASSEMBLY CONNECTOR)

CAUTION:
Be sure to wear insulated gloves.

  1. Check that the service plug grip is not installed.
    NOTICE:
    After removing the service plug grip, do not turn the ignition switch to ON (READY), unless instructed by the repair manual because this may cause a malfunction.


    A267460
  1. Check the connector connections and contact pressure of the low voltage connectors of the inverter with converter assembly (Click here).

    NOTICE:
    Before disconnecting the connector, confirm that it is properly connected by checking that the locking claws are engaged and that the connector does not pull out.

    OK:
    The connectors are connected securely and there are no contact pressure problems.

    HINT:
    When connecting the connector, insert it with the locking lever in the raised position. Rotate the lever downward and make sure that the connector is pulled into its socket. When the locking lever is in its fully closed position, a click will be heard as its locking claws engage. After the click is heard, pull up on the connector to confirm that it is properly connected.


NG
CONNECT SECURELY
OK


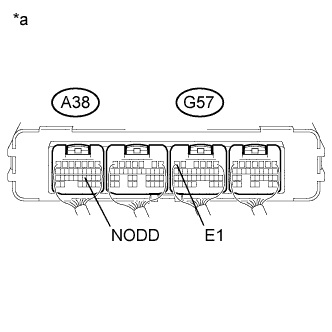
3.CHECK POWER MANAGEMENT CONTROL ECU (NODD)
  1. Turn the ignition switch to ON (READY).


    A249168E15
  1. Measure the voltage according to the value(s) in the table below.

    Standard Voltage:
    Tester Connection
    Switch Condition
    Specified Condition
    A38-21 (NODD) - G57-6 (E1)
    Ignition switch ON (READY)
    5 to 7 V

    Text in Illustration  
    *a
    Component with harness connected
    (Power Management Control ECU)

  1. Turn the ignition switch off.


NG
Go to step 6
OK


4.CLEAR DTC
  1. Connect the Techstream to the DLC3.

  1. Turn the ignition switch to ON (IG).

  1. Enter the following menus: Powertrain / Hybrid Control / Trouble Codes.

  1. Read and record the DTCs and freeze frame data.

  1. Clear DTCs and freeze frame data.

  1. Turn the ignition switch off.


NEXT


5.CHECK DTC OUTPUT (HYBRID CONTROL)
  1. Connect the Techstream to the DLC3.

  1. Turn the ignition switch to ON (READY).

  1. Enter the following menus: Powertrain / Hybrid Control / Trouble Codes.

  1. Check if DTCs are output.

    Result:
    Result
    Proceed to
    P0A09-265 is not output.
    A
    P0A09-265 is output again.
    B

  1. Turn the ignition switch off.


B
REPLACE POWER MANAGEMENT CONTROL ECU (Click here)
A

CHECK FOR INTERMITTENT PROBLEMS (Click here)  

6.CHECK HARNESS AND CONNECTOR (RESISTANCE VALUE OF NODD INSIDE POWER MANAGEMENT CONTROL ECU)

CAUTION:
Be sure to wear insulated gloves.

  1. Check that the service plug grip is not installed.

    NOTICE:
    After removing the service plug grip, do not turn the ignition switch to ON (READY), unless instructed by the repair manual because this may cause a malfunction.

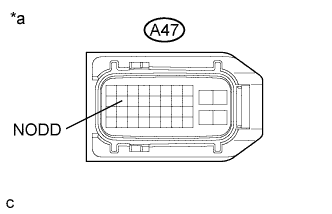
  1. Disconnect connector A47 from the inverter with converter assembly.


    A215725E68
  1. Measure the resistance according to the value(s) in the table below.

    Standard Resistance:
    Tester Connection
    Switch Condition
    Specified Condition
    A47-12 (NODD) - Body ground
    Ignition switch off
    110 to 150 kΩ

    Text in Illustration 
    *a
    Front view of wire harness connector
    (to Inverter with Converter Assembly)

  1. Connect the inverter with converter assembly connector.


NG
Go to step 7
OK

REPLACE INVERTER WITH CONVERTER ASSEMBLY (Click here)  

7.CHECK HARNESS AND CONNECTOR (INVERTER WITH CONVERTER ASSEMBLY - POWER MANAGEMENT CONTROL ECU)

CAUTION:
Be sure to wear insulated gloves.

  1. Check that the service plug grip is not installed.

    NOTICE:
    After removing the service plug grip, do not turn the ignition switch to ON (READY), unless instructed by the repair manual because this may cause a malfunction.

  1. Disconnect connector A47 from the inverter with converter assembly.

  1. Disconnect connector A38 from the power management control ECU.
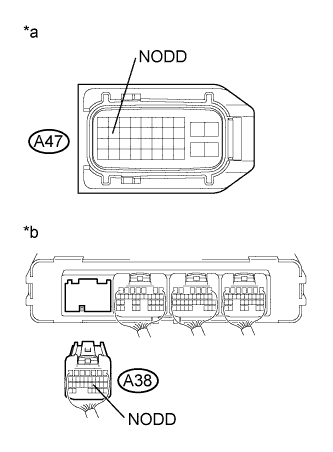


    A216618E20
  1. Measure the resistance according to the value(s) in the table below.

    Standard Resistance:
    Tester Connection
    Switch Condition
    Specified Condition
    A47-12 (NODD) - A38-21 (NODD)
    Ignition switch off
    Below 1 Ω
    A47-12 (NODD) or A38-21 (NODD) - Body ground and other terminals
    Ignition switch off
    10 kΩ or higher

    Text in Illustration  
    *a
    Front view of wire harness connector
    (to Inverter with Converter Assembly)
    *b
    Rear view of wire harness connector
    (to Power Management Control ECU)

  1. Connect the inverter with converter assembly connector.

  1. Connect the power management control ECU connector.


NG
REPAIR OR REPLACE HARNESS OR CONNECTOR
OK

REPLACE POWER MANAGEMENT CONTROL ECU (Click here)