DTC P0A92-261 Hybrid Generator Performance |
| DTC No. | INF Code | DTC Detection Condition | Trouble Area |
| P0A92 | 261 | Generator magnetic force deterioration or same phase short circuit Magnetic force of the generator decreases or a coil circuit in one of the 3 phases remains shorted for a certain period of time. (1 trip detection logic) |
|
| Related DTCs | P0A92 (INF 261): Magnetic force deterioration / same phase short circuit |
| Required sensors / components | MG1, inverter, generator resolver |
| Frequency of operation | Continuous |
| Duration | TMC's intellectual property |
| MIL operation | 1 driving cycle |
| Sequence of operation | None |
| The monitor will run whenever the following DTCs are not present | TMC's intellectual property |
| Other conditions belong to TMC's intellectual property | - |
| TMC's intellectual property | - |
| Power management control ECU | DTC P0A92 (INF 261) is not detected |
| 1.CHECK DTC OUTPUT (HYBRID CONTROL) |
Connect the Techstream to the DLC3.
Turn the ignition switch to ON (IG).
Enter the following menus: Powertrain / Hybrid Control / Trouble Codes.
Check if DTCs are output.
| Result | Proceed to |
| Only P0A92-261 is output or P0A92-261 and DTCs other than the ones in the table below are also output. | A |
| Any of the following DTCs are also output. | B |
| DTC No. | Relevant Diagnosis |
| P0A1A (all INF codes)*1 | Generator Control Module |
| P0A1B (all INF codes)*1 | Drive Motor "A" Control Module |
| P0A1D (all INF codes)*1 | Hybrid Powertrain Control Module |
| P0A3F-243 | Drive Motor "A" Position Sensor Circuit |
| P0A40-500 | Drive Motor "A" Position Sensor Circuit Range/Performance |
| P0A41-245 | Drive Motor "A" Position Sensor Circuit Low |
| P0A4B-253 | Generator Position Sensor Circuit |
| P0A4C-513 | Generator Position Sensor Circuit Range/Performance |
| P0A4D-255 | Generator Position Sensor Circuit Low |
| P0A51-174 | Drive Motor "A" Current Sensor Circuit |
| P0A60 (all INF codes)*1 | Drive Motor "A" Phase V Current |
| P0A63 (all INF codes)*1 | Drive Motor "A" Phase W Current |
| P0A72 (all INF codes)*1 | Generator Phase V Current |
| P0A75 (all INF codes)*1 | Generator Phase W Current |
| P0A78-266, 267, 306, 586 | Drive Motor "A" Inverter Performance |
| P0A7A-203, 344 | Generator Inverter Performance |
| P0A90-509 | Drive Motor "A" Performance |
| P0A92-521 | Hybrid Generator Performance |
| P0A94-585, 587, 589, 590 | DC / DC Converter Performance |
| P0AA6 (all INF codes)*1 | Hybrid Battery Voltage System Isolation Fault |
| P0C76-523 | Hybrid Battery System Discharge Time Too Long |
| P3004-132 | High Voltage Power Resource |
Turn the ignition switch off.
|
| ||||
| A | |
 |
| 2.CHECK DTC OUTPUT (HYBRID CONTROL) |
Connect the Techstream to the DLC3.
Turn the ignition switch to ON (IG).
Enter the following menus: Powertrain / Hybrid Control / Trouble Codes.
Check if DTCs are output.
| Result | Proceed to |
| Any of the following DTCs are also output. | A |
| Only P0A92-261 is output or P0A92-261 and DTCs other than the ones in the table below are also output. | B |
| DTC No. | Relevant Diagnosis |
| P0A90-251 | Drive Motor "A" Performance |
Turn the ignition switch off.
|
| ||||
| A | |
|
| 3.CHECK POWER MANAGEMENT CONTROL ECU |
Turn the ignition switch to ON (IG).
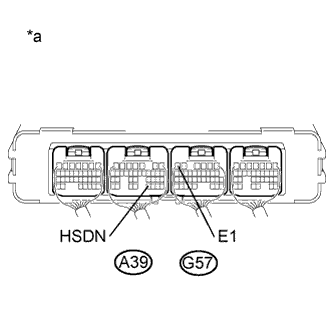 |
Measure the voltage according to the value(s) in the table below.
| Tester Connection | Switch Condition | Specified Condition |
| A39-31 (HSDN) - G57-6 (E1) | Ignition switch ON | Below 4.5 V |
| *a | Component with harness connected (Power Management Control ECU) |
Turn the ignition switch off.
|
| ||||
| OK | |
|
| 4.SIMULATION TEST |
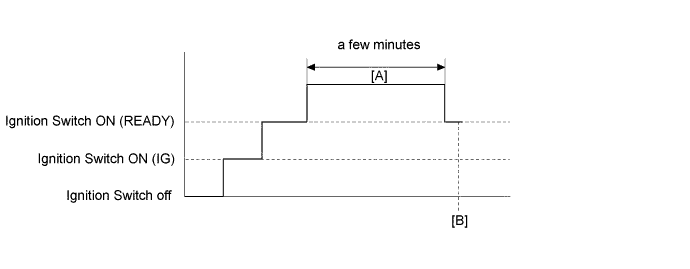
Turn the ignition switch to ON (READY).
Clear the DTCs.
Drive the vehicle until the cumulative traveling time using the engine is a few minutes. (It is not required to keep driving using the engine.)
Connect the Techstream to the DLC3.
Enter the following menus: Powertrain / Hybrid Control / Trouble Codes.
Check if DTCs are output.
| Result | Proceed to |
| P0A92-261 is output or no DTC is output. | A |
| P0A7A-344 or P0A92-521 is output. | B |
Turn the ignition switch off.
|
| ||||
| A | |
|
| 5.CHECK CONNECTOR CONNECTION CONDITION (INVERTER WITH CONVERTER ASSEMBLY CONNECTOR) |
Check that the service plug grip is not installed.
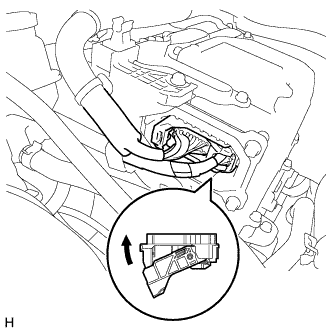 |
Check the connector connections and contact pressure of the low voltage connectors of the inverter with converter assembly (Click here).
|
| ||||
| OK | |
|
| 6.CHECK INVERTER WITH CONVERTER ASSEMBLY (MOTOR CABLE (FOR MG1) CONNECTION CONDITION) |
Check that the service plug grip is not installed.
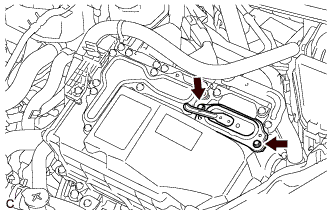 |
Remove the inverter terminal cover from the inverter with converter assembly.
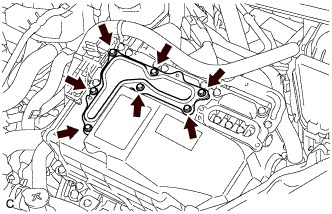 |
Remove the inverter cover from the inverter with converter assembly.
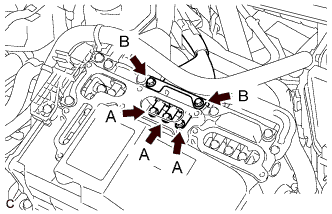 |
Check that the bolts for the motor cable (for MG1) are tightened to the specified torque, the motor cable (for MG1) is connected securely, and there are no contact problems.
Disconnect the motor cable (for MG1) from the inverter with converter assembly.
Check for arc marks at the terminals for the motor cable (for MG1).
| Result | Proceed to | |
| The terminals are connected securely and there are no contact problems. | There are no arc marks. | A |
| The terminals are not connected securely and there is a contact problem. | There are arc marks. | B |
| The terminals are not connected securely and there is a contact problem. | There are no arc marks. | C |
| The terminals are connected securely and there are no contact problems. | There are arc marks. | B |
Connect the motor cable (for MG1) to the inverter with converter assembly.
Install the inverter cover.
Install the inverter terminal cover.
|
| ||||
|
| ||||
| A | |
|
| 7.CHECK HYBRID VEHICLE TRANSAXLE ASSEMBLY (MOTOR CABLE (FOR MG1) CONNECTION CONDITION) |
Check that the service plug grip is not installed.
Remove the inverter with converter assembly (Click here).
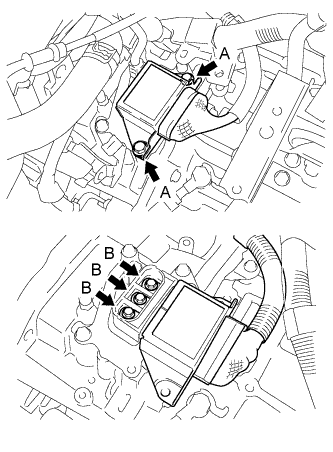 |
Check that the bolts for the motor cable (for MG1) are tightened to the specified torque, the motor cable (for MG1) is connected securely, and there are no contact problems.
Disconnect the motor cable (for MG1) from the hybrid vehicle transaxle assembly.
Check for arc marks at the terminals for the motor cable (for MG1).
| Result | Proceed to | |
| The terminals are connected securely and there are no contact problems. | There are no arc marks. | A |
| The terminals are not connected securely and there is a contact problem. | There are arc marks. | B |
| The terminals are not connected securely and there is a contact problem. | There are no arc marks. | C |
| The terminals are connected securely and there are no contact problems. | There are arc marks. | B |
Connect the motor cable (for MG1) to the hybrid vehicle transaxle assembly.
Install the inverter with converter assembly.
|
| ||||
|
| ||||
| A | |
|
| 8.CHECK MOTOR CABLE (FOR MG1) |
Check that the service plug grip is not installed.
Remove the motor cable (Click here).
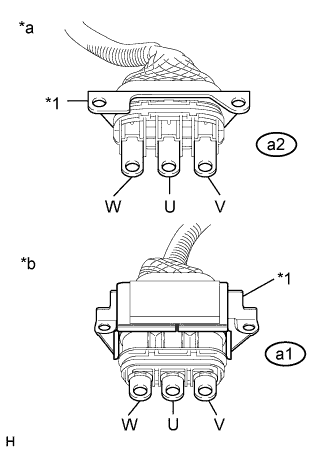 |
Using a megohmmeter set to 500 V, measure the resistance according to the value(s) in the table below.
| Tester Connection | Switch Condition | Specified Condition |
| a2-1 (W) - Body ground and shield ground | Ignition switch off | 100 MΩ or higher |
| a2-2 (U) - Body ground and shield ground | Ignition switch off | 100 MΩ or higher |
| a2-3 (V) - Body ground and shield ground | Ignition switch off | 100 MΩ or higher |
| *1 | Shield ground |
| *a | Motor Cable (for MG1) (Inverter with Converter Assembly Side) |
| *b | Motor Cable (for MG1) (Hybrid Vehicle Transaxle Assembly Side) |
Measure the resistance according to the value(s) in the table below.
| Tester Connection | Switch Condition | Specified Condition |
| a2-1 (W) - a1-1 (W) | Ignition switch off | Below 1 Ω |
| a2-2 (U) - a1-2 (U) | Ignition switch off | Below 1 Ω |
| a2-3 (V) - a1-3 (V) | Ignition switch off | Below 1 Ω |
| a2-1 (W) - a1-2 (U) | Ignition switch off | 100 MΩ or higher |
| a2-2 (U) - a1-3 (V) | Ignition switch off | 100 MΩ or higher |
| a2-3 (V) - a1-1 (W) | Ignition switch off | 100 MΩ or higher |
Install the motor cable.
|
| ||||
| OK | ||
 | ||
| ||
| 9.CHECK HARNESS AND CONNECTOR (POWER MANAGEMENT CONTROL ECU - INVERTER WITH CONVERTER ASSEMBLY) |
Check that the service plug grip is not installed.
Disconnect connector A47 from the inverter with converter assembly.
Disconnect connector A39 from the power management control ECU.
Connect the cable to the negative (-) auxiliary battery terminal.
Turn the ignition switch to ON (IG).
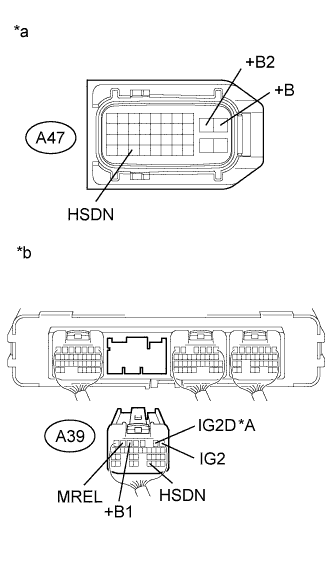 |
Measure the voltage according to the value(s) in the table below.
| Tester Connection | Switch Condition | Specified Condition |
| A47-31 (HSDN) or A39-31 (HSDN) - Body ground | Ignition switch ON | Below 1 V |
| *A | w/ Smart Key System |
| *a | Front view of wire harness connector (to Inverter with Converter Assembly) |
| *b | Rear view of wire harness connector (to Power Management Control ECU) |
Turn the ignition switch off.
Disconnect the cable from the negative (-) auxiliary battery terminal.
Measure the resistance according to the value(s) in the table below.
| Tester Connection | Switch Condition | Specified Condition |
| A39-31 (HSDN) - A39-1 (IG2) | Power switch off | 10 kΩ or higher |
| A39-31 (HSDN) - A39-2 (IG2D) | Power switch off | 10 kΩ or higher |
| A39-31 (HSDN) - A39-5 (+B1) | Power switch off | 10 kΩ or higher |
| A39-31 (HSDN) - A39-6 (MREL) | Power switch off | 10 kΩ or higher |
| A47-31 (HSDN) - A47-10 (+B) | Power switch off | 10 kΩ or higher |
| A47-31 (HSDN) - A47-9 (+B2) | Power switch off | 10 kΩ or higher |
| Tester Connection | Switch Condition | Specified Condition |
| A39-31 (HSDN) - A39-1 (IG2) | Ignition switch off | 10 kΩ or higher |
| A39-31 (HSDN) - A39-5 (+B1) | Ignition switch off | 10 kΩ or higher |
| A39-31 (HSDN) - A39-6 (MREL) | Ignition switch off | 10 kΩ or higher |
| A47-31 (HSDN) - A47-10 (+B) | Ignition switch off | 10 kΩ or higher |
| A47-31 (HSDN) - A47-9 (+B2) | Ignition switch off | 10 kΩ or higher |
Connect the inverter with converter assembly connector.
Connect the power management control ECU connector.
|
| ||||
| OK | |
|
| 10.CHECK INVERTER WITH CONVERTER ASSEMBLY |
Check that the service plug grip is not installed.
Disconnect connector A47 from the inverter with converter assembly.
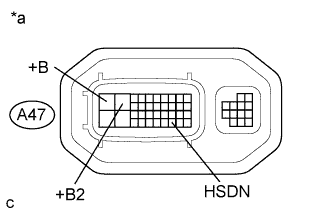 |
Measure the resistance according to the value(s) in the table below.
| Tester Connection | Switch Condition | Specified Condition |
| A47-31 (HSDN) - A47-10 (+B) | Ignition switch off | 5 kΩ or higher |
| A47-31 (HSDN) - A47-9 (+B2) | Ignition switch off | 5 kΩ or higher |
| *a | Component without harness connected (Inverter with Converter Assembly) |
Connect the inverter with converter assembly connector.
|
| ||||
| OK | ||
| ||
| ||

