Home › Vehicle Interior › SEAT BELT › REAR SEAT OUTER BELT ASSEMBLY

REAR SEAT OUTER BELT ASSEMBLY > INSTALLATION

for Preparation Click here


1. INSPECT REAR SEAT 3 POINT TYPE OUTER BELT ASSEMBLY


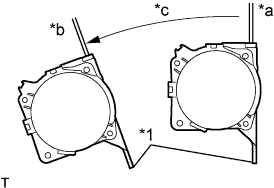
    B108365E02
  1. Before installing the rear seat 3 point type outer belt assembly, check the ELR function.

    NOTICE:
    Do not disassemble the retractor.


    1. When the inclination of the retractor is 15° or less, check that the belt can be pulled from the retractor. When the inclination of the retractor is over 45°, check that the belt locks.
      Text in Illustration 
      *1
      Retractor
      *a
      Unlocked
      *b
      Locked
      *c
      45°
      If the result is not as specified, replace the rear seat 3 point type outer belt assembly.


2. INSTALL REAR SEAT 3 POINT TYPE OUTER BELT ASSEMBLY
  1. Engage the 2 guides to install the rear seat 3 point type outer belt assembly.

  1. Install the bolt.

    Torque:
    42 N*m{ 428 kgf*cm , 31 ft.*lbf }

  1. Connect the shoulder anchor of the rear seat 3 point type outer belt assembly with the bolt.

    Torque:
    42 N*m{ 428 kgf*cm , 31 ft.*lbf }


3. INSTALL ROOF SIDE INNER GARNISH RH (for RH Side)
  1. Pass the floor anchor of the rear seat 3 point type outer belt assembly RH through the roof side inner garnish RH.

  1. Engage the 5 clips to install the roof side inner garnish RH.


    B297734
  1. Engage the guide and 4 claws to connect the belt guide.


4. INSTALL ROOF SIDE INNER GARNISH LH (for LH Side)
  1. Pass the floor anchor of the rear seat 3 point type outer belt assembly LH through the roof side inner garnish LH.

  1. Engage the 5 clips to install the roof side inner garnish LH.


5. CONNECT REAR CENTER SEAT LAP TYPE BELT ASSEMBLY (for RH Side)
  1. Install the shoulder anchor of the rear center seat lap type belt assembly with the bolt.

    Torque:
    42 N*m{ 428 kgf*cm , 30 ft.*lbf }


    B300538
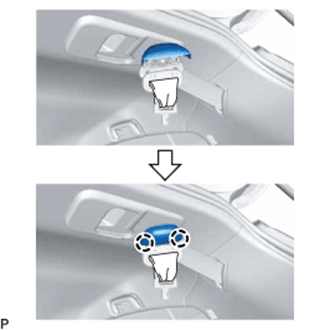
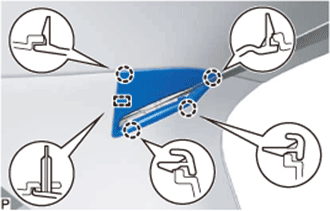
  1. Engage the 2 claws to close the cover as shown in the illustration.


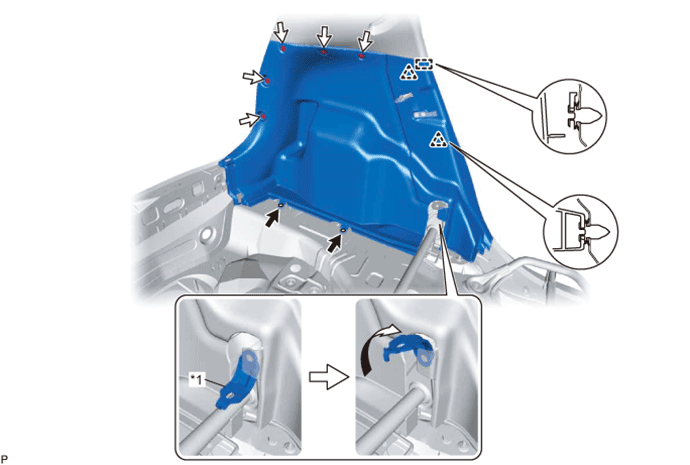
6. INSTALL DECK TRIM SIDE PANEL ASSEMBLY (w/o Package Tray Trim)


  1. Engage the guide and 2 clips.


    B300798E01


    Text in Illustration 
    *1
    Rear Seatback Hinge
    -
    -

  1. Install the deck trim side panel assembly LH with the 2 screws and 5 clips.

  1. Turn the rear seatback hinge in the direction indicated by the arrow shown in the illustration.


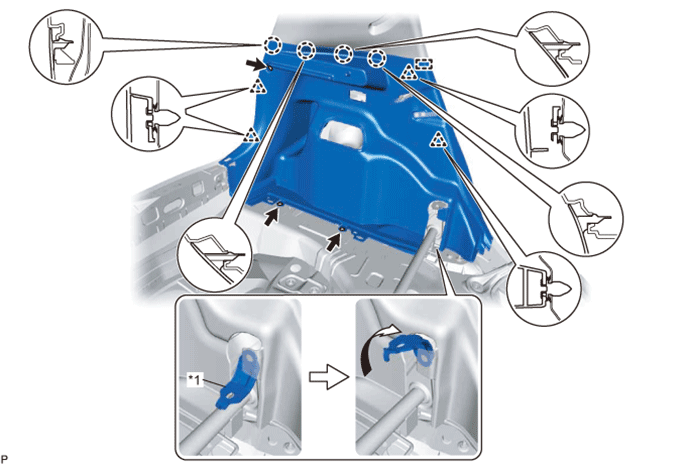
7. INSTALL DECK TRIM SIDE PANEL ASSEMBLY (w/ Package Tray Trim)


  1. Engage the guide, 4 claws and 4 clips.


    B300800E01


    Text in Illustration 
    *1
    Rear Seatback Hinge
    -
    -

  1. Install the deck trim side panel assembly LH with the bolt and 2 screws.

  1. Turn the rear seatback hinge in the direction indicated by the arrow shown in the illustration.


8. INSTALL NO. 1 LUGGAGE COMPARTMENT LIGHT ASSEMBLY (w/ Package Tray Trim)
for LH Side:


9. INSTALL REAR ABSORBER CAP (w/ Package Tray Trim)
  1. Engage the 2 guides and 2 claws to install the rear absorber cap LH.


10. CONNECT REAR SEAT 3 POINT TYPE OUTER BELT ASSEMBLY
  1. Engage the 2 claws.

  1. Install the floor anchor of the rear seat 3 point type outer belt assembly with the bolt.

    Torque:
    42 N*m{ 428 kgf*cm , 31 ft.*lbf }


11. INSTALL REAR DECK TRIM COVER
  1. Engage the 2 guides and 4 claws.

  1. Install the rear deck trim cover with the 2 clips.


12. INSTALL SPARE WHEEL CUSHION
  1. Install the 2 spare wheel cushions.


13. INSTALL REAR FLOOR MAT ASSEMBLY
  1. Install the rear floor mat assembly.


14. INSTALL PACKAGE TRAY TRIM PANEL ASSEMBLY (w/ Package Tray Trim)
  1. Install the package tray trim panel assembly.


15. INSTALL REAR DOOR OPENING TRIM WEATHERSTRIP
for LH Side:
for RH Side:


16. INSTALL REAR DOOR SCUFF PLATE
  1. Engage the guide and the 5 claws to install the rear door scuff plate.


17. INSTALL REAR SEATBACK ASSEMBLY (for Bench Type Seatback)
  1. Place the rear seatback assembly in the cabin.

    NOTICE:
    Be careful not to damage the vehicle body.

  1. Install the rear seatback assembly with the 2 bolts.

    Torque:
    37 N*m{ 377 kgf*cm }

  1. Raise the rear seatback assembly.


18. INSTALL REAR SEAT CUSHION ASSEMBLY (for Bench Type Seatback)
  1. Place the rear seat cushion assembly in the cabin.

    NOTICE:
    Be careful not to damage the vehicle body.


    B296199
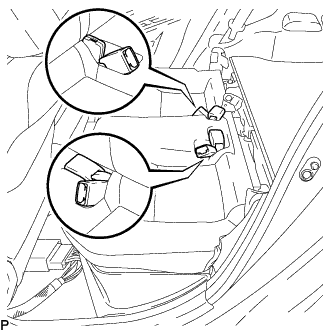
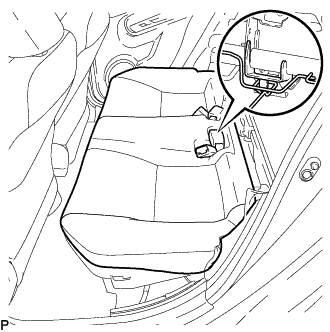
  1. Push out the seat belt buckles from the back of the rear seat cushion assembly so that they are positioned as shown in the illustration.


    B296198
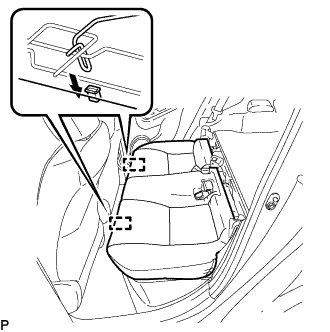
  1. Engage the hook of the rear seat cushion assembly to the CRS anchor bracket.


    B296116
  1. Engage the 2 rear seat cushion lock hooks to install the rear seat cushion assembly as shown in the illustration.

  1. Confirm that the seat cushion is firmly installed.

    NOTICE:
    When installing the seat cushion, make sure that the seat belt buckles are not under the seat cushion.

  1. Engage the 2 clips.


19. INSTALL REAR SEATBACK ASSEMBLY LH (for Separate Type Seatback)
  1. Place the rear seatback assembly LH in the cabin.

    NOTICE:
    Be careful not to damage the vehicle body.

  1. Install the rear seatback assembly LH with the 2 bolts.

    Torque:
    37 N*m{ 377 kgf*cm , 27 ft.*lbf }

  1. Raise the rear seatback assembly LH.


20. INSTALL REAR SEATBACK ASSEMBLY RH (for Separate Type Seatback)
  1. Place the rear seatback assembly RH in the cabin.

    NOTICE:
    Be careful not to damage the vehicle body.

  1. Install the rear seatback assembly RH with the 2 bolts.

    Torque:
    37 N*m{ 377 kgf*cm , 27 ft.*lbf }

  1. Raise the rear seatback assembly RH.


21. INSTALL REAR SEAT CUSHION ASSEMBLY (for Separate Type Seatback)
  1. Place the rear seat cushion assembly in the cabin.

    NOTICE:
    Be careful not to damage the vehicle body.


    B296199
  1. Push out the seat belt buckles from the back of the rear seat cushion assembly so that they are positioned as shown in the illustration.


    B296198
  1. Engage the hook of the rear seat cushion assembly to the CRS anchor bracket.


    B296116
  1. Engage the 2 rear seat cushion lock hooks to install the rear seat cushion assembly as shown in the illustration.

  1. Confirm that the seat cushion is firmly installed.

    NOTICE:
    When installing the seat cushion, make sure that the seat belt buckles are not under the seat cushion.

  1. Engage the 2 clips.


22. INSTALL FRONT CENTER FLOOR COVER
  1. Engage the 2 guides to install the front center floor cover.

  1. Install the 3 clips.


23. INSTALL FRONT FLOOR COVER LH
  1. Engage the 3 guides.


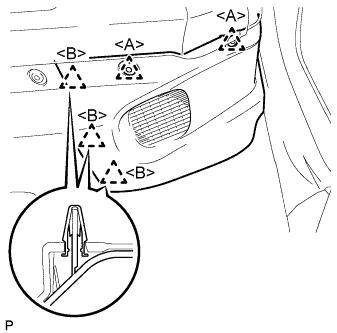
    B301490E01
  1. Engage the 3 clips <B> to install the front floor cover LH.

  1. Install the 2 clips <A>.


24. INSTALL FRONT FLOOR COVER RH
  1. Engage the 3 guides.


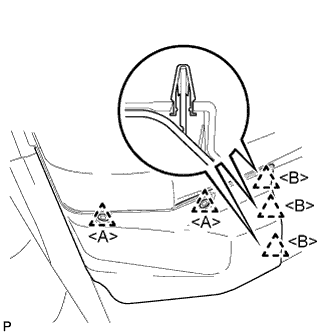
    B301488E01
  1. Engage the 3 clips <B> to install the front floor cover RH.

  1. Install the 2 clips <A>.


25. INSTALL REAR CENTER SEAT HEADREST ASSEMBLY


26. INSTALL REAR SEAT HEADREST ASSEMBLY