Home › Drivetrain › AXLE AND DIFFERENTIAL › FRONT AXLE HUB

FRONT AXLE HUB > REMOVAL

for Preparation Click here


NOTICE:
  1. When the brake pedal is first depressed after replacing the brake pads or pushing back the disc brake piston, DTC C1214 may be output. As there is no malfunction, clear the DTC.
  2. While the auxiliary battery is connected, even if the ignition switch is off, the brake control system activates when the brake pedal is depressed or the door courtesy switch is turned on. Therefore, even if only brake shoes are to be removed and installed, be sure to perform the Disable Brake Control procedure and disconnect the cable from the negative (-) terminal of the auxiliary battery before beginning work.

HINT:
  1. Use the same procedure for the RH side and LH side.
  2. The procedure listed below is for the LH side.


1. PRECAUTION

NOTICE:
After turning the ignition switch off, waiting time may be required before disconnecting the cable from the negative (-) auxiliary battery terminal. Therefore, make sure to read the disconnecting the cable from the negative (-) auxiliary battery terminal notice before proceeding with work (Click here).


2. DISABLE BRAKE CONTROL
  1. Wait at least 2 minutes after turning the ignition switch off.

    NOTICE:
    When the brake pedal is depressed or the door courtesy switch is turned on even if the ignition switch is off, the brake control system activates. Therefore do not depress the brake pedal or open/close the doors until the reservoir level switch connector is disconnected.


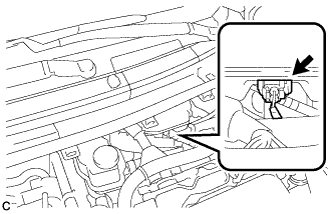
    C250008
  1. Disconnect the reservoir level switch connector with the parking brake applied.

  1. Disconnect the cable from the negative (-) auxiliary battery terminal (Click here).

  1. Depress the brake pedal 40 times or more to return all the fluid in the accumulator back to the reservoir.

  1. Check that the brake pedal can not be further depressed.

  1. Release the parking brake.


3. REMOVE FRONT WHEEL


4. REMOVE FRONT AXLE SHAFT NUT


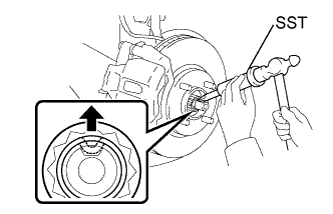
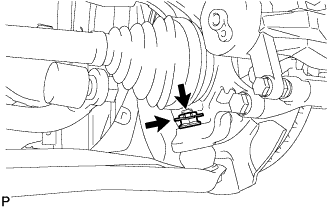
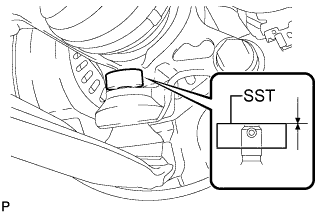
    C236996E01
  1. Using SST and a hammer, release the staked part of the front axle shaft nut.

    SST
    09930-00010  

    NOTICE:
    Loosen the staked part of the nut completely, otherwise the threads of the drive shaft may be damaged.

  1. While applying the brakes, remove the front axle shaft nut.


5. SEPARATE FRONT SPEED SENSOR


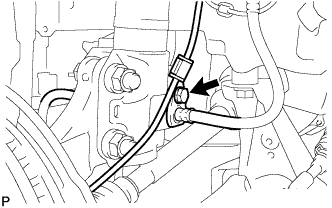
    C107502
  1. Remove the bolt and separate the front speed sensor wire and front flexible hose from the front shock absorber assembly.
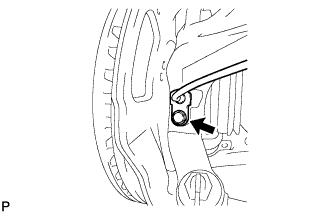
    NOTICE:
    Be sure to separate the front speed sensor from the front shock absorber assembly completely.


    C112274
  1. Remove the bolt and separate the front speed sensor from the steering knuckle.

    NOTICE:
    1. Prevent foreign matter from contacting the sensor tip.
    2. Be careful not to damage the front speed sensor.
    3. Clean the speed sensor installation hole and the contact surfaces every time the speed sensor is removed.


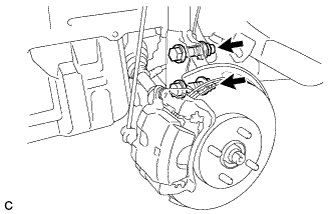
6. SEPARATE FRONT DISC BRAKE CALIPER ASSEMBLY
  1. Remove the 2 bolts and separate the front disc brake caliper assembly from the steering knuckle.

    NOTICE:
    Use wire or an equivalent tool to keep the front disc brake caliper assembly from hanging down by the front flexible hose.


7. REMOVE FRONT DISC


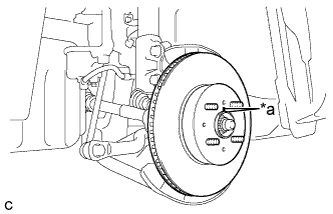
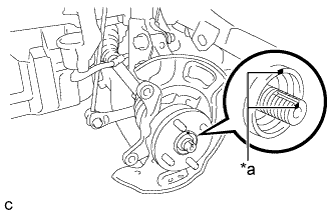
    C249590E01
  1. Remove the front disc.
    Text in Illustration 
    *a
    Matchmark

    HINT:
    Put matchmarks on the disc and the axle hub.


8. SEPARATE TIE ROD END SUB-ASSEMBLY
  1. Remove the cotter pin and nut.


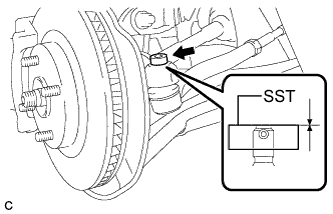
    C249937E01
  1. Install SST to the tie rod end.

    SST
    09960-20010   (09961-02060)

    NOTICE:
    Make sure that the upper end of the tie rod end and SST are aligned.

  1. Secure SST using a string.

    NOTICE:
    Be sure to tighten the string firmly to secure SST to the steering knuckle to prevent SST from falling off.


  1. Using SST, separate the tie rod end from the steering knuckle.
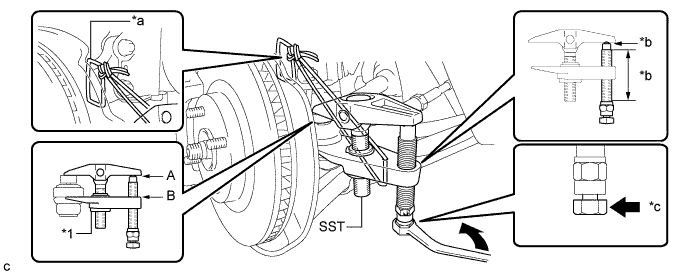
    SST
    09960-20010   (09961-02060)


    C249935E01


    Text in Illustration 
    *1
    Center Nut
    -
    -
    *a
    String
    *b
    Grease Application Area
    *c
    Place the wrench here.
    -
    -

    CAUTION:
    Apply grease to the bolt threads and the tip of SST.

    NOTICE:
    1. Install SST with the center nut so that A and B shown in the illustration are parallel. Otherwise, the dust cover may be damaged.
    2. Be sure to place the wrench on the part indicated in the illustration.
    3. Do not damage the front disc brake dust cover.
    4. Do not damage the ball joint dust cover.
    5. Do not damage the steering knuckle.


9. SEPARATE FRONT LOWER NO. 1 SUSPENSION ARM SUB-ASSEMBLY


    C107513
  1. Remove the clip and nut.


    C172759E06
  1. Install SST to the threaded section of the lower ball joint.

    SST
    09960-20010   (09961-02060)

    NOTICE:
    Make sure that the upper ends of the threaded section of the lower ball joint and SST are aligned.


  1. Using SST, separate the front lower No. 1 suspension arm sub-assembly LH from the steering knuckle.
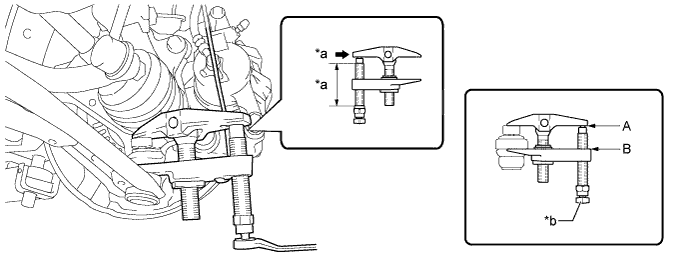
    SST
    09960-20010   (09961-02010, 09961-02060)


    C236386E01


    Text in Illustration 
    *a
    Apply grease
    *b
    Place wrench here

    CAUTION:
    Apply grease to the threads and end of the SST bolt.

    NOTICE:
    1. Make sure to tie the string of SST to the vehicle to prevent SST from dropping.
    2. Install SST so that A and B are parallel.
    3. Be sure to place the wrench on the part indicated in the illustration.
    4. Do not damage the lower ball joint dust cover.
    5. Do not damage the drive shaft outboard joint boots.
    6. Do not damage the front disc brake dust cover.
    7. Do not damage the steering knuckle.


10. SEPARATE FRONT DRIVE SHAFT ASSEMBLY


    C249882E01
  1. Put matchmarks on the front drive shaft assembly and front axle hub sub-assembly.
    Text in Illustration 
    *a
    Matchmark

  1. Using a plastic hammer, separate the front drive shaft assembly from the front axle assembly. If it is difficult to separate, tap the end of the front drive shaft assembly using a brass bar and a hammer.

    NOTICE:
    Be careful not to damage the drive shaft boot.


11. REMOVE FRONT AXLE ASSEMBLY


    C249872
  1. Remove the 2 bolts, 2 nuts and front axle assembly from the front shock absorber assembly.

    NOTICE:
    1. When removing the nuts, keep the bolts from rotating.
    2. Be careful not to damage the drive shaft boot.


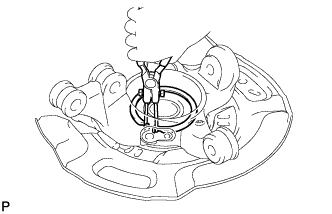
12. REMOVE FRONT AXLE HUB HOLE SNAP RING


    C112582
  1. Using snap ring pliers, remove the axle hub hole snap ring.

    NOTICE:
    When removing the hole snap ring, do not damage the magnetic rotor surface.


13. REMOVE FRONT AXLE HUB SUB-ASSEMBLY
  1. Secure the front axle assembly between aluminum plates in a vise.
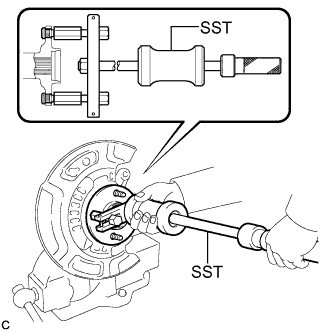
    NOTICE:
    Do not overtighten the vise.


    C249884E01
  1. Using SST, remove the front axle hub sub-assembly.
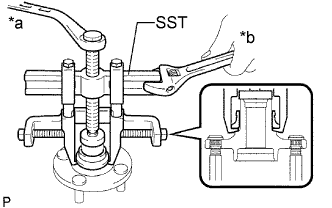
    SST
    09520-00031  

    NOTICE:
    Do not drop the front axle hub sub-assembly.


    G031908E06
  1. Using SST, remove the axle hub bearing inner race.

    SST
    09950-40011   (09951-04020, 09952-04010, 09953-04020, 09954-04010, 09955-04011, 09957-04010, 09958-04011)
    09950-60010   (09951-00370)
    Text in Illustration 
    *a
    Turn
    *b
    Hold


14. REMOVE FRONT AXLE HUB BEARING
  1. Install the removed axle hub bearing inner race onto the outer side of the axle hub bearing.
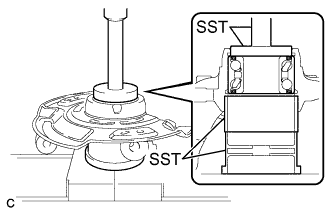


    C249889E01
  1. Using SST and a press, remove the axle hub bearing.

    SST
    09223-15020  
    09387-02010  
    09950-60010   (09951-00630)
    09950-70010   (09951-07100)