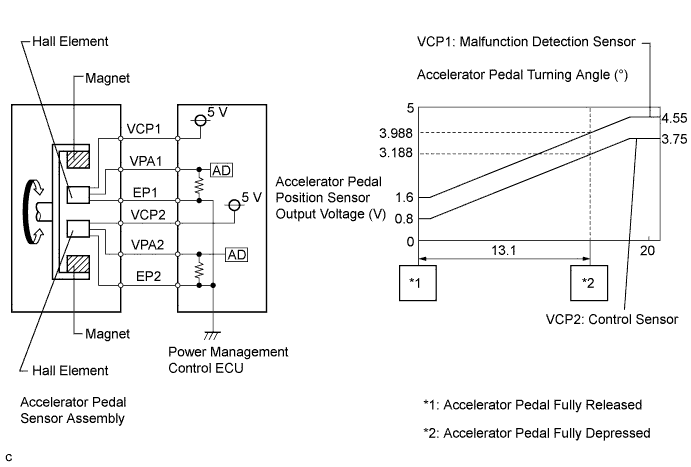
DTC P2120-152 Throttle / Pedal Position Sensor / Switch "D" Circuit |
DTC P2121-106 Throttle / Pedal Position Sensor / Switch "D" Circuit Range / Performance |
DTC P2122-104 Throttle / Pedal Position Sensor / Switch "D" Circuit Low Input |
DTC P2123-105 Throttle / Pedal Position Sensor / Switch "D" Circuit High Input |
DTC P2125-153 Throttle / Pedal Position Sensor / Switch "E" Circuit |
DTC P2126-109 Throttle / Pedal Position Sensor / Switch "E" Circuit Range / Performance |
DTC P2127-107 Throttle / Pedal Position Sensor / Switch "E" Circuit Low Input |
DTC P2128-108 Throttle / Pedal Position Sensor / Switch "E" Circuit High Input |
DTC P2138-110 Throttle / Pedal Position Sensor / Switch "D" / "E" Voltage Correlation |
DTC P2138-154 Throttle / Pedal Position Sensor / Switch "D" / "E" Voltage Correlation |
| DTC No. | INF Code | DTC Detection Condition | Trouble Area |
| P2120 | 152 | Main sensor circuit wiring malfunction or level is not stable Main sensor voltage is 0.4 V or less or 4.8 V or more for a certain period of time. (Both of the following conditions are met: The main sensor voltage is 0.4 V or less for a certain period of time and 4.8 V or more for a certain period of time.) (1 trip detection logic) |
|
| P2121 | 106 | Internal error of the main sensor Main sensor output changes rapidly (detected when there are no circuit malfunctions such as an open or short). (1 trip detection logic) | |
| P2122 | 104 | Open or short to GND in the main sensor circuit The main sensor voltage is 0.4 V or less for 0.5 seconds. (1 trip detection logic) | |
| P2123 | 105 | Short to +B in the main sensor circuit The main sensor voltage is 4.8 V or more for 2 seconds. (1 trip detection logic) | |
| P2125 | 153 | Sub sensor circuit wiring malfunction or level is not stable When the main sensor circuit is normal, the sub sensor voltage is 1.2 V or less or 4.8 V or more for a certain period of time. (Both of the following conditions are met: Sub sensor voltage is 1.2 V or less for a certain period of time, and the main sensor is normal and sub sensor voltage is 4.8 V or more for a certain period of time.) (1 trip detection logic) | |
| P2126 | 109 | Internal error of the sub sensor Sub sensor output changes rapidly (detected when there are no circuit malfunctions such as an open or short). (1 trip detection logic) | |
| P2127 | 107 | Open or short to GND in the sub sensor circuit The sub sensor voltage is 1.2 V or less for 0.5 seconds. (1 trip detection logic) | |
| P2128 | 108 | Short to +B in the sub sensor circuit Main sensor is normal and sub sensor voltage is 4.8 V or more for 2 seconds. (1 trip detection logic) | |
| P2138 | 110 | Difference between the main sensor value and sub sensor value is large. (1 trip detection logic) | |
| 154 | Main or sub sensor circuit wiring malfunction The difference in voltage between the main sensor and sub sensor is 0.02 V or less, or a low output malfunction continues in both the main and sub sensors for a certain period of time. (1 trip detection logic) |
| DTC No. | Data List |
| P2120-152 |
|
| P2121-106 | |
| P2122-104 | |
| P2123-105 | |
| P2125-153 | |
| P2126-109 | |
| P2127-107 | |
| P2128-108 | |
| P2138-110 | |
| P2138-154 |
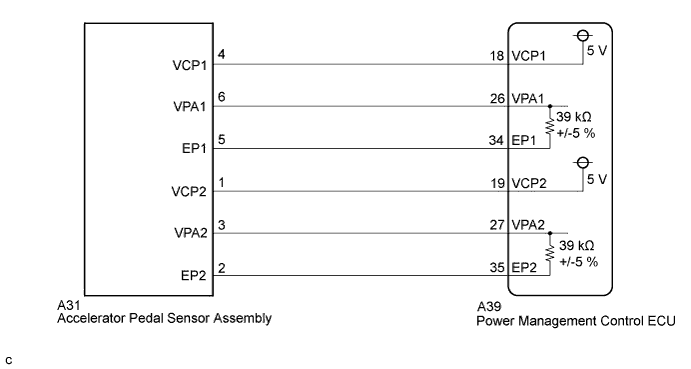
| 1.READ VALUE USING TECHSTREAM (ACCEL PEDAL POS #1, ACCEL PEDAL POS #2) |
Connect the Techstream to the DLC3.
Turn the ignition switch to ON (IG).
Enter the following menus: Powertrain / Hybrid Control / Data List / Accel Pedal Pos #1, Accel Pedal Pos #2.
Read the Data List.
| Tester Display | Accelerator Pedal Condition | Specified Condition |
| Accel Pedal Pos #1 | Not depressed | 10 to 22 % |
| Fully depressed | 52 to 90 % | |
| Not depressed → Fully depressed → Not depressed (Accelerator pedal should be operated slowly) | Value changes progressively | |
| Accel Pedal Pos #2 | Not depressed | 24 to 40 % |
| Fully depressed | 68 to 99 % | |
| Not depressed → Fully depressed → Not depressed (Accelerator pedal should be operated slowly) | Value changes progressively |
Turn the ignition switch off.
|
| ||||
| OK | ||
 | ||
| ||
| 2.CHECK CONNECTOR CONNECTION CONDITION (ACCELERATOR PEDAL SENSOR ASSEMBLY CONNECTOR) |
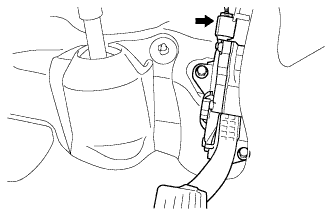 |
Check the connection of the accelerator pedal sensor assembly connector.
|
| ||||
| OK | |
 |
| 3.CHECK CONNECTOR CONNECTION CONDITION (POWER MANAGEMENT CONTROL ECU CONNECTOR) |
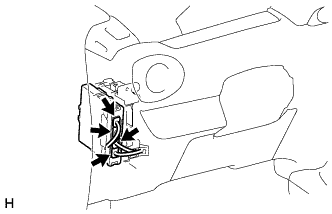 |
Check the connector connections and contact pressure of the relevant terminals for the power management control ECU connectors (Click here).
|
| ||||
| OK | |
|
| 4.CHECK POWER MANAGEMENT CONTROL ECU (CHECK VOLTAGE) |
Disconnect connector A31 from the accelerator pedal sensor assembly.
Turn the ignition switch to ON (IG).
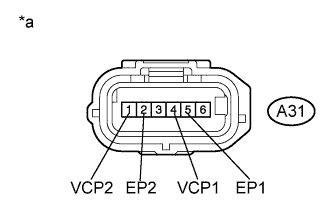 |
Measure the voltage according to the value(s) in the table below.
| Tester Connection | Switch Condition | Specified Condition |
| A31-4 (VCP1) - A31-5 (EP1) | Ignition switch ON | 4.5 to 5.5 V |
| A31-1 (VCP2) - A31-2 (EP2) | Ignition switch ON | 4.5 to 5.5 V |
| *a | Front view of wire harness connector (to Accelerator Pedal Sensor Assembly) |
Turn the ignition switch off.
Connect the accelerator pedal sensor assembly connector.
|
| ||||
| OK | |
|
| 5.CHECK POWER MANAGEMENT CONTROL ECU (CHECK RESISTANCE) |
Disconnect connector A31 from the accelerator pedal sensor assembly.
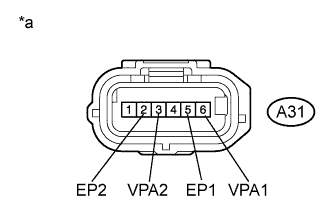 |
Measure the resistance according to the value(s) in the table below.
| Tester Connection | Switch Condition | Specified Condition |
| A31-6 (VPA1) - A31-5 (EP1) | Ignition switch off | 36.60 to 41.61 kΩ |
| A31-3 (VPA2) - A31-2 (EP2) | Ignition switch off | 36.60 to 41.61 kΩ |
| *a | Front view of wire harness connector (to Accelerator Pedal Sensor Assembly) |
Connect the accelerator pedal sensor assembly connector.
|
| ||||
| OK | ||
| ||
| ||
| 6.CHECK HARNESS AND CONNECTOR (POWER MANAGEMENT CONTROL ECU - ACCELERATOR PEDAL SENSOR) |
Disconnect connector A31 from the accelerator pedal sensor assembly.
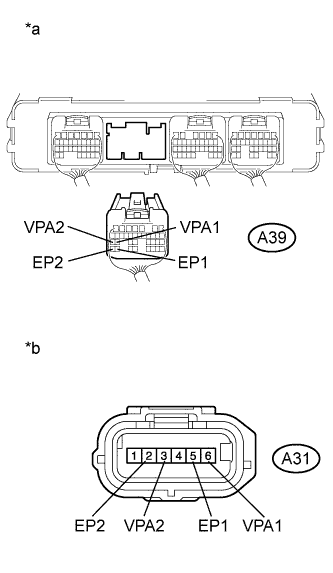 |
Disconnect connector A39 from the power management control ECU.
Turn the ignition switch to ON (IG).
Measure the voltage according to the value(s) in the table below.
| Tester Connection | Switch Condition | Specified Condition |
| A39-26 (VPA1) - Body ground | Ignition switch ON | Below 1 V |
| A39-27 (VPA2) - Body ground | Ignition switch ON | Below 1 V |
| A39-34 (EP1) - Body ground | Ignition switch ON | Below 1 V |
| A39-35 (EP2) - Body ground | Ignition switch ON | Below 1 V |
| *a | Rear view of wire harness connector (to Power Management Control ECU) |
| *b | Front view of wire harness connector (to Accelerator Pedal Sensor Assembly) |
Turn the ignition switch off.
Measure the resistance according to the value(s) in the table below.
| Tester Connection | Switch Condition | Specified Condition |
| A39-26 (VPA1) - A31-6 (VPA1) | Ignition switch off | Below 1 Ω |
| A39-34 (EP1) - A31-5 (EP1) | Ignition switch off | Below 1 Ω |
| A39-27 (VPA2) - A31-3 (VPA2) | Ignition switch off | Below 1 Ω |
| A39-35 (EP2) - A31-2 (EP2) | Ignition switch off | Below 1 Ω |
| Tester Connection | Switch Condition | Specified Condition |
| A39-26 (VPA1) or A31-6 (VPA1) - Body ground and other terminals | Ignition switch off | 10 kΩ or higher |
| A39-34 (EP1) or A31-5 (EP1) - Body ground and other terminals | Ignition switch off | 10 kΩ or higher |
| A39-27 (VPA2) or A31-3 (VPA2) - Body ground and other terminals | Ignition switch off | 10 kΩ or higher |
| A39-35 (EP2) or A31-2 (EP2) - Body ground and other terminals | Ignition switch off | 10 kΩ or higher |
Connect the power management control ECU connector.
Connect the accelerator pedal sensor assembly connector.
|
| ||||
| OK | ||
| ||
| ||
| 7.CHECK HARNESS AND CONNECTOR (POWER MANAGEMENT CONTROL ECU - ACCELERATOR PEDAL SENSOR) |
Disconnect connector A31 from the accelerator pedal sensor assembly.
Disconnect connector A39 from the power management control ECU.
Turn the ignition switch to ON (IG).
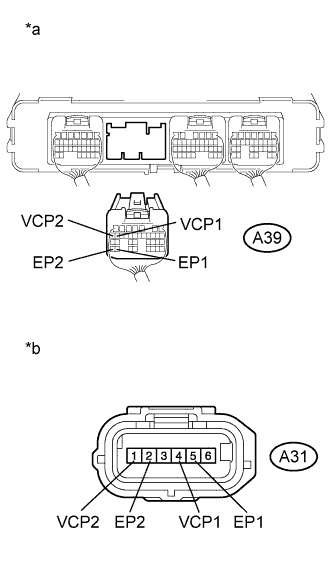 |
Measure the voltage according to the value(s) in the table below.
| Tester Connection | Switch Condition | Specified Condition |
| A39-18 (VCP1) - Body ground | Ignition switch ON | Below 1 V |
| A39-34 (EP1) - Body ground | Ignition switch ON | Below 1 V |
| A39-19 (VCP2) - Body ground | Ignition switch ON | Below 1 V |
| A39-35 (EP2) - Body ground | Ignition switch ON | Below 1 V |
| *a | Rear view of wire harness connector (to Power Management Control ECU) |
| *b | Front view of wire harness connector (to Accelerator Pedal Sensor Assembly) |
Turn the ignition switch off.
Measure the resistance according to the value(s) in the table below.
| Tester Connection | Switch Condition | Specified Condition |
| A39-18 (VCP1) - A31-4 (VCP1) | Ignition switch off | Below 1 Ω |
| A39-34 (EP1) - A31-5 (EP1) | Ignition switch off | Below 1 Ω |
| A39-19 (VCP2) - A31-1 (VCP2) | Ignition switch off | Below 1 Ω |
| A39-35 (EP2) - A31-2 (EP2) | Ignition switch off | Below 1 Ω |
| Tester Connection | Switch Condition | Specified Condition |
| A39-18 (VCP1) or A31-4 (VCP1) - Body ground and other terminals | Ignition switch off | 10 kΩ or higher |
| A39-34 (EP1) or A31-5 (EP1) - Body ground and other terminals | Ignition switch off | 10 kΩ or higher |
| A39-19 (VCP2) or A31-1 (VCP2) - Body ground and other terminals | Ignition switch off | 10 kΩ or higher |
| A39-35 (EP2) or A31-2 (EP2) - Body ground and other terminals | Ignition switch off | 10 kΩ or higher |
Connect the power management control ECU connector.
Connect the accelerator pedal sensor assembly connector.
|
| ||||
| OK | ||
| ||
| ||

