 |
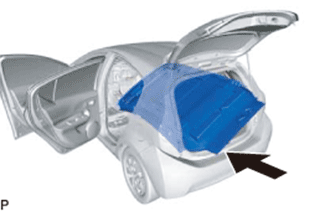
Pull the roof headlining back into the vehicle through the back door.
- NOTICE:
- Do not damage the roof headlining assembly or body interior.
ROOF HEADLINING > INSTALLATION |
| 1. INSTALL ROOF HEADLINING ASSEMBLY (w/o Sliding Roof) |
|
Pull the roof headlining back into the vehicle through the back door.
Engage the claw.
Install the roof headlining assembly with the 3 clips.
for front pillar RH side:
Engage the 3 clamps.
Connect the connector.
for front pillar LH side:
Engage the 3 clamps.
Connect the connector.
for rear pillar RH side:
Engage the 2 clamps.
Connect the connector bracket with the bolt.
Connect the connector.
| 2. INSTALL ROOF HEADLINING ASSEMBLY (w/ Sliding Roof) |
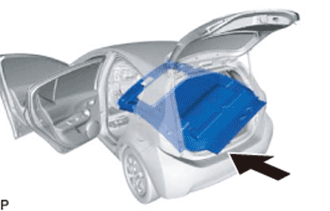 |
Pull the roof headlining back into the vehicle through the back door.
Engage the claw.
Install the roof headlining assembly with the clip.
for front pillar RH side:
Engage the 3 clamps.
Connect the connector.
for front pillar LH side:
Engage the 3 clamps.
Connect the connector.
for rear pillar RH side:
Engage the 2 clamps.
Connect the connector bracket with the bolt.
Connect the connector.
for Roof Side:
Connect the connector.
| 3. INSTALL VISOR HOLDER |
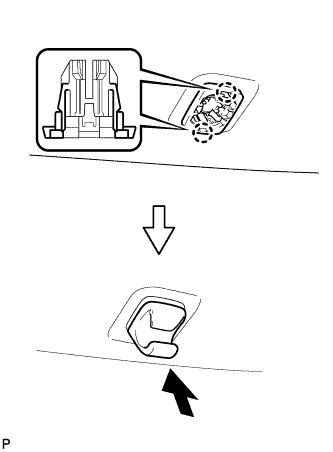 |
Engage the 2 claws and turn the visor holder counterclockwise 45° to install it.
| 4. INSTALL VISOR ASSEMBLY LH |
Install the visor assembly LH with the 2 screws.
Connect the visor shaft into the visor holder.
| 5. INSTALL VISOR ASSEMBLY RH |
| 6. INSTALL SLIDING ROOF OPENING TRIM MOULDING (w/ Sliding Roof) |
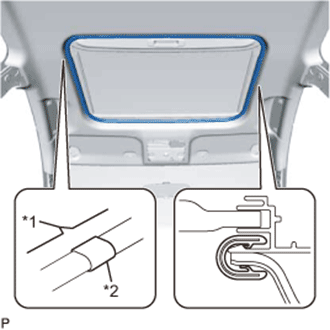 |
Align the alignment mark on the moulding with the notch of the roof headlining to install the sliding roof opening trim moulding.
| *1 | Notch |
| *2 | Alignment Mark |
| 7. INSTALL ASSIST GRIP ASSEMBLY |
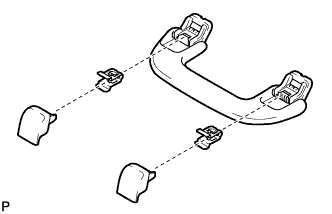 |
Assemble the front assist grip assembly as shown in the illustration.
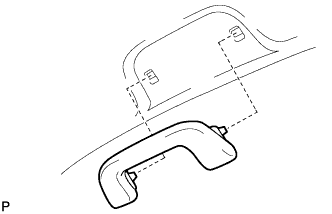 |
Install the assist grip assembly.
| 8. INSTALL ROOF HEADLINING SERVICE HOLE COVER (w/ Sliding Roof) |
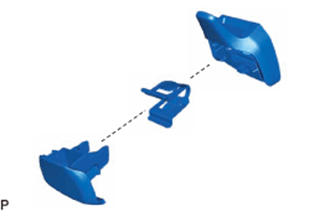 |
Assemble the roof headlining service hole cover as shown in the illustration.
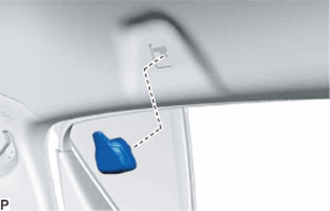 |
Install the roof headlining service hole cover.
| 9. INSTALL MAP LIGHT ASSEMBLY (w/o Sliding Roof) |
Connect the connector.
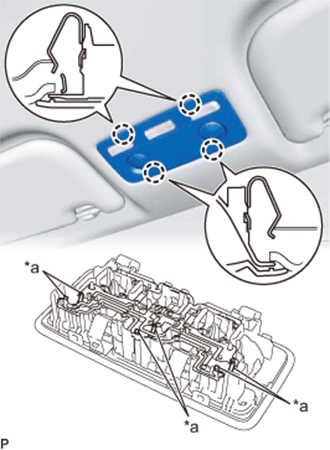 |
Engage the 4 claws to install the map light assembly.
| *a | Contact Portion |
| 10. INSTALL MAP LIGHT ASSEMBLY (w/ Sliding Roof) |
Connect the connector.
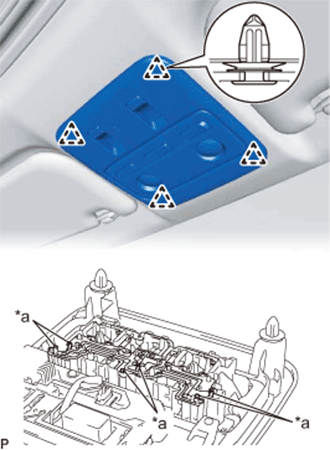 |
Engage the 4 clips to install the map light assembly.
| *a | Contact Portion |
| 11. INSTALL ROOF SIDE INNER GARNISH LH |
Pass the floor anchor of the rear seat 3 point type outer belt assembly LH through the roof side inner garnish LH.
Engage the 5 clips to install the roof side inner garnish LH.
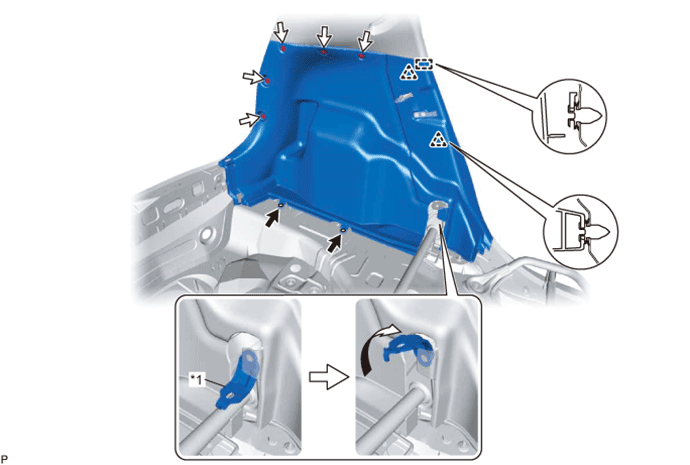
| 12. INSTALL DECK TRIM SIDE PANEL ASSEMBLY LH (w/o Package Tray Trim) |
Engage the guide and 2 clips.
| *1 | Rear Seatback Hinge | - | - |
Install the deck trim side panel assembly LH with the 2 screws and 5 clips.
Turn the rear seatback hinge in the direction indicated by the arrow shown in the illustration.
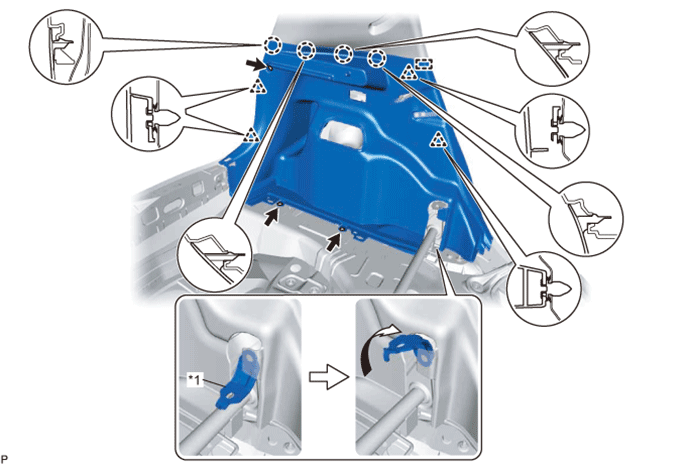
| 13. INSTALL DECK TRIM SIDE PANEL ASSEMBLY LH (w/ Package Tray Trim) |
Engage the guide, 4 claws and 4 clips.
| *1 | Rear Seatback Hinge | - | - |
Install the deck trim side panel assembly LH with the bolt and 2 screws.
Turn the rear seatback hinge in the direction indicated by the arrow shown in the illustration.
| 14. INSTALL REAR ABSORBER CAP LH (w/ Package Tray Trim) |
Engage the 2 guides and 2 claws to install the rear absorber cap LH.
| 15. INSTALL NO. 1 LUGGAGE COMPARTMENT LIGHT ASSEMBLY (w/ Package Tray Trim) |
Connect the connector.
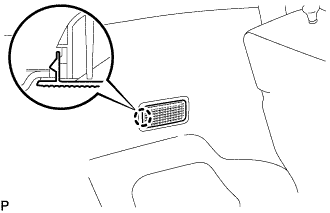 |
Engage the claw to install the No. 1 luggage compartment light assembly.
| 16. CONNECT REAR SEAT 3 POINT TYPE OUTER BELT ASSEMBLY LH |
Engage the 2 claws.
Install the floor anchor of the rear seat 3 point type outer belt assembly with the bolt.
| 17. INSTALL ROOF SIDE INNER GARNISH RH |
Pass the floor anchor of the rear seat 3 point type outer belt assembly RH through the roof side inner garnish RH.
Engage the 5 clips to install the roof side inner garnish RH.
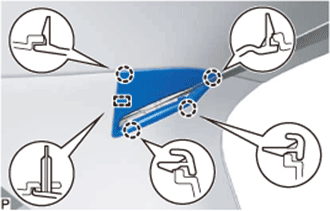 |
Engage the guide and 4 claws to connect the belt guide.
| 18. CONNECT REAR CENTER SEAT LAP TYPE BELT ASSEMBLY |
Install the shoulder anchor of the rear center seat lap type belt assembly with the bolt.
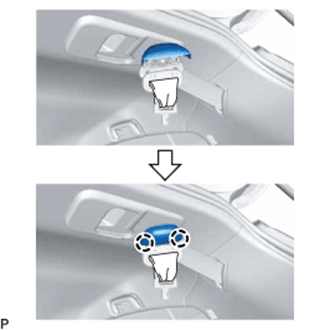 |
Engage the 2 claws to close the cover as shown in the illustration.
| 19. INSTALL DECK TRIM SIDE PANEL ASSEMBLY RH |
| 20. INSTALL REAR ABSORBER CAP RH (w/ Package Tray Trim) |
| 21. INSTALL REAR SEAT 3 POINT TYPE OUTER BELT ASSEMBLY RH |
| 22. INSTALL REAR DECK TRIM COVER |
Engage the 2 guides and 4 claws.
Install the rear deck trim cover with the 2 clips.
| 23. INSTALL PACKAGE TRAY TRIM PANEL ASSEMBLY (w/ Package Tray Trim) |
Install the package tray trim panel assembly.
| 24. INSTALL SPARE WHEEL CUSHION |
Install the 2 spare wheel cushions.
| 25. INSTALL REAR FLOOR MAT ASSEMBLY |
Install the rear floor mat assembly.
| 26. INSTALL CENTER PILLAR UPPER GARNISH LH |
Pass the floor anchor of the front seat outer seat belt assembly LH through the center pillar upper garnish LH.
Engage the clip.
Install the center pillar upper garnish LH with the 2 screws.
| 27. INSTALL CENTER PILLAR LOWER GARNISH LH |
Engage the 4 claws and 2 clips to install the center pillar lower garnish LH.
| 28. CONNECT FRONT SEAT OUTER BELT ASSEMBLY LH |
Install the floor anchor of the front seat outer belt assembly with the bolt.
| 29. INSTALL LAP BELT OUTER ANCHOR COVER (for LH Side) |
Engage the 3 claws and install the lap belt outer anchor cover.
| 30. INSTALL REAR DOOR OPENING TRIM WEATHERSTRIP LH |
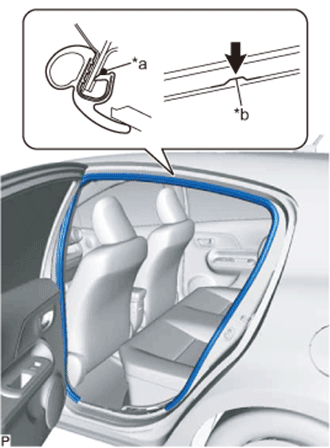 |
Align the alignment mark (White) on the weatherstrip with the protruding portion on the body indicated by the arrow in the illustration, and install the rear door opening trim weatherstrip LH.
| *a | Alignment Mark (White) |
| *b | Flange Position |
| 31. INSTALL FRONT PILLAR GARNISH LH |
Remove the protective cover.
Make sure that the front pillar garnish clip is not damaged.
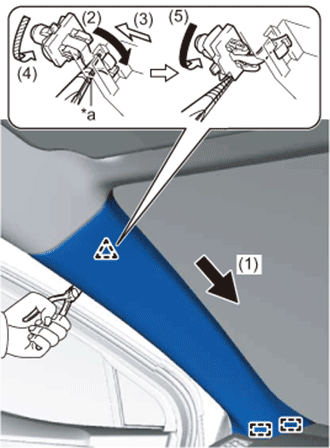 |
Push the front pillar garnish LH in the direction indicated by the arrow (1) shown in the illustration to engage the 2 guides.
| *a | Protective Tape |
Using needle-nose pliers with the tips wrapped with protective tape, bend the end of the front pillar garnish clip in the direction indicated by the arrow (2) shown in the illustration.
Push the front pillar garnish LH in the direction indicated by the arrow (3) shown in the illustration and insert it to the front pillar garnish clip.
Using needle-nose pliers with the tips wrapped with protective tape, rotate the front pillar garnish clip in the direction indicated by the arrow (4) shown in the illustration.
Using needle-nose pliers with the tips wrapped with protective tape, push the front pillar garnish clip in the direction indicated by the arrow (5) and rotate it to the position shown in the illustration.
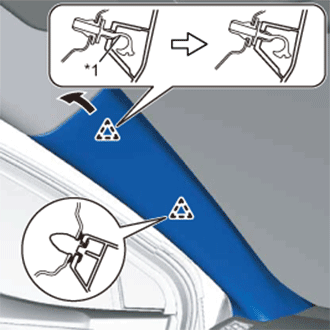 |
Engage the clip and front pillar garnish clip to install the front pillar garnish LH.
| *1 | Front Pillar Garnish Clip |
| 32. INSTALL FRONT DOOR OPENING TRIM WEATHERSTRIP LH |
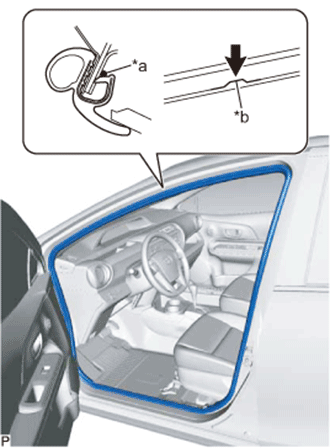 |
Align the alignment mark (Yellow) on the weatherstrip with the protruding portion on the body indicated by the arrow in the illustration, and install the front door opening trim weatherstrip LH.
| *a | Alignment Mark (Yellow) |
| *b | Flange Position |
| 33. INSTALL COWL SIDE TRIM BOARD LH |
Engage the clip.
Install the cowl side trim board with the clip.
| 34. INSTALL FRONT DOOR SCUFF PLATE LH |
Engage the 8 claws to install the front door scuff plate.
| 35. INSTALL REAR DOOR SCUFF PLATE LH |
Engage the guide and the 5 claws to install the rear door scuff plate.
| 36. INSTALL CENTER PILLAR UPPER GARNISH RH |
| 37. INSTALL CENTER PILLAR LOWER GARNISH RH |
| 38. CONNECT FRONT SEAT OUTER BELT ASSEMBLY RH |
| 39. INSTALL LAP BELT OUTER ANCHOR COVER (for RH Side) |
| 40. INSTALL REAR DOOR OPENING TRIM WEATHERSTRIP RH |
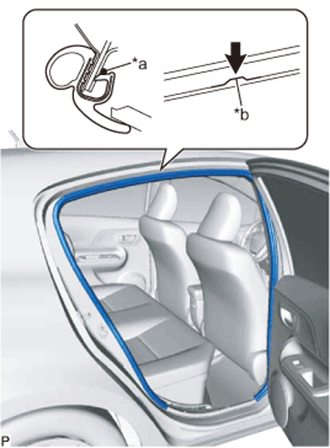 |
Align the alignment mark (Red) on the weatherstrip with the protruding portion on the body indicated by the arrow in the illustration, and install the rear door opening trim weatherstrip RH.
| *a | Alignment Mark (Red) |
| *b | Flange Position |
| 41. INSTALL FRONT PILLAR GARNISH RH |
| 42. INSTALL REAR DOOR SCUFF PLATE RH |
| 43. INSTALL FRONT DOOR OPENING TRIM WEATHERSTRIP RH |
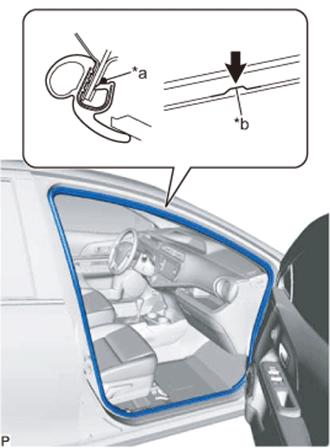 |
Align the alignment mark (Yellow green) on the weatherstrip with the protruding portion on the body indicated by the arrow in the illustration, and install the front door opening trim weatherstrip RH.
| *a | Alignment Mark (Yellow green) |
| *b | Flange Position |
| 44. INSTALL COWL SIDE TRIM BOARD RH |
| 45. INSTALL FRONT DOOR SCUFF PLATE RH |
| 46. INSTALL REAR SEAT CUSHION ASSEMBLY (for Bench Type Seatback) |
Place the rear seat cushion assembly in the cabin.
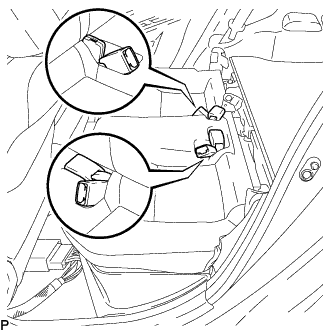 |
Push out the seat belt buckles from the back of the rear seat cushion assembly so that they are positioned as shown in the illustration.
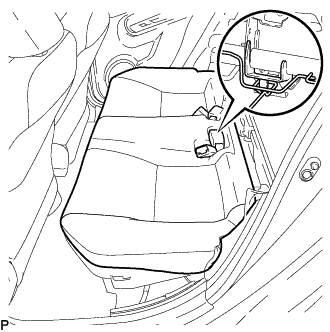 |
Engage the hook of the rear seat cushion assembly to the CRS anchor bracket.
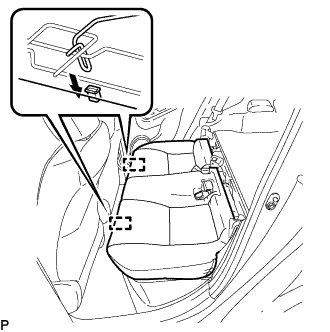 |
Engage the 2 rear seat cushion lock hooks to install the rear seat cushion assembly as shown in the illustration.
Confirm that the seat cushion is firmly installed.
Engage the 2 clips.
| 47. INSTALL REAR SEATBACK ASSEMBLY (for Bench Type Seatback) |
Place the rear seatback assembly in the cabin.
Install the rear seatback assembly with the 2 bolts.
Raise the rear seatback assembly.
| 48. INSTALL REAR SEAT CUSHION ASSEMBLY (for Separate Type Seatback) |
Place the rear seat cushion assembly in the cabin.
|
Push out the seat belt buckles from the back of the rear seat cushion assembly so that they are positioned as shown in the illustration.
|
Engage the hook of the rear seat cushion assembly to the CRS anchor bracket.
|
Engage the 2 rear seat cushion lock hooks to install the rear seat cushion assembly as shown in the illustration.
Confirm that the seat cushion is firmly installed.
Engage the 2 clips.
| 49. INSTALL REAR SEATBACK ASSEMBLY LH (for Separate Type Seatback) |
Place the rear seatback assembly LH in the cabin.
Install the rear seatback assembly LH with the 2 bolts.
Raise the rear seatback assembly LH.
| 50. INSTALL REAR SEATBACK ASSEMBLY RH (for Separate Type Seatback) |
Place the rear seatback assembly RH in the cabin.
Install the rear seatback assembly RH with the 2 bolts.
Raise the rear seatback assembly RH.
| 51. INSTALL REAR CENTER SEAT HEADREST ASSEMBLY |
| 52. INSTALL REAR SEAT HEADREST ASSEMBLY |
| 53. INSTALL FRONT CENTER FLOOR COVER |
Engage the 2 guides to install the front center floor cover.
Install the 3 clips.
| 54. INSTALL FRONT FLOOR COVER LH |
Engage the 3 guides.
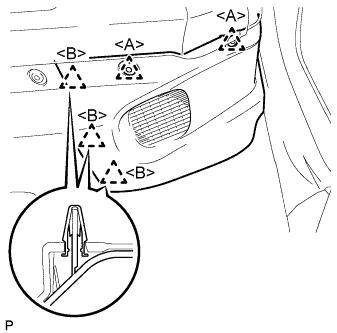 |
Engage the 3 clips <B> to install the front floor cover LH.
Install the 2 clips <A>.
| 55. INSTALL FRONT FLOOR COVER RH |
Engage the 3 guides.
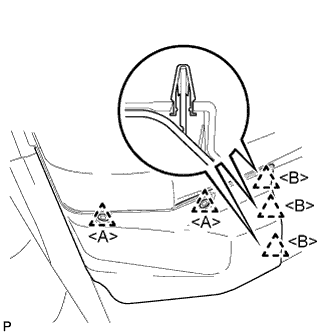 |
Engage the 3 clips <B> to install the front floor cover RH.
Install the 2 clips <A>.