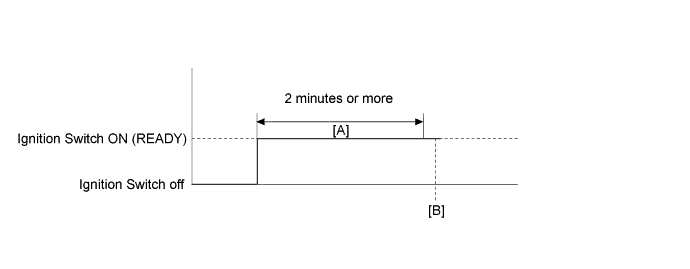
DTC P314A-828 Inverter Coolant Pump Speed Signal |
| DTC No. | INF Code | DTC Detection Condition | Trouble Area |
| P314A | 828 | The water pump speed signal is not sent to the power management control ECU when the ignition switch is turned on (READY) or water pump revolution speed is extremely low or stop.*1 (1 trip detection logic) |
|
| DTC No. | Data List |
| P314A-828 |
|
| DTC No. | Active Test |
| P314A-828 | Activate the Water Pump*3 |
| Related DTCs | P314A (INF 828): Verify pulse input |
| Required sensors / components | Inverter Water Pump Assembly |
| Frequency of operation | Continuous |
| Duration | TMC's intellectual property |
| MIL operation | Immediately |
| Sequence of operation | None |
| The monitor will run whenever the following DTCs are not present | TMC's intellectual property |
| Other conditions belong to TMC's intellectual property | - |
| TMC's intellectual property | - |
| Power management control ECU | DTC P314A (INF 828) is not detected |
| 1.CLEAR DTC |
Connect the Techstream to the DLC3.
Turn the ignition switch to ON (IG).
Enter the following menus: Powertrain / Hybrid Control / Trouble Codes.
Read and record the DTCs and freeze frame data.
Clear DTCs and freeze frame data.
Turn the ignition switch off.
| NEXT | |
 |
| 2.PERFORM ACTIVE TEST USING TECHSTREAM (ACTIVATE THE WATER PUMP) |
Connect the Techstream to the DLC3.
Turn the ignition switch to ON (IG).
Enter the following menus: Powertrain / Hybrid Control / Active Test / Activate the Water Pump.
Perform the Activate the Water Pump Active Test.
Touch the inverter water pump assembly and check that it is operating (vibrating).
Turn the ignition switch off.
|
| ||||
| OK | |
|
| 3.CHECK CONNECTOR CONNECTION CONDITION (POWER MANAGEMENT CONTROL ECU CONNECTOR) |
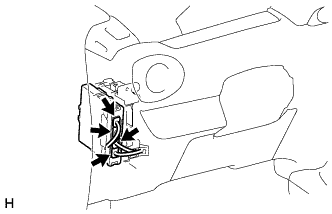 |
Check the connector connections and contact pressure of the relevant terminals for the power management control ECU connectors (Click here).
|
| ||||
| OK | |
|
| 4.CHECK CONNECTOR CONNECTION CONDITION (INVERTER WATER PUMP ASSEMBLY CONNECTOR) |
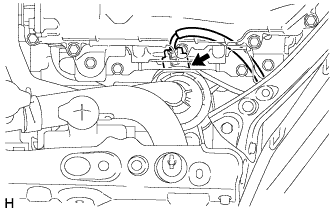 |
Check the connector connections and contact pressure of the relevant terminals for the inverter water pump assembly connector (Click here).
|
| ||||
| OK | |
|
| 5.CHECK HARNESS AND CONNECTOR (POWER MANAGEMENT CONTROL ECU - INVERTER WATER PUMP ASSEMBLY) |
Disconnect connector A38 from the power management control ECU.
Disconnect connector A53 from the inverter water pump assembly.
Measure the resistance according to the value(s) in the table below.
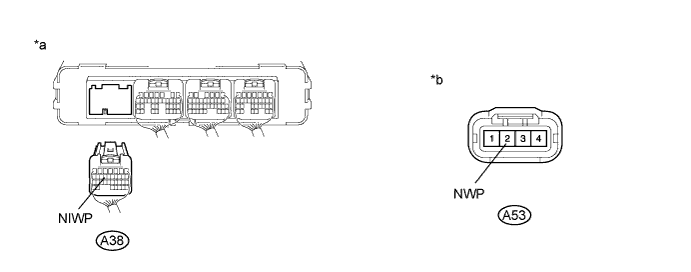
| *a | Rear view of wire harness connector (to Power Management Control ECU) | *b | Front view of wire harness connector (to Inverter Water Pump Assembly) |
| Tester Connection | Switch Condition | Specified Condition |
| A38-14 (NIWP) - A53-2 (NWP) | Ignition switch off | Below 1 Ω |
| A38-14 (NIWP) or A53-2 (NWP) -Body ground and other terminals | Ignition switch off | 10 kΩ or higher |
Connect the power management control ECU connector.
Connect the inverter water pump assembly connector.
|
| ||||
| OK | |
|
| 6.CHECK POWER MANAGEMENT CONTROL ECU |
Disconnect connector A53 from the inverter water pump assembly.
Turn the ignition switch to ON (IG).
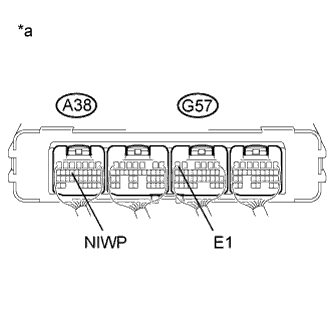 |
Measure the voltage according to the value(s) in the table below.
| Tester Connection | Switch Condition | Specified Condition |
| A38-14 (NIWP) - G57-6 (E1) | Ignition switch ON (IG) | 11 to 14 V |
| *a | Component with harness connected (Power Management Control ECU) |
Turn the ignition switch off.
Connect the inverter water pump assembly connector.
|
| ||||
| OK | |
|
| 7.CLEAR DTC |
Connect the Techstream to the DLC3.
Turn the ignition switch to ON (IG).
Enter the following menus: Powertrain / Hybrid Control / Trouble Codes.
Read and record the DTCs and freeze frame data.
Clear DTCs and freeze frame data.
Turn the ignition switch off.
| NEXT | |
|
| 8.PERFORM ACTIVE TEST USING TECHSTREAM (ACTIVATE THE WATER PUMP) |
Connect the Techstream to the DLC3.
Turn the ignition switch to ON (IG).
Enter the following menus: Powertrain / Hybrid Control / Active Test / Activate the Water Pump.
Perform the "Activate the Water Pump" Active Test.
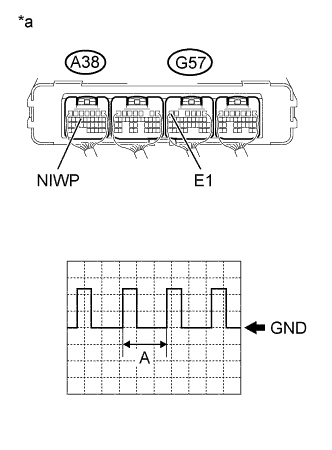 |
Connect an oscilloscope between the power management control ECU terminals specified in the table below, and measure the waveform.
| Item | Content |
| Terminal | A38-14 (NIWP) - G57-6 (E1) |
| Equipment Setting | 5 V/DIV., 100 ms./DIV. |
| Condition | Ignition switch ON (IG), during Active Test |
| *a | Component with harness connected (Power Management Control ECU) |
Turn the ignition switch off.
|
| ||||
| OK | ||
 | ||
| ||
| 9.CHECK CONNECTOR CONNECTION CONDITION (INVERTER WATER PUMP ASSEMBLY CONNECTOR) |
|
Check the connector connections and contact pressure of the relevant terminals for the inverter water pump assembly connector (Click here).
|
| ||||
| OK | |
|
| 10.CHECK HARNESS AND CONNECTOR (INVERTER WATER PUMP ASSEMBLY - IGCT RELAY) |
Remove the IGCT relay from the No. 2 engine room relay block and No. 2 junction block assembly.
Disconnect connector A53 from the inverter water pump assembly.
Measure the resistance according to the value(s) in the table below.
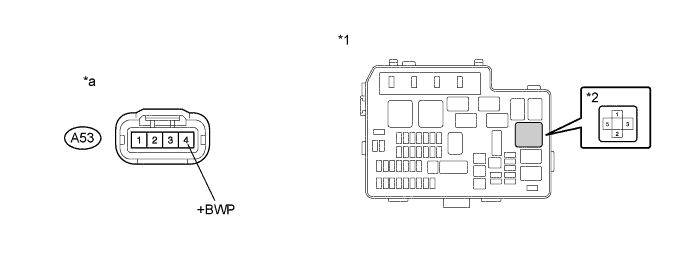
| *1 | No. 2 Engine Room Relay Block and No. 2 Junction Block Assembly | *2 | IGCT Relay |
| *a | Front view of wire harness connector (to Inverter Water Pump Assembly) | - | - |
| Tester Connection | Switch Condition | Specified Condition |
| A53-4 (+BWP) - 5 (IGCT relay) | Ignition switch off | Below 1 Ω |
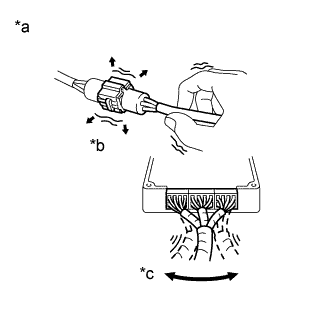 |
| *a | Example |
| *b | Shake Slightly |
| *c | Vibrate Slightly |
Install the IGCT relay.
Connect the inverter water pump assembly connector.
|
| ||||
| OK | |
|
| 11.CHECK HARNESS AND CONNECTOR (INVERTER WATER PUMP ASSEMBLY - BODY GROUND) |
Disconnect connector A53 from the inverter water pump assembly.
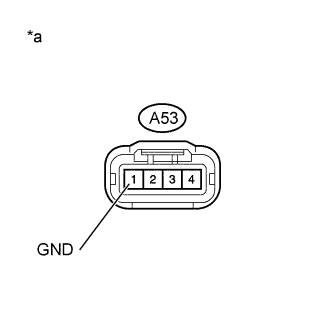 |
Measure the resistance according to the value(s) in the table below.
| Tester Connection | Switch Condition | Specified Condition |
| A53-1 (GND) - Body ground | Ignition switch off | 10 kΩ or higher |
| *a | Front view of wire harness connector (to Inverter Water Pump Assembly) |
Connect the inverter water pump assembly connector.
|
| ||||
| OK | ||
| ||
| ||
| 12.CHECK FUSE (IGCT NO. 3) |
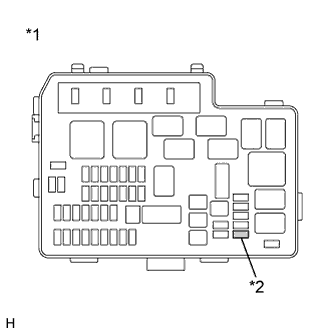 |
Remove the IGCT NO. 3 fuse from the No. 2 engine room relay block and No. 2 junction block assembly.
Measure the resistance according to the value(s) in the table below.
| Tester Connection | Condition | Specified Condition |
| IGCT NO. 3 fuse | Always | Below 1Ω |
| *1 | No. 2 Engine Room Relay Block and No. 2 Junction Block Assembly |
| *2 | IGCT NO. 3 Fuse |
Install the IGCT NO. 3 fuse.
|
| ||||
| OK | ||
| ||
| ||
| 13.CHECK INSTALLATION CONDITION (IGCT NO. 3 FUSE) |
Check the terminals of the IGCT NO. 3 fuse holder.
|
| ||||
| OK | |
|
| 14.CHECK HARNESS AND CONNECTOR (INVERTER WATER PUMP ASSEMBLY CIRCUIT) |
Remove the IGCT NO. 3 fuse from the No. 2 engine room relay block and No. 2 junction block assembly.
Remove the IGCT relay from the No. 2 engine room relay block and No. 2 junction block assembly.
Disconnect connector A53 from the inverter water pump assembly.
Measure the resistance according to the value(s) in the table below.
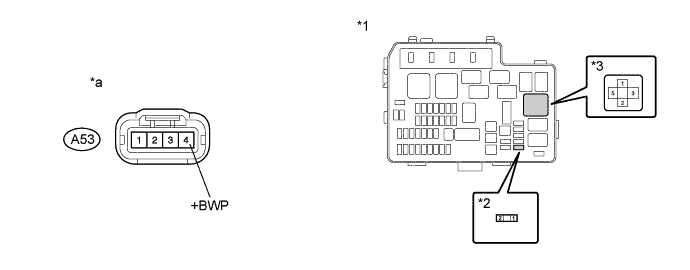
| *1 | No. 2 Engine Room Relay Block and No. 2 Junction Block Assembly | *2 | IGCT NO. 3 Fuse |
| *3 | IGCT Relay | - | - |
| *a | Front view of wire harness connector (to Inverter Water Pump Assembly) | - | - |
| Tester Connection | Switch Condition | Specified Condition |
| A53-4 (+BWP) - 2 (IGCT NO. 3 fuse) | Ignition switch off | Below 1 Ω |
| 1 (IGCT NO. 3 fuse) - 5 (IGCT relay) | Ignition switch off | Below 1 Ω |
| A53-4 (+BWP) or 2 (IGCT NO. 3 fuse) - Body ground and other terminals | Ignition switch off | 10 kΩ or higher |
| 1 (IGCT NO. 3 fuse) or 5 (IGCT relay) - Body ground and other terminals | Ignition switch off | 10 kΩ or higher |
Install the IGCT NO. 3 fuse.
Install the IGCT relay.
Connect the inverter water pump assembly connector.
|
| ||||
| OK | |
|
| 15.CHECK FUSE (IGCT NO. 3) |
|
Remove the IGCT NO. 3 fuse from the No. 2 engine room relay block and No. 2 junction block assembly.
Measure the resistance according to the value(s) in the table below.
| Tester Connection | Condition | Specified Condition |
| IGCT NO. 3 fuse | Always | Below 1Ω |
| *1 | No. 2 Engine Room Relay Block and No. 2 Junction Block Assembly |
| *2 | IGCT NO. 3 Fuse |
Install the IGCT NO. 3 fuse.
|
| ||||
| OK | ||
| ||
| ||
| 16.CHECK FUSE HOLDER TERMINAL (IGCT NO. 3 FUSE) |
Check the terminals of the IGCT NO. 3 fuse holder.
|
| ||||
| OK | |
|
| 17.CHECK FUSE (IGCT NO. 3) |
|
Remove the IGCT NO. 3 fuse from the No. 2 engine room relay block and No. 2 junction block assembly.
Measure the resistance according to the value(s) in the table below.
| Tester Connection | Condition | Specified Condition |
| IGCT NO. 3 fuse | Always | Below 1Ω |
| *1 | No. 2 Engine Room Relay Block and No. 2 Junction Block Assembly |
| *2 | IGCT NO. 3 Fuse |
Install the IGCT NO. 3 fuse.
|
| ||||
| OK | ||
| ||
| ||
| 18.CHECK FUSE (IGCT NO. 3) |
|
Remove the IGCT NO. 3 fuse from the No. 2 engine room relay block and No. 2 junction block assembly.
Measure the resistance according to the value(s) in the table below.
| Tester Connection | Condition | Specified Condition |
| IGCT NO. 3 fuse | Always | Below 1Ω |
| *1 | No. 2 Engine Room Relay Block and No. 2 Junction Block Assembly |
| *2 | IGCT NO. 3 Fuse |
Install the IGCT NO. 3 fuse.
|
| ||||
| OK | ||
| ||
| ||
| 19.CHECK HARNESS AND CONNECTOR (INVERTER WATER PUMP ASSEMBLY - BODY GROUND) |
Disconnect connector A53 from the inverter water pump assembly.
|
Measure the resistance according to the value(s) in the table below.
| Tester Connection | Switch Condition | Specified Condition |
| A53-1 (GND) - Body ground | Ignition switch off | 10 kΩ or higher |
| *a | Front view of wire harness connector (to Inverter Water Pump Assembly) |
Connect the inverter water pump assembly connector.
|
| ||||
| OK | |
|
| 20.CHECK FUSE HOLDER TERMINAL (IGCT NO. 3 FUSE) |
Check the terminals of the IGCT NO. 3 fuse holder.
|
| ||||
| OK | |
|
| 21.REPLACE INVERTER WATER PUMP ASSEMBLY |
| NEXT | ||
| ||
| ||
| 22.CHECK FUSE (IGCT NO. 3) |
|
Remove the IGCT NO. 3 fuse from the No. 2 engine room relay block and No. 2 junction block assembly.
Measure the resistance according to the value(s) in the table below.
| Tester Connection | Condition | Specified Condition |
| IGCT NO. 3 fuse | Always | Below 1Ω |
| *1 | No. 2 Engine Room Relay Block and No. 2 Junction Block Assembly |
| *2 | IGCT NO. 3 Fuse |
Install the IGCT NO. 3 fuse.
|
| ||||
| OK | ||
| ||
| ||
| 23.CONNECT SECURELY |
Connect the inverter water pump assembly connector securely.
| NEXT | ||
| ||
| ||
| 24.REPAIR OR REPLACE HARNESS OR CONNECTOR |
| NEXT | ||
| ||
| ||
| 25.REPAIR OR REPLACE HARNESS OR CONNECTOR (IGCT NO. 3 FUSE HOLDER TERMINAL) |
| NEXT | ||
| ||
| ||

