 |
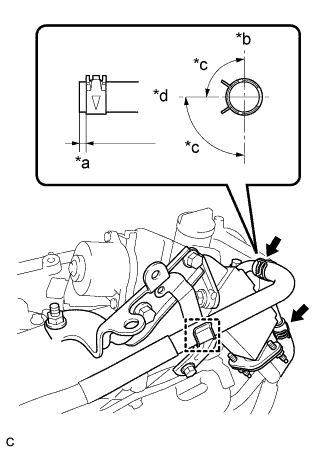
Connect the No. 4 water by-pass hose and No. 5 water by-pass hose.
| *a | 2 to 7 mm (0.079 to 0.276 in.) |
| *b | Up |
| *c | 90° |
| *d | Engine Rear |
EGR COOLER > INSTALLATION |
| 1. INSTALL EGR COOLER ASSEMBLY |
Using an E8 "TORX" socket wrench, install the 2 stud bolts.
Install a new gasket and the EGR valve assembly with the 2 bolts.
Connect the No. 1 water by-pass hose.
Temporarily install a new gasket and the EGR valve with cooler assembly with the 2 bolts and 2 nuts.
Install the EGR valve bracket with the 2 bolts and nut.
Install the EGR valve with cooler assembly with the 2 bolts and 2 nuts.
|
Connect the No. 4 water by-pass hose and No. 5 water by-pass hose.
| *a | 2 to 7 mm (0.079 to 0.276 in.) |
| *b | Up |
| *c | 90° |
| *d | Engine Rear |
Install the wire harness clamp bracket with the bolt.
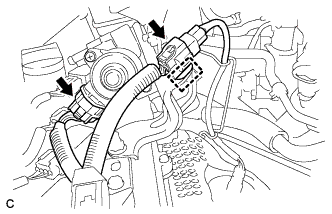 |
Connect the 2 connectors and wire harness clamp.
| 2. INSTALL NO. 2 EGR PIPE |
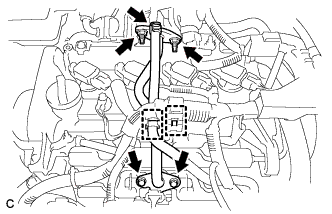 |
Install 2 new gaskets and the No. 2 EGR pipe with the 2 bolts and 2 nuts.
Connect the clamp and No. 2 water by-pass hose.
Connect the wire harness clamp.
| 3. ADD COOLANT (for Engine) |
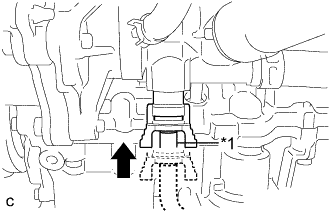 |
Insert the engine drain cock plug.
| *1 | Hose |
Disconnect the hose from the engine drain cock plug.
Install the stop ring.
Tighten the radiator drain cock plug by hand.
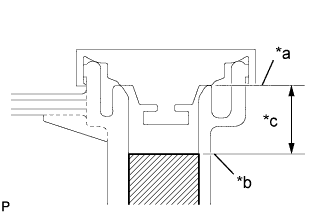 |
Slowly fill the radiator with TOYOTA Super Long Life Coolant (SLLC) from the water filler. (Coolant level should be within 20 mm (0.787 in.) from the filler tube end.)
| *a | Filler Tube End |
| *b | Coolant Level |
| *c | 20 mm |
Remove the reserve tank cap.
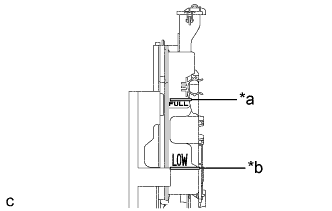 |
Slowly pour coolant into the radiator reserve tank assembly until it reaches the full line.
| *a | Full Line |
| *b | Low Line |
Squeeze the No. 1 and No. 2 radiator hoses several times by hand, and then check the level of the coolant.
If the coolant level is low, add coolant.
Install the water filler cap sub-assembly and reserve tank cap.
Put the engine in inspection mode (Click here).
Bleed air from the cooling system.
Warm up the engine until the thermostat opens. While the thermostat is open, circulate the coolant for several minutes.
Squeeze the No. 1 and No. 2 radiator hoses several times by hand to bleed air.
Stop the engine and wait until the engine coolant cools down.
Add engine coolant to the full line on the radiator reserve tank assembly.
| 4. INSPECT FOR COOLANT LEAK (for Engine) |
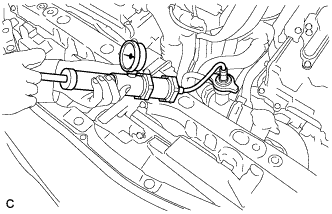 |
Fill the radiator with coolant and attach a radiator cap tester.
Put the engine in inspection mode (Click here).
Warm up the engine.
Using a radiator cap tester, increase the pressure inside the radiator to 108 kPa (1.1 kgf/cm2, 16 psi), and check that the pressure does not drop.
If the pressure drops, check the hoses, radiator, engine water pump, front exhaust pipe assembly and engine coolant temperature sensor for leaks. If no external leaks are found, check the heater core, cylinder block and cylinder head.
| 5. INSTALL OUTER COWL TOP PANEL SUB-ASSEMBLY |
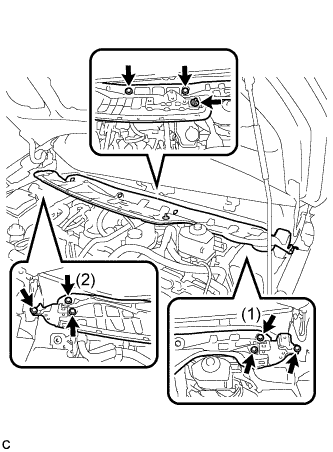 |
Install the outer cowl top panel sub-assembly with the 8 bolts and nut.
Engage the clamp to install the wire harness.
| 6. INSTALL FRONT NO. 1 VENTILATOR SEAL |
Engage the clamp to install the front No. 1 ventilator seal to the outer cowl top panel sub-assembly.
| 7. INSTALL FRONT AIR SHUTTER SEAL |
Engage the clamp to install the front air shutter seal to the outer cowl top panel sub-assembly.
| 8. INSTALL INNER COWL TOP TO COWL BRACE |
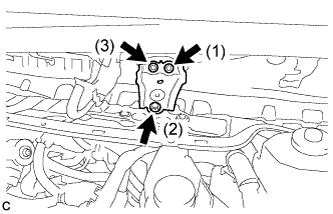 |
Install the inner cowl top to cowl brace to the outer cowl top panel sub-assembly with the 3 bolts.
| 9. INSTALL WINDSHIELD WIPER MOTOR AND LINK ASSEMBLY |