| NG |  |
| Go to step 4 |
DTC P0AE7-224 Hybrid Battery Precharge Contactor Control Circuit High |
| DTC No. | INF Code | DTC Detection Condition | Trouble Area |
| P0AE7 | 224 | Open or +B short in SMRP circuit Primary circuit of SMRP is malfunctioning. (2 trip detection logic) |
|
| DTC No. | Data List |
| P0AE7-224 |
|
| 1.READ VALUE USING TECHSTREAM (SMRP STATUS) |
Connect the Techstream to the DLC3.
Turn the ignition switch to ON (IG).
Enter the following menus: Powertrain / Hybrid Control / Data List / SMRP Status.
Read the Data List.
| Tester Display | Switch Condition | Specified Condition |
| SMRP Status | Ignition switch ON | OFF |
Turn the ignition switch off.
|
| ||||
| OK | |
 |
| 2.CHECK CONNECTOR CONNECTION CONDITION (POWER MANAGEMENT CONTROL ECU CONNECTOR) |
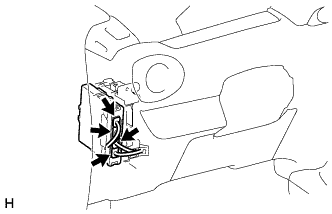 |
Check the connector connections and contact pressure of the relevant terminals for the power management control ECU connectors (Click here).
|
| ||||
| OK | |
|
| 3.CHECK CONNECTOR CONNECTION CONDITION (HYBRID BATTERY JUNCTION BLOCK ASSEMBLY CONNECTOR) |
Check that the service plug grip is not installed.
Remove the No. 1 hybrid vehicle battery cover panel LH .
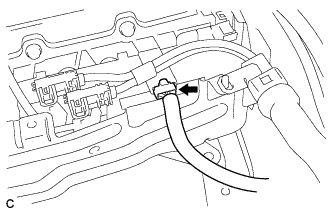 |
Check the connector connections and contact pressure of the relevant terminals for the hybrid battery junction block assembly connector (Click here).
Install the No. 1 hybrid vehicle battery cover panel LH.
|
| ||||
| OK | ||
 | ||
| ||
| 4.CHECK HARNESS AND CONNECTOR (SMRP VOLTAGE) |
Turn the ignition switch to ON (IG).
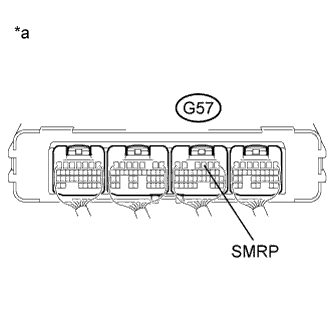 |
Measure the voltage according to the value(s) in the table below.
| Tester Connection | Switch Condition | Specified Condition |
| G57-3 (SMRP) - Body ground | Ignition switch ON | Below 1 V |
| *a | Component with harness connected (Power Management Control ECU) |
Turn the ignition switch off.
|
| ||||
| OK | |
|
| 5.CHECK CONNECTOR CONNECTION CONDITION (POWER MANAGEMENT CONTROL ECU CONNECTOR) |
|
Check the connector connections and contact pressure of the relevant terminals for the power management control ECU connectors (Click here).
|
| ||||
| OK | ||
| ||
| ||
| 6.CHECK HARNESS AND CONNECTOR (POWER MANAGEMENT CONTROL ECU - BODY GROUND) |
Disconnect connector G57 from the power management control ECU.
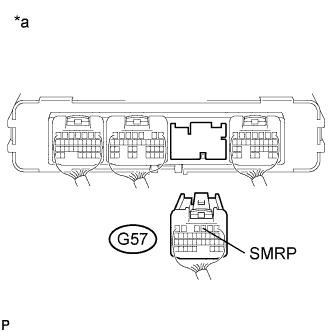 |
Measure the resistance according to the value(s) in the table below.
| Tester Connection | Switch Condition | Specified Condition |
| G57-3 (SMRP) - Body ground | Ignition switch off | 112 to 274 Ω |
| *a | Rear view of wire harness connector (to Power Management Control ECU) |
Connect the power management control ECU connector.
|
| ||||
| OK | |
|
| 7.CHECK HARNESS AND CONNECTOR (SHORT TO POWER SUPPLY WIRES) |
Check that the service plug grip is not installed.
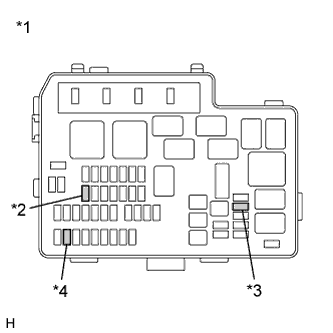 |
Remove the IG2 No. 2 fuse, IGCT No. 2 fuse and AM2 fuse from the No. 2 engine room relay block and No. 2 junction block assembly. (w/ Smart key system)
| *1 | No. 2 Engine Room Relay Block and No. 2 Junction Block Assembly |
| *2 | IG2 No. 2 Fuse |
| *3 | IGCT No. 2 Fuse |
| *4 | AM2 Fuse |
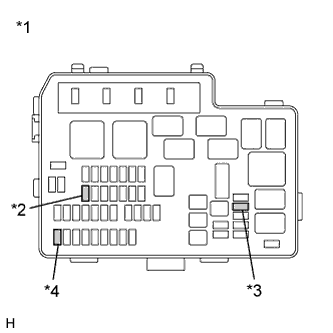 |
Remove the IG2 No. 2 fuse, IGCT No. 2 fuse and ECU-B No. 2 fuse from the No. 2 engine room relay block and No. 2 junction block assembly. (w/o Smart key system)
| *1 | No. 2 Engine Room Relay Block and No. 2 Junction Block Assembly |
| *2 | IG2 No. 2 Fuse |
| *3 | IGCT No. 2 Fuse |
| *4 | ECU-B No. 2 Fuse |
Remove the No. 1 hybrid vehicle battery cover panel LH .
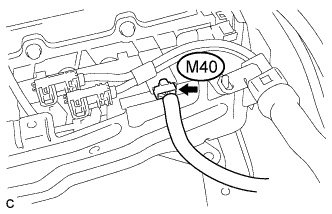 |
Disconnect connector M40 from the hybrid battery junction block assembly.
Disconnect all the connectors from the power management control ECU. (w/ Smart key system)
Disconnect connector A38, A39 and G57 from the power management control ECU. (w/o Smart key system)
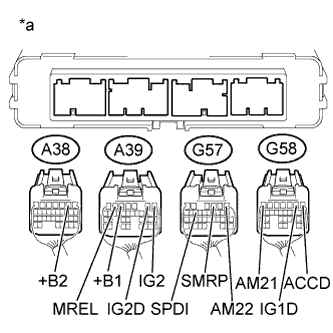 |
Measure the resistance according to the value(s) in the table below. (w/ Smart key system)
| Tester Connection | Switch Condition | Specified Condition |
| G57-3 (SMRP) - A38-2 (+B2) | Power switch off | 10 kΩ or higher |
| G57-3 (SMRP) - A39-5 (+B1) | Power switch off | 10 kΩ or higher |
| G57-3 (SMRP) - G57-1 (AM22) | Power switch off | 10 kΩ or higher |
| G57-3 (SMRP) - G58-7 (AM21) | Power switch off | 10 kΩ or higher |
| G57-3 (SMRP) - A39-6 (MREL) | Power switch off | 10 kΩ or higher |
| G57-3 (SMRP) - A39-1 (IG2) | Power switch off | 10 kΩ or higher |
| G57-3 (SMRP) - G58-1 (ACCD) | Power switch off | 10 kΩ or higher |
| G57-3 (SMRP) - G58-2 (IG1D) | Power switch off | 10 kΩ or higher |
| G57-3 (SMRP) - A39-2 (IG2D) | Power switch off | 10 kΩ or higher |
| G57-3 (SMRP) - G57-14 (SPDI) | Power switch off | 10 kΩ or higher |
| *a | Rear view of wire harness connector (to Power Management Control ECU) |
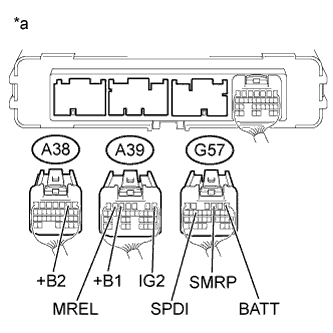 |
Measure the resistance according to the value(s) in the table below. (w/o Smart key system)
| Tester Connection | Switch Condition | Specified Condition |
| G57-3 (SMRP) - A38-2 (+B2) | Ignition switch off | 10 kΩ or higher |
| G57-3 (SMRP) - A39-1 (IG2) | Ignition switch off | 10 kΩ or higher |
| G57-3 (SMRP) - A39-5 (+B1) | Ignition switch off | 10 kΩ or higher |
| G57-3 (SMRP) - A39-6 (MREL) | Ignition switch off | 10 kΩ or higher |
| G57-3 (SMRP) - G57-1 (BATT) | Ignition switch off | 10 kΩ or higher |
| G57-3 (SMRP) - G57-14 (SPDI) | Ignition switch off | 10 kΩ or higher |
| *a | Rear view of wire harness connector (to Power Management Control ECU) |
Connect the power management control ECU connectors.
Connect the hybrid battery junction block assembly connector.
Install the No. 1 hybrid vehicle battery cover panel LH.
Install the IG2 No. 2 fuse, IGCT No. 2 fuse and AM2 fuse to the No. 2 engine room relay block and No. 2 junction block assembly. (w/ Smart key system)
Install the IG2 No. 2 fuse, IGCT No. 2 fuse and ECU-B No. 2 fuse to the No. 2 engine room relay block and No. 2 junction block assembly. (w/o Smart key system)
|
| ||||
| OK | ||
| ||
| ||
| 8.CHECK HARNESS AND CONNECTOR (POWER MANAGEMENT CONTROL ECU - HYBRID BATTERY JUNCTION BLOCK ASSEMBLY) |
Check that the service plug grip is not installed.
Remove the No. 1 hybrid vehicle battery cover panel LH .
Disconnect connector M40 from the hybrid battery junction block assembly.
Disconnect connector G57 from the power management control ECU.
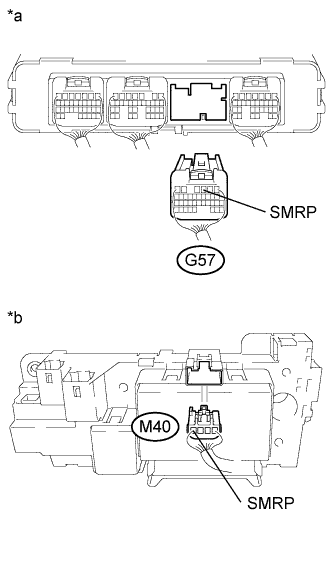 |
Measure the resistance according to the value(s) in the table below.
| Tester Connection | Switch Condition | Specified Condition |
| G57-3 (SMRP) - M40-4 (SMRP) | Ignition switch off | Below 1 Ω |
| Tester Connection | Switch Condition | Specified Condition |
| G57-3 (SMRP) and M40-4 (SMRP) - Body ground and other terminals | Ignition switch off | 10 kΩ or higher |
| *a | Rear view of wire harness connector (to Power Management Control ECU) |
| *b | Rear view of wire harness connector (to Hybrid Battery Junction Block Assembly) |
Connect the power management control ECU connector.
Connect the hybrid battery junction block assembly connector.
Install the No. 1 hybrid vehicle battery cover panel LH.
|
| ||||
| OK | |
|
| 9.CHECK HARNESS AND CONNECTOR (HYBRID BATTERY JUNCTION BLOCK ASSEMBLY - BODY GROUND) |
Check that the service plug grip is not installed.
Remove the No. 1 hybrid vehicle battery cover panel LH .
Disconnect connector M40 from the hybrid battery junction block assembly.
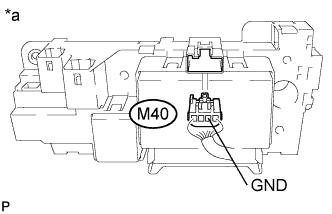 |
Measure the resistance according to the value(s) in the table below.
| Tester Connection | Switch Condition | Specified Condition |
| M40-2 (GND) - Body ground | Ignition switch off | Below 1 Ω |
| *a | Rear view of wire harness connector (to Hybrid Battery Junction Block Assembly) |
Connect the hybrid battery junction block assembly connector.
Install the No. 1 hybrid vehicle battery cover panel LH.
|
| ||||
| OK | |
|
| 10.INSPECT HYBRID BATTERY JUNCTION BLOCK ASSEMBLY (SMRP) |
Check that the service plug grip is not installed.
Remove the hybrid battery junction block assembly (Click here).
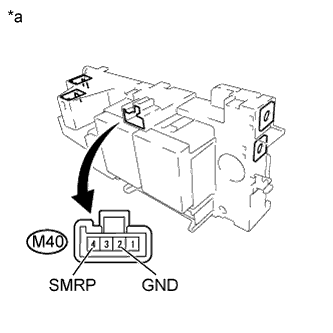 |
Measure the resistance according to the value(s) in the table below.
| Tester Connection | Condition | Specified Condition |
| M40-4 (SMRP) - M40-2 (GND) | -40 to 80 °C (-40 to 176°F) | 112 to 274 Ω |
| *a | Component without harness connected (Hybrid Battery Junction Block Assembly) |
Install the hybrid battery junction block assembly.
|
| ||||
| OK | ||
| ||
| ||
