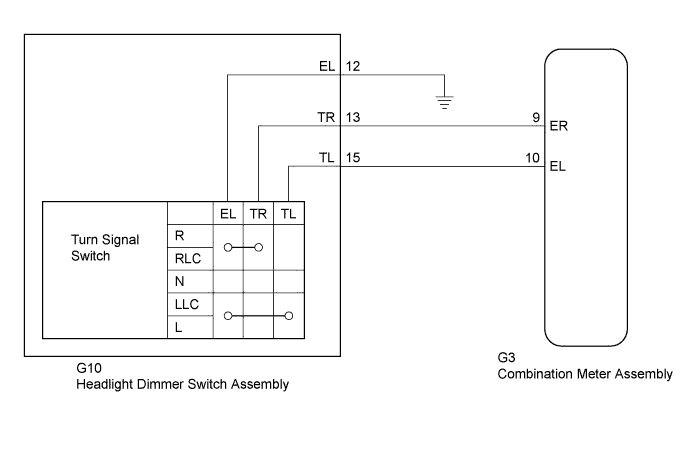
LIGHTING SYSTEM > Turn Signal Switch Circuit |
| 1.READ VALUE USING TECHSTREAM |
Connect the Techstream to the DLC3.
Turn the ignition switch to ON (IG).
Turn the Techstream on.
Enter the following menus: Body Electrical / Combination Meter / Data List.
Read the display on the Techstream.
| Tester Display | Measurement Item/Range | Normal Condition | Diagnostic Note |
| Turn Signal Switch (Right) | Turn signal switch (Right) signal/ON or OFF | ON: Turn signal switch (Right) on OFF: Turn signal switch (Right) off | - |
| Turn Signal Switch (Left) | Turn signal switch (Left) signal/ON or OFF | ON: Turn signal switch (Left) on OFF: Turn signal switch (Left) off | - |
|
| ||||
| OK | ||
 | ||
| ||
| 2.INSPECT HEADLIGHT DIMMER SWITCH ASSEMBLY |
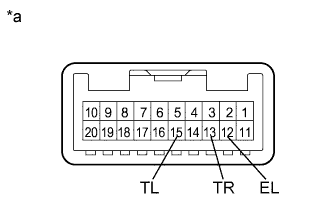 |
Remove the headlight dimmer switch assembly (Click here).
Measure the resistance according to the value(s) in the table below.
| Tester Connection | Condition | Specified Condition |
| 13 (TR) - 12 (EL) | Turn signal switch in neutral position | 10 kΩ or higher |
| 15 (TL) - 12 (EL) | Turn signal switch in neutral position | 10 kΩ or higher |
| 13 (TR) - 12 (EL) | Turn signal switch in right turn position | Below 1 Ω |
| 15 (TL) - 12 (EL) | Turn signal switch in left turn position | Below 1 Ω |
| *a | Component without harness connected (Headlight Dimmer Switch Assembly) |
|
| ||||
| OK | |
 |
| 3.CHECK HARNESS AND CONNECTOR (HEADLIGHT DIMMER SWITCH ASSEMBLY - COMBINATION METER ASSEMBLY) |
Disconnect the G3 combination meter assembly connector.
Measure the resistance according to the value(s) in the table below.
| Tester Connection | Condition | Specified Condition |
| G10-13 (TR) - G3-9 (ER) | Always | Below 1 Ω |
| G10-15 (TL) - G3-10 (EL) | Always | Below 1 Ω |
| G10-12 (EL) - Body ground | Always | Below 1 Ω |
| G3-9 (ER) - Body ground | Always | 10 kΩ or higher |
| G3-10 (EL) - Body ground | Always | 10 kΩ or higher |
|
| ||||
| OK | ||
| ||
| ||

