METER / GAUGE SYSTEM > DETAILS


OPERATING CONDITION
  1. Eco Driving Indicator Light Operation Condition

    1. When all of the following conditions are met, the power management control ECU and meter ECU determine that Eco-friendly driving is being performed and turn on the Eco Driving Indicator Light. However, if any condition is not met, the Eco Driving Indicator Light turns off.

      Condition
      1. The power switch is turned on (IG).
      2. READY-on state.
      3. While the vehicle is running.
      4. The shift position is in D.
      5. PWR mode is not selected.
      6. EV drive mode indicator is turned off.
      7. The running power is less than the upper threshold.
      8. The hybrid system is normal.
      9. The hybrid system temperature is normal.
      10. When the vehicle is at a speed of about 130 km/h (80.8 mph) or below.

  2. Hybrid System Indicator Operation Condition

    1. Hybrid System Indicator is activated when the following conditions are met.

      Condition
      1. The power switch is turned on (IG).
      2. READY-on state.
      3. The shift position is in D or B.


SYSTEM CONTROL


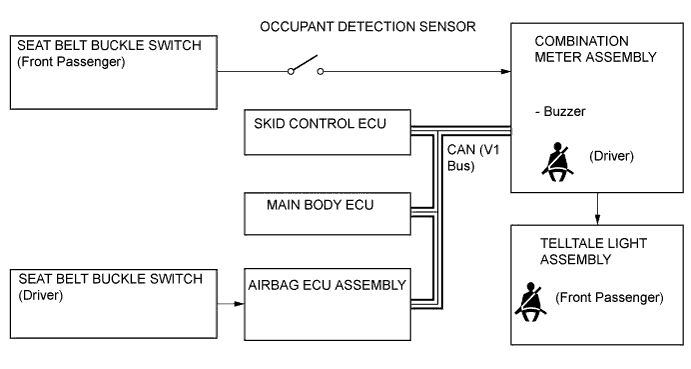
  1. Front Seat Belt Warning

    1. The occupant detection sensor, which is enclosed in the seat cushion of the front passenger seat, is used to detect whether or not the front passenger seat is occupied.

    2. The front seat belt warning blinks each front seat belt warning light individually when the driver does not fasten the driver seat belt or the front passenger does not fasten the front passenger seat belt.


    3. The front seat belt warning buzzer sounds when the vehicle speed reaches approximately 20 km/h (12.4 mph) or more while the front seat belt warning light is blinking. If the seat belt is not then fastened after approximately 30 seconds have elapsed since the buzzer sounded, the front seat belt warning buzzer sounds more loudly than normal for approximately 90 seconds.


      Y103282E02


FUNCTION
  1. Combination Meter

    1. The table below shows the combination meter function:

      Display Item
      Outline
      Fuel Gauge Display
      Displays the remaining fuel amount. Also, it is capable of displaying the indication accurately when cornering or driving on a steep slope by using a software application capable of suppressing any indication deviations.
      Speedometer
      1. Digitally displays the vehicle speed signal in MPH or km/h*1.
      2. Digitally displays the vehicle speed signal in km/h*2.
      Instantaneous Fuel Consumption Display
      Displays the instantaneous fuel consumption, which is calculated by the combination meter assembly based on the vehicle speed and the amount of fuel used.
      Shift Position Display
      Displays the shift position.

      1. *1: For England models
      2. *2: Except England models

  2. Multi-information Display

    1. The table below shows the multi-information display function:

      Display
      Display Item
      Outline
      Y103728
      Remaining battery amount
      Displays the remaining HV battery amount in 8 levels according to the signal from the power management control ECU.
      Y115262
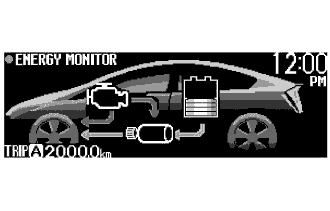
      Energy Monitor
      1. Engine to Tire
      2. Engine to Motor
      3. Motor to Tire
      4. Tire to Motor
      5. Motor to Battery
      6. Battery to Motor
      Y103286
      Eco Driving Indicator Light
      Receives the signal from the power management control ECU and meter ECU during vehicle operation and turns on/off the indicator depending on the situation, whether Eco-friendly acceleration is being performed or not.
      Y115263
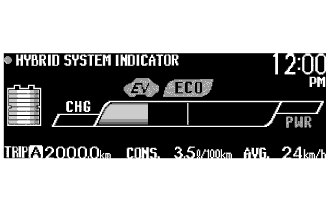
      Hybrid System Indicator
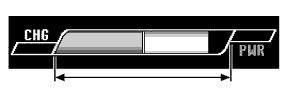
      Hybrid System Indicator displays the system power output and regenerative charging of the hybrid system.
      Y103729
      Charge area
      1. The left-end charge area bar turns white and informs the driver of a state in which energy is being regenerated.
      2. Eco Driving Indicator Light turns on.
      Y103730
      Hybrid Eco area
      1. Hybrid Eco area shows that the vehicle is driven in a condition that promotes frequent motor-only operation. (Based on various conditions, the computer automatically controls if the engine should be stopped to increase fuel efficiency.)
      2. Eco Driving Indicator Light turns on.
      Y103731
      Eco area
      1. Shows that the vehicle is driven in Eco-friendly.
      2. Eco Driving Indicator Light turns on.
      Y103732
      Power area
      1. The power area indicates that the Eco-friendly driving range is being exceeded (during full power driving, etc.).
      2. Eco Driving Indicator Light turns off.
      Y115265
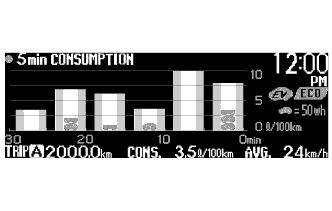
      5 min. Consumption Record
      Displays the history of the average fuel consumption in 5 minute interval on a bar graph. Displays the average recovered energy amount for 5 minutes using a symbol.
      Y115270
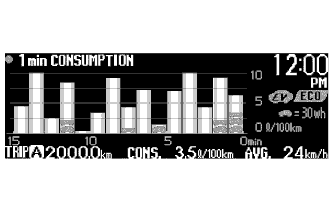
      1 min. Consumption Record
      Displays the history of the average fuel consumption in 1 minute intervals on a bar graph. Displays the average recovered energy amount for 1 minute using a symbol.
      Y115264
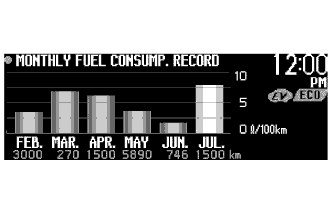
      Monthly Fuel Consumption Record
      1. Calculates the average monthly fuel consumption and shows it on a bar graph.
      2. Monthly average fuel consumption for the current and previous 5 months is displayed.
      Y115273
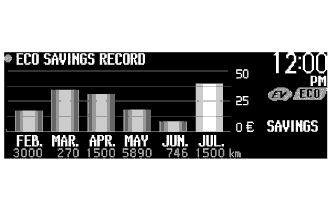
      Eco Savings Record
      1. Shows the difference of the price in a bar graph between the estimated gasoline amount that is to be consumed when the target fuel consumption value is applied and the price for the gasoline that has been actually consumed.
      2. It is necessary to register the target fuel consumption value and the gasoline price per 1 L. The combination meter assembly calculates the price for the amount of gasoline consumed using the actual fuel consumption value and shows the price difference between the price for the amount of gasoline at the target fuel consumption.


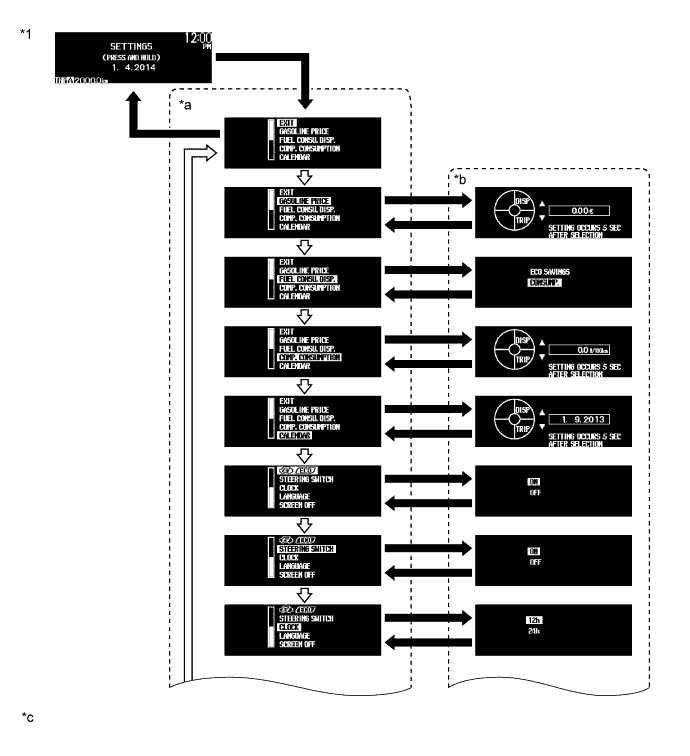
  3. Custom Setting Function for Multi-information Display


    1. When the vehicle speed is approximately 8 km (5 mph) or less, the display mode for the following 5 items can be used.

      Item
      Customizing Value
      GASOLINE PRICE
      Inputs the gasoline price per 1 L.
      FUEL CONSU. DISP
      Selects the monthly fuel consumption record and Eco saving record on/off mode.
      COMP. CONSUMPTION
      Inputs the value of the target fuel consumption.
      CALENDAR
      Adjusts the date.
      EV/ECO
      Selects the Eco Driving Indicator Light and EV Driving Indicator Light on/off mode.
      STEERING SWITCH
      Selects the touch tracer display on/off mode.
      CLOCK
      Selects the 12/24 hour time display mode.
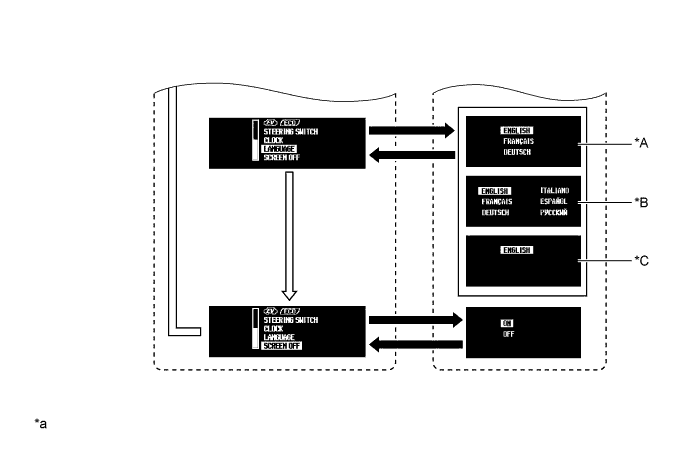
      LANGUAGE
      Selects the display language.
      SCREEN OFF
      Turns on/off the multi-information display.


      Y167089E01


      Text in Illustration 
      *1
      Setting Screen
      -
      -
      *a
      Setting Item Selection Screen
      *b
      Setting Selector Screen
      *c
      The illustrations are examples only.
      -
      -
      V100135
      Multi-information Display Mode Switch is Pressed and Held.
      V100136
      Multi-information Display Mode Switch is Pressed Briefly.

      Y115278E02


      Text in Illustration 
      *A
      RHD Models for Europe
      *B
      LHD Models for Europe
      *C
      Models for Australia
      -
      -
      *a
      The illustrations are examples only.
      -
      -
      V100135
      Multi-information Display Mode Switch is Pressed and Held.
      V100136
      Multi-information Display Mode Switch is Pressed Briefly.


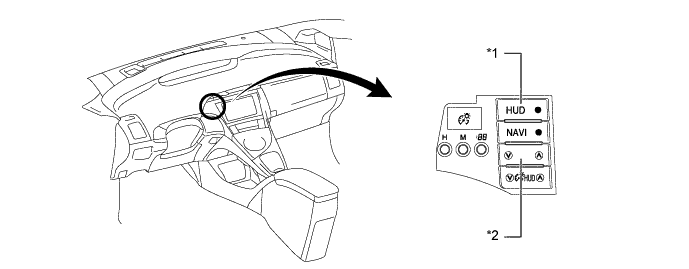
  4. Custom Setting Function for Headup Display


    1. When the vehicle speed is 0 km/h (0 mph), a vehicle speed that starts indicating vehicle speeds in the headup display can be set. Firstly, press and hold the headup display main switch to flash the vehicle speed indication. While the indication is flashing, select a desired vehicle speed using the display position adjustment switch. The selected vehicle speed will be set by pressing and holding the headup display main switch.


      Y115282E01


      Text in Illustration 
      *1
      Headup Display Main Switch
      *2
      Display Position Adjustment Switch

  5. Buzzer

    1. The table below shows the warning and reminder functions of the buzzer in the combination meter assembly:

      Function
      Item
      Warning
      1. Shift Operation Warning
      2. READY
      3. Reverse (R) Selected Warning
      4. Entry and Start System Warning
      5. Engine Immobiliser System Warning
      6. Low Fuel Warning
      7. Front Seat Belt Warning
      8. P Position Request Warning
      9. Low HV Battery Voltage Warning
      10. HV Battery Charging Request Warning
      11. Parking Brake Unreleased Warning
      12. Door Open Driving Warning
      13. Sliding Roof Warning
      14. Shift Warning
      15. EV Drive Mode Reject Warning
      16. Cruise Control Warning
      17. Seat Belt Warning
      18. Shift Reject Warning
      Reminder
      1. Light Reminder System

  6. Warning Message

    1. When a warning is necessary, the warning display interrupts the current display on the multi-information display.

    2. The master warning light may illuminate or blink and the buzzer in the combination meter assembly may sound depending on the item in the multi-information display.

      Priority
      Warning Message
      Master Warning Light
      Buzzer
      1
      BRAKE!
      -
      -
      2
      AUTO POWER OFF TO CONSERVE BATTERY
      -
      -
      3
      SHIFT TO P POSITION
      Blinks
      Sounds
      4
      SHIFT TO P POSITION WHEN PARKED
      Blinks
      Sounds
      N POSITION
      Blinks
      Sounds
      DEPRESS BRAKE PEDAL WHEN VEHICLE IS AT A STANDSTILL
      Blinks
      Sounds
      TRACTION BATTERY PROTECTION MODE RESTART AFTER SHIFTING TO P POSITION
      Blinks
      Sounds
      TRACTION BATTERY POWER LOW CHARGE WHEN NOT IN N POSITION
      Blinks
      Sounds
      5
      P LOCK MALFUNCTION WHEN PARKING, PARK IN FLAT PLACE AND APPLY PARKING BRAKE SECURELY
      Illuminates
      Sounds
      CHECK HYBRID SYSTEM
      STOP THE VEHICLE IN A SAFE PLACE
      Illuminates
      Sounds
      CHECK BRAKE LAMP SYSTEM
      Illuminates
      Sounds
      6
      KEY NOT DETECTED
      Blinks
      Sounds
      7
      SWITCHED TO N. TO SHIFT TO P, STOP CAR AND PRESS P SWITCH
      Blinks
      Sounds
      CLEAN RADAR SENSOR
      Illuminates
      Sounds
      CRUISE CONTROL NOT AVAILABLE
      Illuminates
      Sounds
      8
      CHECK CRUISE CONTROL SYSTEM
      Illuminates
      Sounds
      CHECK PCS SYSTEM
      Illuminates
      Sounds
      LOW ENGINE OIL PRESSURE
      Illuminates
      Sounds
      9
      TURN POWER OFF
      Blinks
      Sounds
      SHIFT TO P POSITION AND PUSH POWER SWITCH TO TURN OFF
      Blinks
      Sounds
      KEY DETECTED IN VEHICLE
      Blinks
      Sounds
      DEPRESS BRAKE PEDAL, TOUCH POWER SWITCH WITH KEY
      Blinks
      Sounds
      DEPRESS BRAKE PEDAL AND PUSH POWER SWITCH TO START
      Blinks
      Sounds
      SHIFT TO P POSITION WHEN STARTING
      Blinks
      Sounds
      10
      KEY BATTERY LOW
      Illuminates
      Sounds
      HYBRID SYSTEM OVERHEAT
      Illuminates
      Sounds
      11
      COOLING PERFORMANCE OF THE HYBRID BATTERY IS LOW CONSULT A DEALER
      -
      -
      PCS NOT CURRENTLY AVAILABLE
      -
      -
      EV MODE CURRENTLY NOT AVAILABLE
      -
      Sounds
      EV MODE NOT AVAILABLE WARMING UP
      -
      Sounds
      EV MODE NOT AVAILABLE LOW BATTERY
      -
      Sounds
      EV MODE NOT AVAILABLE EXCESSIVE SPEED
      -
      Sounds
      EV MODE NOT AVAILABLE EXCESSIVE ACCEL
      -
      Sounds
      EV MODE CURRENTLY NOT AVAILABLE BECAUSE HEATER ON
      -
      Sounds
      EV MODE DEACTIVATED
      -
      Sounds
      EV MODE DEACTIVATED LOW BATTERY
      -
      Sounds
      EV MODE DEACTIVATED EXCESSIVE SPEED
      -
      Sounds
      EV MODE DEACTIVATED EXCESSIVE ACCEL.
      -
      Sounds
      EV MODE CANCELLED BECAUSE HEATER ON
      -
      Sounds
      THEFT SENSOR OFF
      -
      -
      THEFT SENSOR ON
      -
      -
      12
      CHECK HEADLIGHT SYSTEM
      Blinks
      -

      HINT:
      When multiple warning conditions occur at the same time, the highest priority warning message is displayed first. The next high priority warning message can be displayed by pressing the multi-information display mode switch briefly.


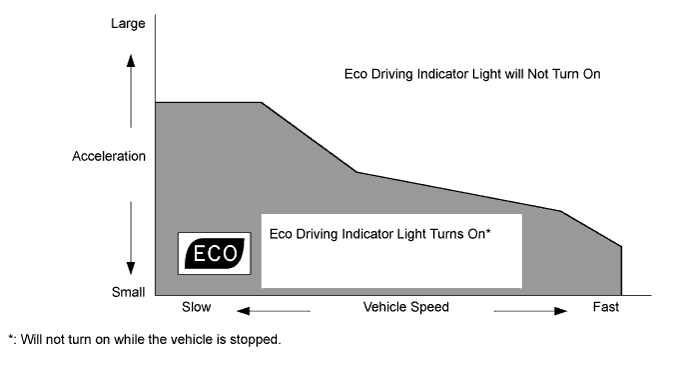
  7. Eco Driving Indicator Light


    1. When the power management control ECU and meter ECU determine, using information such as vehicle speed, vehicle power, shift position and drive mode, that the vehicle is being driven Eco-friendly, they turn on the Eco Driving Indicator Light. The operating diagram of the Eco Driving Indicator Light function is as follows:


      Y100651E06


  8. Dimming Mode Display

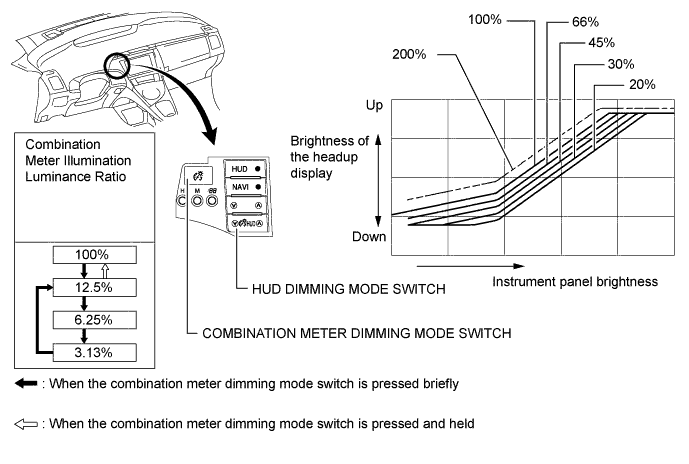
    1. The combination meter illumination brightness can be adjusted to one of 4 levels by pressing the combination meter dimming mode switch when the taillights are turned on.


    2. The brightness of the headup display automatically changes in response to the ambient light level. However, it can be adjusted to one of 5 levels by pressing the HUD dimming mode switch.


      Y115283E01

      HINT:
      The brightness of the headup display can be increased to 200% by pressing and holding the up side of the HUD dimming mode switch when it is at the brightness ratio of 100%. To cancel, briefly press the down side of the switch. The brightness will return to the level it was.


CONSTRUCTION


  1. Combination Meter

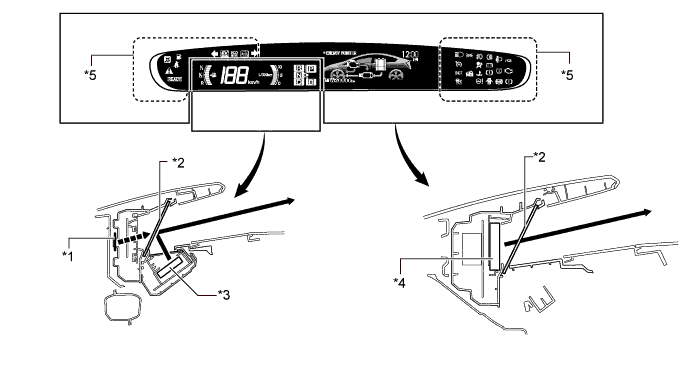
    1. A reflective display method is used to display the speedometer, fuel gauge, instantaneous fuel consumption and shift position. Using the vacuum fluorescent display (VFD), the light emitted by the vacuum fluorescent display panel is reflected in the reflective glass, allowing a virtual image to be visible to the driver's eyes.


    2. Light emitted in the display area is transmitted through the reflective glass, allowing the warning lights, indicator lights, and information on the multi-information display to be visible to the driver's eyes.


      Y167090E01


      Text in Illustration 
      *1
      Virtual Image
      *2
      Reflective Glass
      *3
      Vacuum Fluorescent Display
      *4
      Vacuum Fluorescent Display or LED Indicator Display
      *5
      LED Indicator Display
      -
      -


  2. Touch Tracer Display


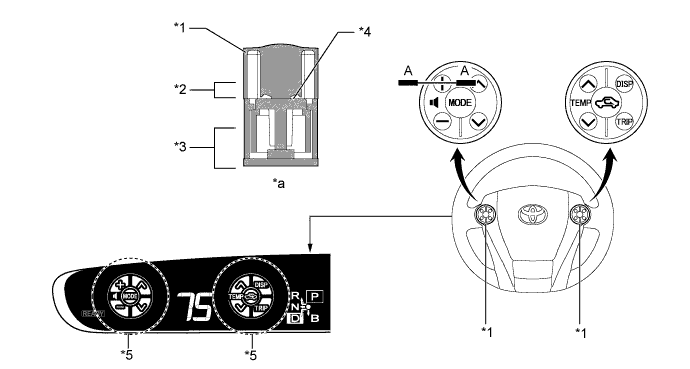
    1. A touch sensor is provided on frequently used switches such as the multi-information display mode switch, TRIP/ODO mode switch, audio and air conditioning switches. The touch tracer display is displayed when any of the switches is touched by the driver's finger, and the switch is activated when pressed.

      Steering Pad Switch Assembly
      Touch sensor
      Audio System
      Volume Switch (+)
      X
      Volume Switch (-)
      X
      Mode Switch
      X
      Seek Switch (Up)
      X
      Seek Switch (Down)
      X
      Multi-information display
      TRIP/ODO Mode Switch
      X
      Display Mode Switch
      X
      Air Conditioning System
      Air Inlet Control Switch
      X
      Temp Switch (Up)
      X
      Temp Switch (Down)
      X
      Bluetooth Hands-free System
      Voice Switch
      -
      On Hook Switch
      -
      Off Hook Switch
      -
      Dynamic Radar Cruise Control System
      Distance Control Switch
      -

      HINT:
      X: Equipped
      - : Not equipped


      Y103692E03


      Text in Illustration 
      *1
      Steering Pad Switch
      *2
      Touch Switch Area
      *3
      Function Switch Area
      *4
      Touch Sensor
      *5
      Touch Tracer Display
      -
      -
      *a
      A-A Cross Section
      -
      -


  3. Headup Display

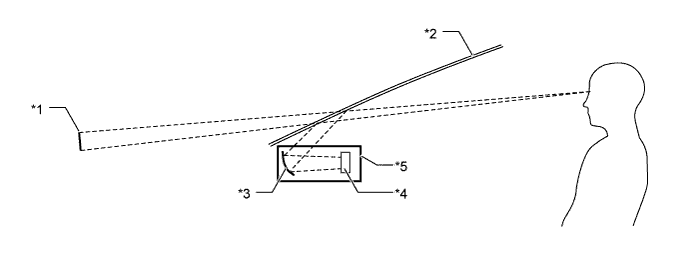
    1. The Headup display projects the image from the dot Vacuum Fluorescent Display (VFD), built into the Headup display unit (combination meter mirror ECU), in a position approximately 2 m (6.6 ft) forward of the driver using a concave mirror and the windshield, in order to support the driver with various information.


    2. By changing the angle of the concave mirror, the position of the image displayed can be adjusted.


      Y103068E01


      Text in Illustration 
      *1
      Headup Display image
      *2
      Windshield Glass
      *3
      Concave mirror
      *4
      Dot VFD
      *5
      Headup Display Unit (Combination Meter Mirror ECU)
      -
      -


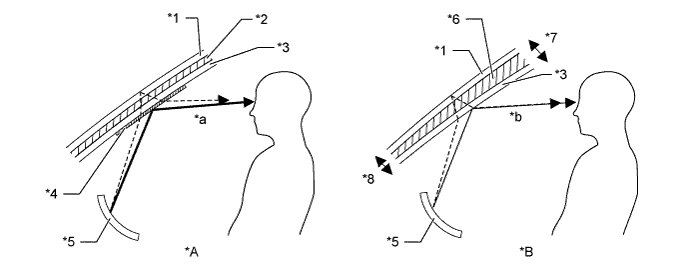
  4. Windshield Glass for Headup Display

    1. Windshield glass without a combiner treatment is used for the Headup display.

    2. This glass has a wedge-shaped inner film. This film, with its varying thickness, is located between the outer and inner layers of glass.

    3. The light that strikes the glass is reflected by the inner surface of the inner glass, and also by the inner side of the outer surface of outer layer of glass. With a conventional windshield, the light reflected from these 2 surfaces diverges due to the thickness of the glass, resulting in a double image.

    4. The film's wedge shape is used to eliminate the reflection angle difference between the outer glass and inner glass. This recombines the reflected light and eliminates the double image.


    5. Thus, the reflected light from the Headup display unit is seen by the driver as a single display image.


      Y103069E03


      Text in Illustration 
      *A
      Windshield Glass with Normal Film
      *B
      Windshield Glass with Wedge-shaped Film
      *1
      Outer Glass
      *2
      Uniform Thickness Film
      *3
      Inner Glass
      *4
      Combiner
      *5
      Concave Mirror
      *6
      Wedge-shaped Film
      *7
      Thick
      *8
      Thin
      *a
      The combiner makes the light reflected by the inner glass brighter, however, a double image is caused by a divergence of the reflected light.
      *b
      Reflected light is recombined and a double image is prevented.


OPERATION


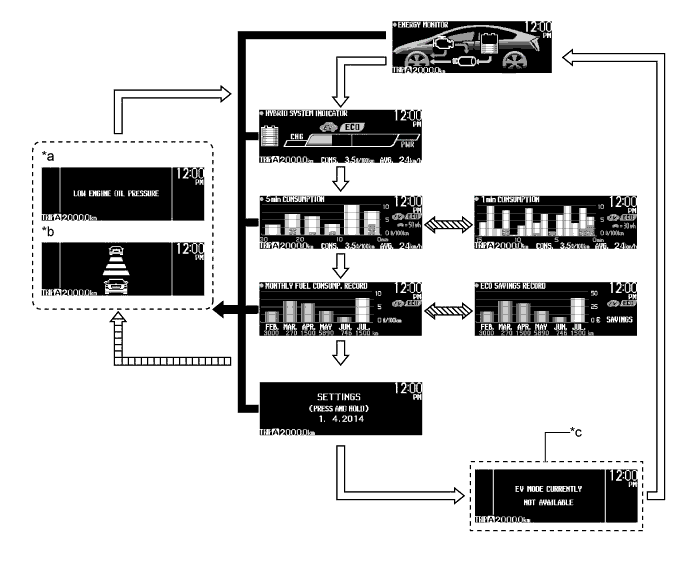
  1. Multi-information Display Mode Switch


    1. When the customize setting is turned on, the multi-information display changes in the order below each time the multi-information display mode switch is pressed.


      Y166176E01


      Text in Illustration 
      *a
      Warning, Caution or Advisory Message
      *b
      Dynamic Radar Cruise Control System and Pre-crash Safety System are displayed.
      *c
      When advisory conditions are not solved.
      -
      -
      V100136
      Multi-information Display Mode Switch is Pressed Briefly.
      V100135
      When warning message, dynamic radar cruise control system, pre-crash safety system display signals are received.
      V100137
      Multi-information Display Mode Switch is Pressed and Held.
      V100138
      If warning or caution display conditions are still met after returning to the normal information display using the multi-information display mode switch.


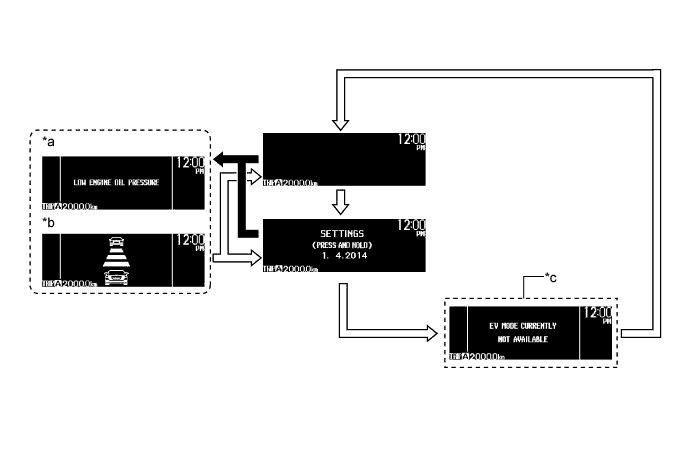
    2. When the customize setting is turned off, the multi-information display changes in the order below each time the multi-information display mode switch is pressed.


      Y166177E01


      Text in Illustration 
      *a
      Warning, Caution or Advisory Message
      *b
      Dynamic Radar Cruise Control System and Pre-crash Safety System are displayed.
      *c
      When advisory conditions are not solved.
      -
      -
      V100136
      Multi-information Display Mode Switch is Pressed Briefly.
      V100135
      When warning message, dynamic radar cruise control system, pre-crash safety system display signals are received.


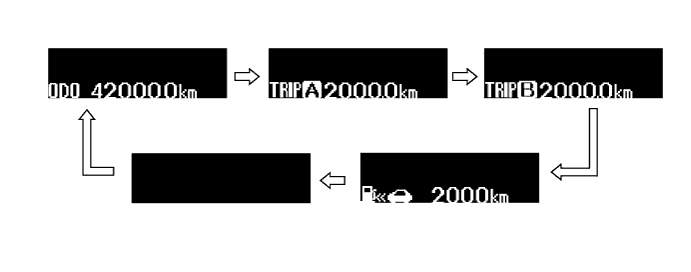
  2. TRIP/ODO Mode Switch


    1. The indication on the trip counter changes in the order below each time the TRIP/ODO mode switch is pressed.


      Y103215


      Text in Illustration 
      V100136
      TRIP/ODO Mode Switch is Pressed Briefly.
      -
      -

    2. The trip meter can be reset when the TRIP/ODO mode switch is pressed and held while the trip A or trip B screen is being displayed.

    3. The highest fuel consumption can be reset when the TRIP/ODO mode switch is pressed and held while the trip A or trip B fuel consumption history screen is being displayed.

    4. All the fuel consumption history is reset when the multi-information display mode switch is pressed and held while the fuel consumption graph screen is being displayed.


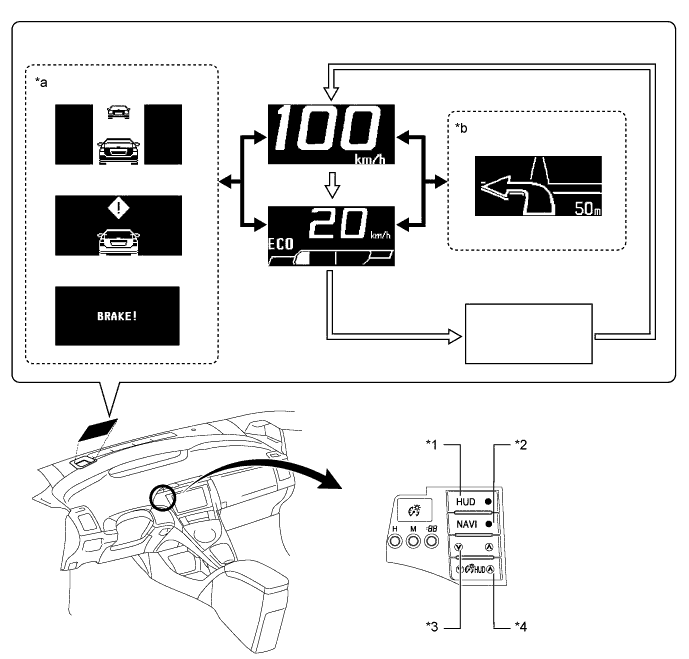
  3. Headup Display Satellite Switch


    1. The headup display changes in the order below by pressing the headup display satellite switch.


      Y115284E01


      Text in Illustration 
      *1
      HUD Main Switch
      *2
      NAVI Switch
      *3
      Headup Display Position Adjustment Switch
      *4
      Headup Display Luminance Adjustment Switch
      *a
      Dynamic Radar Cruise Control System, Pre-crash Safety System Warning Indicators are displayed.
      *b
      Turn-by-turn Navigation Display
      V100136
      Headup Display Main Switch is Pressed Briefly.
      V100135
      When dynamic radar cruise control system, pre-crash safety system and turn-by-turn navigation display signals are received.