Home › Suspension › FRONT SUSPENSION › FRONT STABILIZER BAR

FRONT STABILIZER BAR > INSTALLATION

for Preparation Click here


1. INSTALL FRONT STABILIZER BAR BUSHING LH


    C148690E01
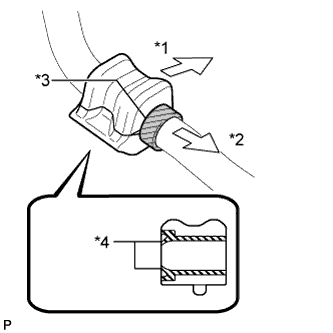
  1. Install the front stabilizer bar bushing to the front stabilizer bar as shown in the illustration.
    Text in Illustration 
    *1
    Front of the Vehicle
    *2
    Inside of the Vehicle
    *3
    Stopper
    *4
    Dust Lip

    NOTICE:
    1. Install the front stabilizer bar bushing so that the dust lips face outward of the vehicle.
    2. Install the front stabilizer bar bushing so that the cutouts face rearward of the vehicle.


2. INSTALL FRONT STABILIZER BAR BUSHING RH

HINT:
Perform the same procedure as for the LH side.


3. INSTALL FRONT STABILIZER BAR


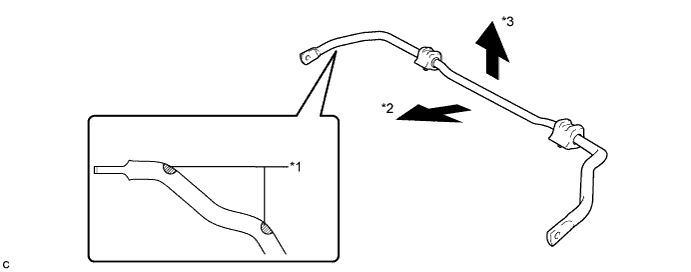
  1. Install the front stabilizer bar to the front suspension crossmember sub-assembly so that the identification mark is positioned on the right side of the vehicle.


    C206986E01


    Text in Illustration 
    *1
    Identification Mark
    *2
    Front of the Vehicle
    *3
    Top of the Vehicle
    -
    -


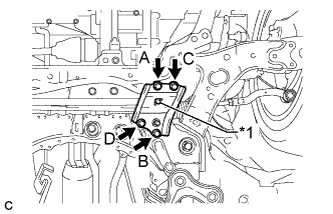
4. INSTALL FRONT SUSPENSION MEMBER FRONT BRACE LH


    C205605E01
  1. Install the front suspension member front brace LH with the 4 bolts.
    Text in Illustration 
    *1
    Protrusion

    Torque:
    87 N*m{ 887 kgf*cm , 64 ft.*lbf }

    NOTICE:
    1. Temporarily tighten bolt A, and then fully tighten the 4 bolts in the order of B, C, D, and A.
    2. After installing the front suspension member front brace LH, make sure that the protrusion of the No. 1 front stabilizer bar bushing comes out.


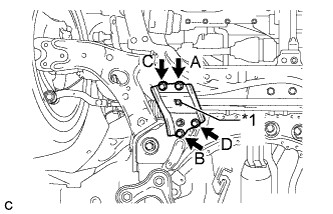
5. INSTALL FRONT SUSPENSION MEMBER FRONT BRACE RH


    C205606E01
  1. Install the front suspension member front brace RH with the 4 bolts.
    Text in Illustration 
    *1
    Protrusion

    Torque:
    87 N*m{ 887 kgf*cm , 64 ft.*lbf }

    NOTICE:
    1. Temporarily tighten bolt A, and then fully tighten the 4 bolts in the order of B, C, D, and A.
    2. After installing the front suspension member front brace RH, make sure that the protrusion of the No. 1 front stabilizer bar bushing comes out.


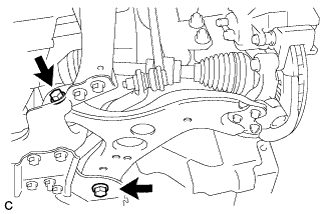
6. TEMPORARILY INSTALL FRONT NO. 1 LOWER SUSPENSION ARM SUB-ASSEMBLY LH


    C205613
  1. Temporarily install the front No. 1 lower suspension arm LH to the front suspension crossmember with the 2 bolts and nut.

    NOTICE:
    Because the nut has its own stopper, do not turn the nut. Tighten the bolt with the nut secured.


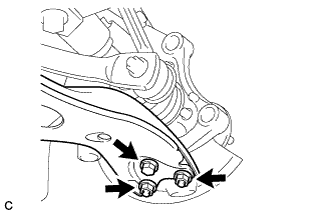
7. CONNECT FRONT NO. 1 LOWER SUSPENSION ARM SUB-ASSEMBLY LH


    C205578
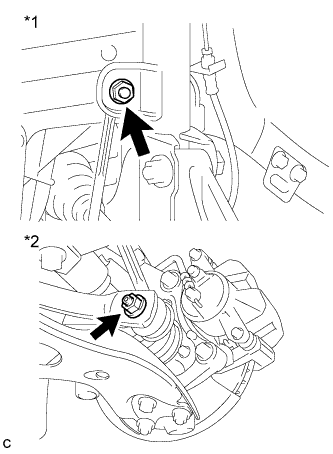
  1. Install the front No. 1 lower suspension arm sub-assembly to the front lower ball joint with the bolt and 2 nuts.

    Torque:
    89 N*m{ 908 kgf*cm , 66 ft.*lbf }


8. INSTALL FRONT STABILIZER LINK ASSEMBLY LH


    C206991E01
  1. Install the front stabilizer link assembly LH with the 2 nuts.
    Text in Illustration 
    *1
    Upper Side
    *2
    Lower Side

    Torque:
    74 N*m{ 755 kgf*cm , 55 ft.*lbf }

    HINT:
    If the ball joint turns together with the nut, use a hexagon wrench (6 mm) to hold the stud bolt.


9. INSTALL FRONT STABILIZER LINK ASSEMBLY RH

HINT:
Perform the same procedure for as the LH side.


10. INSTALL FRONT WHEELS

Torque:
103 N*m{ 1050 kgf*cm , 76 ft.*lbf }


11. STABILIZE SUSPENSION
  1. Lower the vehicle.

  1. Press down on the vehicle several times to stabilize the suspension.


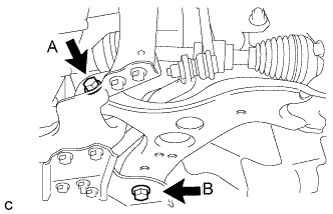
12. FULLY TIGHTEN FRONT NO. 1 LOWER SUSPENSION ARM SUB-ASSEMBLY LH


    C212310E02
  1. Fully tighten the bolt A and B.

    Torque:
    Bolt A:
    233 N*m{ 2376 kgf*cm , 172 ft.*lbf }
    Bolt B:
    214 N*m{ 2182 kgf*cm , 158 ft.*lbf }

    NOTICE:
    Because the nut has its own stopper, do not turn the nut. Tighten the bolt with the nut secured.


13. INSTALL NO. 2 ENGINE UNDER COVER


14. INSTALL NO. 1 ENGINE UNDER COVER


15. INSPECT AND ADJUST FRONT WHEEL ALIGNMENT

HINT:
Inspect and adjust the front wheel alignment (Click here).