Home › Vehicle Exterior › WINDOW / GLASS › WINDSHIELD GLASS

WINDSHIELD GLASS > INSTALLATION

for Preparation Click here


1. INSTALL NO. 2 WINDSHIELD GLASS STOPPER
  1. Using a brush or a sponge, coat the application area of the No. 2 windshield glass stoppers with Primer G.

    NOTICE:
    1. Do not apply too much primer.
    2. Allow the primer to dry for 3 minutes or more.
    3. Throw away any leftover primer.

    HINT:
    If an area other than that specified is coated by accident, wipe off the primer with a clean piece of cloth before it dries.


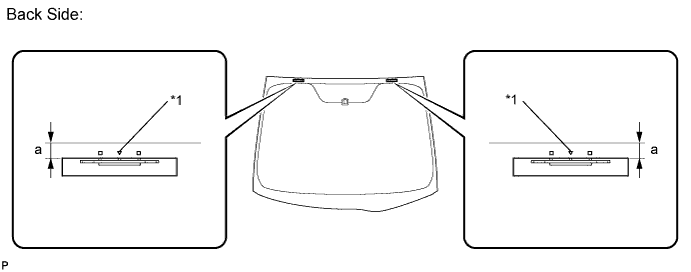
  1. Install 2 new No. 2 windshield glass stoppers onto the windshield glass, as shown in the illustration.


    B229131E01


    Text in Illustration 
    *1
    Ceramic Notch

    Standard Dimension:
    Area
    Dimension
    a
    13.7 to 14.7 mm (0.539 to 0.578 in.)

    NOTICE:
    Only the 2-piece type No. 2 windshield glass stoppers are supplied. Use the 2-piece type stoppers even if the 1-piece type stoppers were used.


2. INSTALL NO. 1 WINDSHIELD GLASS STOPPER


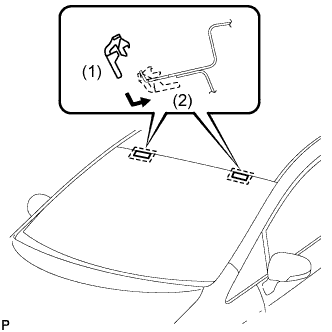
    B229132E01
  1. Install 2 new No. 1 windshield glass stoppers to the vehicle body, as shown in the illustration.

    NOTICE:
    Only the 2-piece type No. 1 windshield glass stoppers are supplied. Use the 2-piece type stoppers even if the 1-piece type stoppers were used.


3. INSTALL WINDSHIELD OUTSIDE MOULDING
  1. Using a brush or a sponge, coat the application area of a new windshield outside moulding with Primer G.

    NOTICE:
    1. Do not apply too much primer.
    2. Allow the primer to dry for 3 minutes or more.
    3. Throw away any leftover primer.

    HINT:
    If an area other than that specified is coated by accident, wipe off the primer with a clean piece of cloth before it dries.


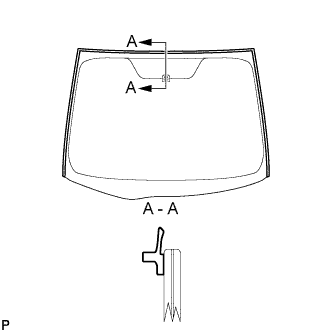
    B229134E01
  1. Install the windshield outside moulding onto the windshield glass, as shown in the illustration.


4. INSTALL WINDOW GLASS ADHESIVE DAM
  1. Using a brush or a sponge, coat the application area of a new window glass adhesive dam with Primer G.

    NOTICE:
    1. Do not apply too much primer.
    2. Allow the primer to dry for 3 minutes or more.
    3. Throw away any leftover primer.

    HINT:
    If an area other than that specified is coated by accident, wipe off the primer with a clean piece of cloth before it dries.


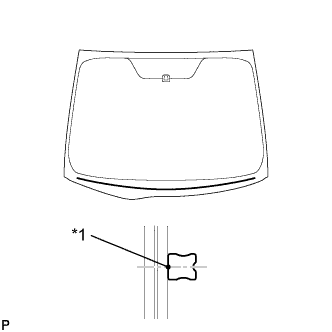
    B229133E01
  1. Install the window glass adhesive dam onto the windshield glass, as shown in the illustration.
    Text in Illustration 
    *1
    Dam Center Line


5. INSTALL WINDSHIELD GLASS SUB-ASSEMBLY


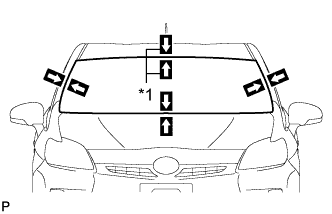
    B229125E01
  1. Position the windshield glass sub-assembly.
    Text in Illustration 
    *1
    Matchmark

    1. Using suction cups, place the windshield glass sub-assembly in the correct position.

    2. Check that the whole contact surface of the windshield glass sub-assembly rim is perfectly even.

    3. Align the matchmarks on the windshield glass sub-assembly and vehicle body.

      NOTICE:
      Check that the windshield glass stoppers are attached to the vehicle body correctly.

    4. Remove the windshield glass sub-assembly.


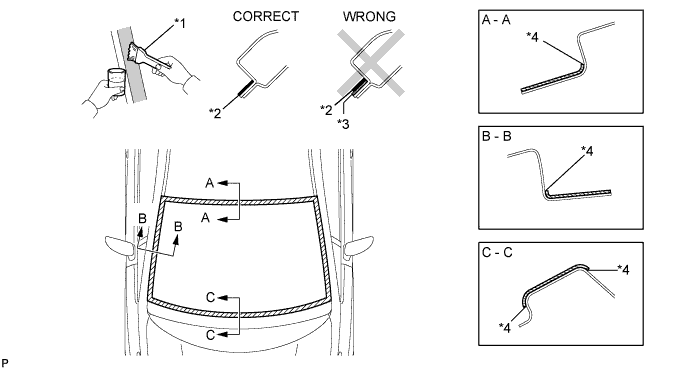
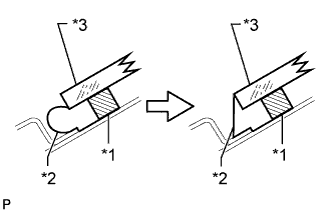
  1. Using a brush, coat the installation surface on the vehicle body with Primer M.


    B229135E01


    Text in Illustration 
    *1
    Brush
    *2
    Primer M
    *3
    Adhesive
    *4
    Edge of Curved Surface

    NOTICE:
    1. Do not coat the adhesive with Primer M.
    2. Do not apply too much primer.
    3. Allow the primer to dry for 3 minutes or more.
    4. Throw away any leftover primer.

    HINT:
    If an area other than that specified is coated by accident, wipe off the primer with a clean piece of cloth before it dries.


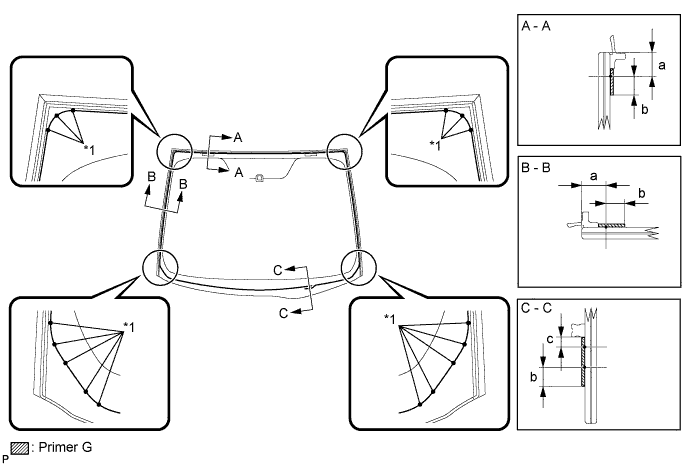
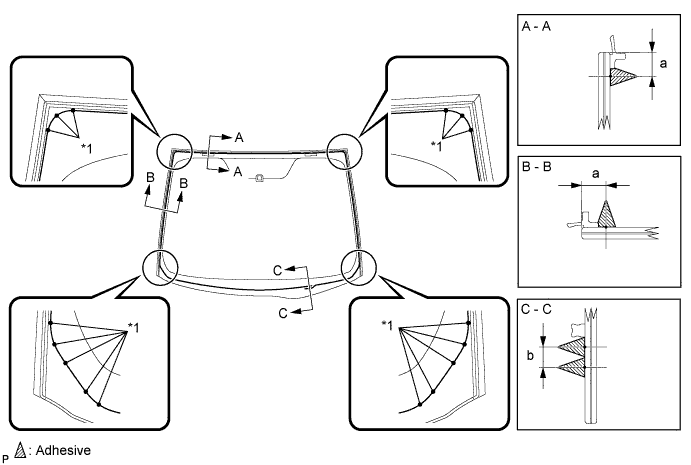
  1. Using a brush or a sponge, coat the application area of adhesive with Primer G.


    B229136E01


    Text in Illustration 
    *1
    Ceramic Notch
    -
    -

    Standard Dimension:
    Area
    Dimension
    a
    9.5 mm (0.374 in.)
    b
    7.0 mm (0.275 in.)
    c
    4.0 mm (0.157 in.)

    NOTICE:
    1. Do not apply too much primer.
    2. Allow the primer to dry for 3 minutes or more.
    3. Throw away any leftover primer.

    HINT:
    1. Apply Primer G onto the ceramic notches.
    2. If an area other than that specified is coated by accident, wipe off the primer with a clean piece of cloth before it dries.


  1. Apply adhesive to the glass.

    Adhesive:
    Toyota Genuine Windshield Glass Adhesive or equivalent


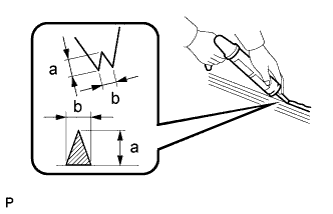
      B214800E02
    1. Cut off the tip of the cartridge nozzle as shown in the illustration.

      Standard Dimension:
      Area
      Dimension
      a
      12.0 mm (0.472 in.)
      b
      8.0 mm (0.315 in.)

      HINT:
      After cutting off the tip, use all adhesive within the time described in the table below.

      Usage Time Frame:
      Temperature
      Usage Time Frame
      35°C (95°F)
      15 minutes
      20°C (68°F)
      1 hour and 40 minutes
      5°C (41°F)
      8 hours

    2. Load the sealer gun with cartridge.


    3. Apply adhesive to the windshield glass sub-assembly as shown in the illustration.


      B229137E01


      Text in Illustration 
      *1
      Ceramic Notch
      -
      -

      Standard Dimension:
      Area
      Dimension
      a
      9.5 mm (0.374 in.)
      b
      8.0 mm (0.315 in.)

      HINT:
      Apply adhesive onto the ceramic notches.


    B229125E01
  1. Install the windshield glass sub-assembly.
    Text in Illustration 
    *1
    Matchmark

    1. Using suction cups, position the windshield glass so that the matchmarks are aligned, and press it in gently along the rim.

      NOTICE:
      1. Check that the windshield glass stoppers are attached to the vehicle body correctly.
      2. Check the clearance between the vehicle body and windshield glass sub-assembly.

    2. Lightly press the front surface of the windshield glass sub-assembly to ensure that the windshield glass is securely fit to the vehicle body.

      HINT:
      Press the glass with a force of 98 N (10 kgf, 22 lbf) or more.


    3. B149738E02
    4. Using a scraper, remove any excess or protruding adhesive.
      Text in Illustration 
      *1
      Dam
      *2
      Adhesive
      *3
      Windshield

      HINT:
      Apply adhesive onto the windshield glass rim.

    5. Hold the windshield glass using protective tape until applied adhesive becomes hard.

      NOTICE:
      Do not drive the vehicle for the time described in the table below.

      Minimum Time:
      Temperature
      Minimum Time prior to Driving Vehicle
      35°C (95°F)
      1 hour and 30 minutes
      20°C (68°F)
      5 hours
      5°C (41°F)
      24 hours


6. INSPECT FOR LEAK AND REPAIR
  1. After the adhesive has hardened, apply water from the outside of the vehicle. Check that no water leaks into the cabin.

  1. If water leaks into the cabin, allow the water to dry and add adhesive.

  1. Remove the protective tape.


7. INSTALL ROOF HEADLINING ASSEMBLY
  1. Return the front section of the roof headlining assembly to the original position.


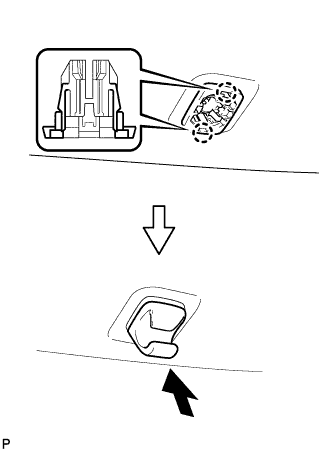
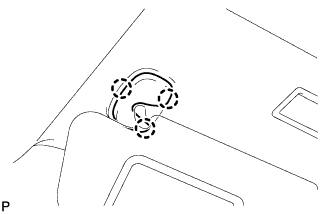
8. INSTALL VISOR HOLDER


    B211698
  1. Engage the 2 claws.

  1. Push in the visor holder as shown in the illustration.

    HINT:
    Use the same procedure for the other visor holder.


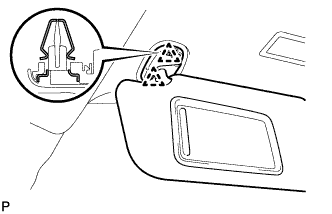
9. INSTALL VISOR ASSEMBLY LH


    B227811
  1. Engage the 2 clips to install the visor assembly LH.


10. INSTALL VISOR BRACKET COVER LH


    B227809
  1. Engage the 3 claws to install the visor bracket cover LH.


11. INSTALL VISOR ASSEMBLY RH

HINT:
Use the same procedure for the RH side and LH side.


12. INSTALL VISOR BRACKET COVER RH

HINT:
Use the same procedure for the RH side and LH side.


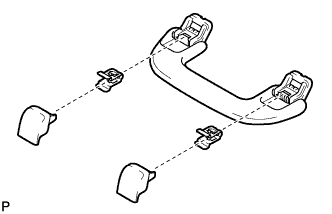
13. INSTALL FRONT ASSIST GRIP ASSEMBLY


    B203057
  1. Assemble the front assist grip assembly as shown in the illustration.


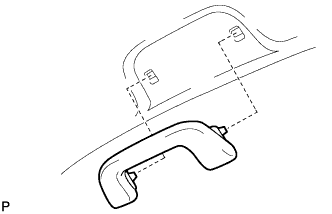
    B229265
  1. Install the front assist grip assembly.

    HINT:
    Use the same procedure for the other front assist grip.


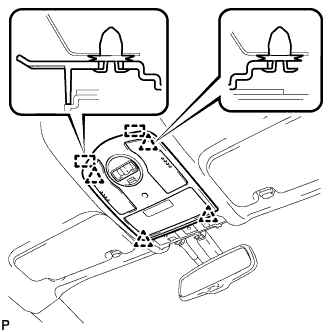
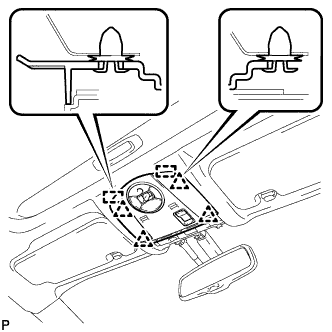
14. INSTALL MAP LIGHT ASSEMBLY (w/o Sliding Roof)
  1. Connect the connector.


    E189674
  1. Engage the 2 guides and 4 clips, and install the map light assembly.


15. INSTALL MAP LIGHT ASSEMBLY (w/ Sliding Roof)
  1. Connect the connector.


    E189672
  1. Engage the 2 guides and 4 clips, and install the map light assembly.


16. INSTALL ROOF TOP MOULDING


    B227833
  1. Engage the 3 claws and 2 clips to install the roof top moulding.


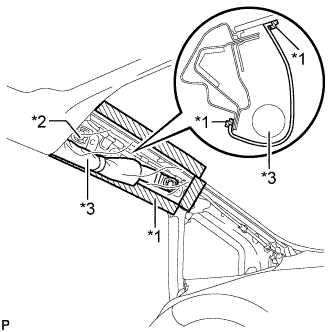
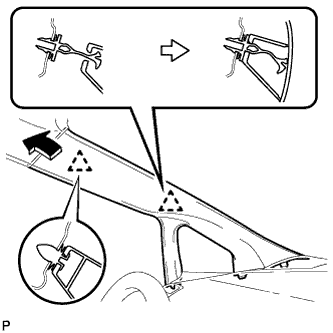
17. INSTALL FRONT PILLAR GARNISH LH


    B227780E01
  1. Remove the protective cover.
    Text in Illustration 
    *1
    Adhesive Tape
    *2
    Protective Cover
    *3
    Curtain Shield Airbag Assembly


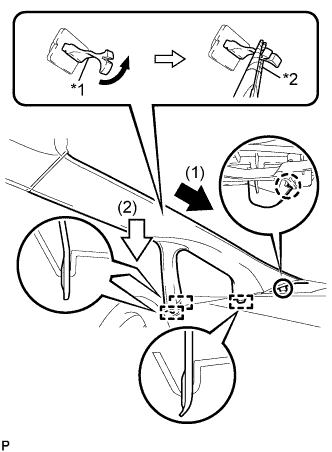
    B257020E01
  1. Make sure that the front pillar garnish clip is not damaged.
    Text in Illustration 
    *1
    Front Pillar Garnish Clip
    *2
    Protective Tape

    NOTICE:
    1. If there is any damage, replace the garnish clip with a new one.
    2. When a garnish clip is being replaced, make sure to install it in the direction shown in the illustration.

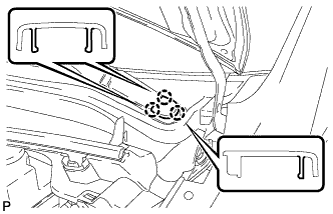
  1. Engage the claw to direction indicated by the arrow (1).

  1. Engage the 3 guides to direction indicated by the arrow (2).

  1. Turn the end of the front pillar garnish clip 90° with needle-nosed pliers and install it to the front pillar garnish LH.

    HINT:
    Tape the needle-nosed pliers tip before use.


    B257025
  1. Engage 2 clips to install the front pillar garnish LH.


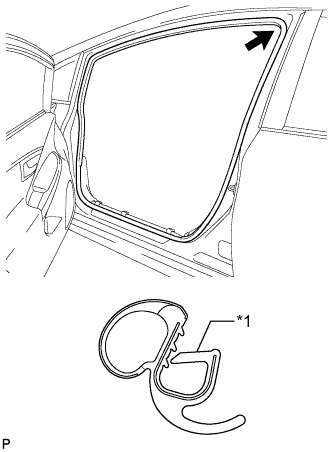
18. INSTALL FRONT DOOR OPENING TRIM WEATHERSTRIP LH


    B227774E01
  1. Align the alignment mark (Yellow) on the weatherstrip with the protruding portion on the body indicated by the arrow in the illustration, and install the front door opening trim weatherstrip LH.
    Text in Illustration 
    *1
    Alignment Mark (Yellow)

    NOTICE:
    After installation, check that the corners fit correctly.


19. INSTALL FRONT PILLAR GARNISH RH

HINT:
Use the same procedure for the RH side and LH side.


20. INSTALL FRONT DOOR OPENING TRIM WEATHERSTRIP RH

HINT:
Use the same procedure for the RH side and LH side.


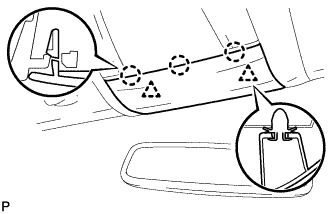
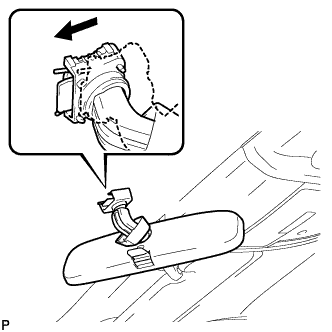
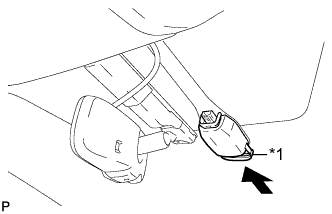
21. INSTALL INNER REAR VIEW MIRROR ASSEMBLY (w/o EC Mirror)


    B229505
  1. Install the inner rear view mirror as shown in the illustration.


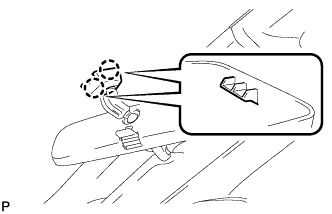
    B229503
  1. Engage the 2 claws and connect the inner rear view mirror cover.


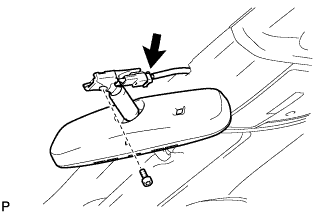
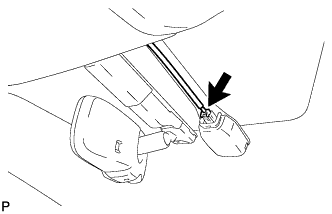
22. INSTALL INNER REAR VIEW MIRROR ASSEMBLY (w/ EC Mirror)


    B229506
  1. Using "TORX" socket wrench (T20), install the inner rear view mirror with the screw.

    Torque:
    1.5 N*m{ 15 kgf*cm , 13 in.*lbf }

  1. Connect the connector.


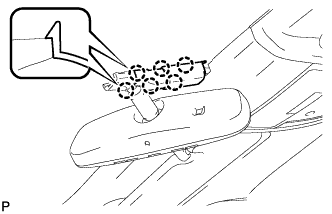
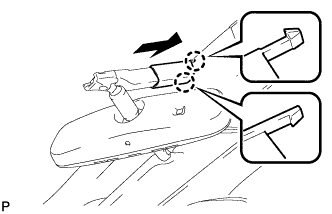
23. INSTALL INNER REAR VIEW MIRROR COVER (w/ EC Mirror)


    B229500
  1. Engage the 6 claws and install the inner rear view mirror cover.


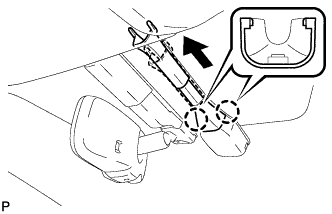
    B229508
  1. Engage the 2 claws and install the inner rear view mirror cover as shown in the illustration.


24. CLEAN WINDSHIELD GLASS (w/ Rain Sensor)

NOTICE:
  1. The rain sensor tape can be reused, however, replace it with a new one if it has dirt on it or it is damaged.
  2. Check that the rain sensor tape does not remain on the windshield glass. If it does, remove it before installing the rain sensor.


25. INSTALL RAIN SENSOR TAPE (w/ Rain Sensor)

HINT:
Rain sensor tape is reusable. Only replace the tape if it is damaged or contaminated.

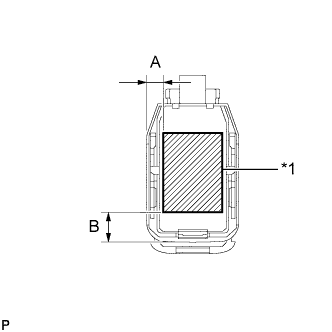
  1. Clean the rain sensor sensing portion with a piece of cloth, etc.


    E189310E01
  1. Peel off the smaller release sheet, and then attach the rain sensor tape on the rain sensor sensing portion as shown in the illustration.
    Standard Clearance 
    Area
    Measurement
    A
    7.25 mm (0,285 in.)
    B
    13.5 mm (0.532 in.)
    Text in Illustration 
    *1
    Rain Sensor Tape

    NOTICE:
    Use your fingers to push out any air bubbles from under the tape.


26. INSTALL RAIN SENSOR (w/ Rain Sensor)
  1. Clean the windshield glass with a piece of cloth, etc.

    NOTICE:
    1. Make sure that there is no rain sensor tape residue remaining on the windshield glass. If there is, remove the residue.
    2. If there is any rain sensor tape residue remaining on the windshield glass, replace the tape.

  1. When installing a new rain sensor or replacing the rain sensor tape:

    1. Peel off the release sheet.

      HINT:
      Do not touch the silicone coated surfaces.


    E189313E01
  1. Gradually attach the rain sensor to the glass surface to prevent air bubbles from forming between them.

    HINT:
    Do not touch the silicone coated or glass surfaces.

  1. Push in the stopper.
    Text in Illustration 
    *1
    Stopper


    E189314
  1. Connect the connector.


27. INSTALL RAIN SENSOR COVER (w/ Rain Sensor)


    E190075
  1. Engage the 2 claws.

  1. Install the rain sensor cover as shown in the illustration.


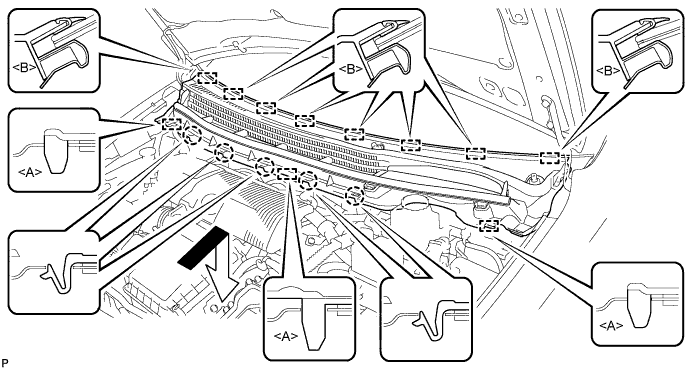
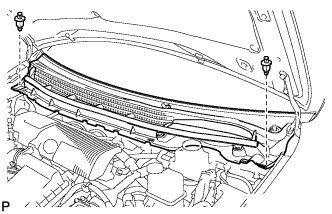
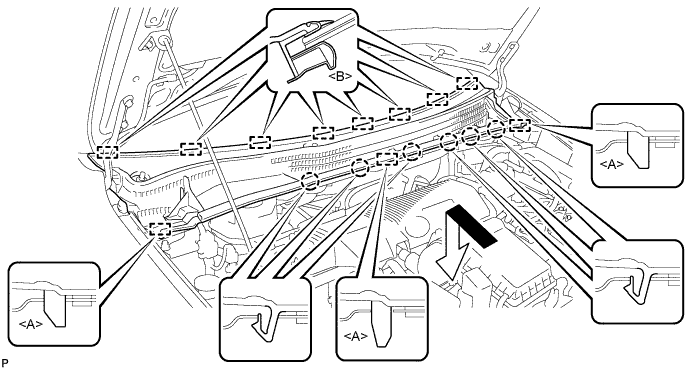
28. INSTALL COWL TOP VENTILATOR LOUVER SUB-ASSEMBLY (for LHD)


  1. Engage the 8 guides <B>.


    E190042E01

  1. Engage the 5 claws and 3 guides <A> to install the cowl top ventilator louver sub-assembly as shown in the illustration.


    E190113
  1. Install the 2 clips.


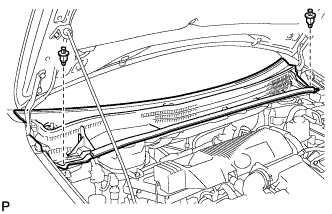
29. INSTALL COWL TOP VENTILATOR LOUVER SUB-ASSEMBLY (for RHD)


  1. Engage the 8 guides <B>.


    E187005E01

  1. Engage the 6 claws and 3 guides <A> to install the cowl top ventilator louver sub-assembly as shown in the illustration.


    E187016
  1. Install the 2 clips.


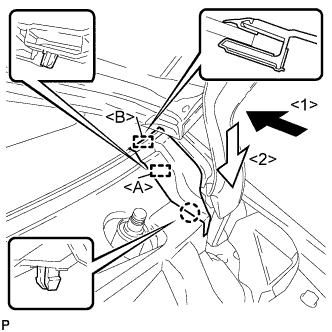
30. INSTALL COWL SIDE VENTILATOR SUB-ASSEMBLY LH


    E193125E01
  1. Engage the guide <B> as shown in the illustration.

  1. Engage the claw and guide <A> to install the cowl side ventilator sub-assembly LH as shown in the illustration.


31. INSTALL COWL SIDE VENTILATOR SUB-ASSEMBLY RH

HINT:
Use the same procedure for the RH side and LH side.


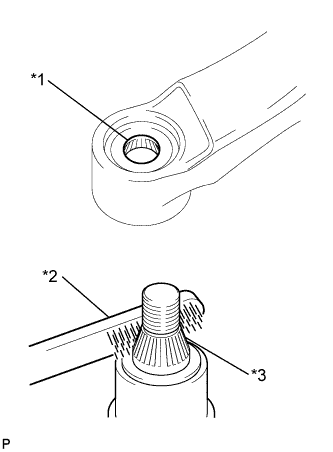
32. INSTALL FRONT WIPER ARM AND BLADE ASSEMBLY RH
  1. Operate the wiper and stop the windshield wiper motor at the automatic stop position.


    E112237E06
  1. When reusing the front wiper arm and blade assembly RH:

    1. Clean the wiper arm serrations.
      Text in Illustration 
      *1
      Wiper Arm Serration
      *2
      Wire Brush
      *3
      Wiper Pivot Serration

  1. When reusing the windshield wiper link assembly:

    1. Clean the wiper pivot serrations with a wire brush.


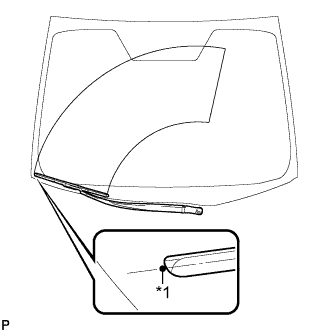
    E189301E01
  1. Install the front wiper arm and blade assembly RH with the nut to the position shown in the illustration.

    Torque:
    23 N*m{ 235 kgf*cm , 17 ft.*lbf }

    Text in Illustration 
    *1
    Ceramic Dot

    HINT:
    Hold the wiper arm by hand while tightening the nut.


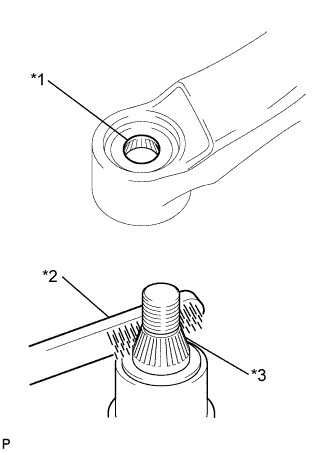
33. INSTALL FRONT WIPER ARM AND BLADE ASSEMBLY LH


    E112237E05
  1. When reusing the front wiper arm and blade assembly LH:

    1. Clean the wiper arm serrations.
      Text in Illustration 
      *1
      Wiper Arm Serration
      *2
      Wire Brush
      *3
      Wiper Pivot Serration

  1. When reusing the windshield wiper link assembly:

    1. Clean the wiper pivot serrations with a wire brush.


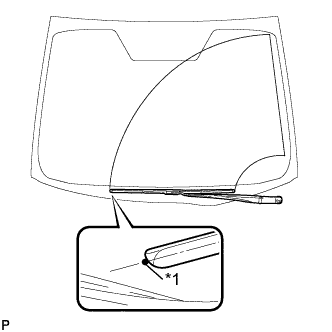
    E189303E01
  1. Install the front wiper arm and blade assembly LH with the nut to the position shown in the illustration.

    Torque:
    23 N*m{ 235 kgf*cm , 17 ft.*lbf }

    Text in Illustration 
    *1
    Ceramic Dot

    HINT:
    Hold the wiper arm by hand while tightening the nut.

  1. Operate the front wipers while spraying washer fluid on the windshield glass. Make sure that the front wipers function properly and there is no interference with the vehicle body.


34. INSTALL FRONT WIPER ARM HEAD CAP


    E190044
  1. Engage the 3 claws to install the front wiper arm head cap.

    HINT:
    Use the same procedure for the RH side and LH side.