Home › Engine / Hybrid System › 2ZR-FXE ENGINE CONTROL › SFI SYSTEM (w/ EGR System)

DTC    P0420    Catalyst System Efficiency Below Threshold (Bank 1)

for Preparation Click here


MONITOR DESCRIPTION

The ECM uses sensors mounted in front of and behind the three-way catalytic converter to monitor its efficiency.
The first sensor, the air fuel ratio sensor, sends pre-catalyst information to the ECM. The second sensor, the heated oxygen sensor, sends post-catalyst information to the ECM.
In order to detect any deterioration in the three-way catalytic converter, the ECM calculates the oxygen storage capacity of the three-way catalytic converter. This calculation is based on the voltage output of the heated oxygen sensor while performing active air fuel ratio control.
The oxygen storage capacity value is an indication of the oxygen storage capacity of the three-way catalytic converter. When the vehicle is being driven with a warm engine, active air fuel ratio control is performed for approximately 15 to 20 seconds. When it is performed, the ECM deliberately sets the air fuel ratio to lean or rich levels. If the cycle of the waveform for the heated oxygen sensor is long, the oxygen storage capacity is great. There is a direct correlation between the heated oxygen sensor and the oxygen storage capacity of the three-way catalytic converter.
The ECM uses the oxygen storage capacity value to determine the state of the three-way catalytic converter. If any deterioration has occurred, it illuminates the MIL and sets the DTC.

DTC No.
DTC Detection Condition
Trouble Area
P0420
Oxygen storage capacity value smaller than standard value under active air fuel ratio control
(2 trip detection logic)
  1. Gas leaks from exhaust system
  2. Air fuel ratio sensor (sensor 1)
  3. Heated oxygen sensor (sensor 2)
  4. Front exhaust pipe assembly (TWC: Front and rear catalyst)
  5. EGR valve assembly

HINT:
  1. Sensor 1 refers to the sensor closest to the engine assembly.
  2. Sensor 2 refers to the sensor farthest away from the engine assembly.


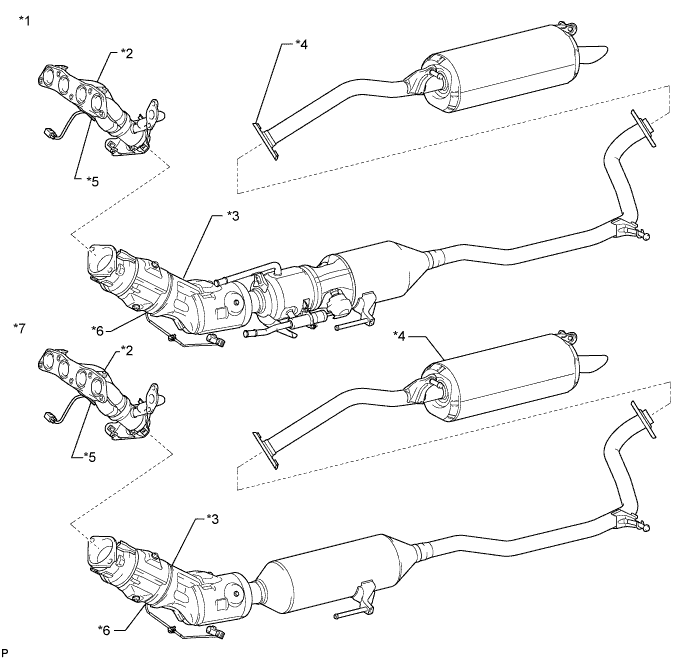
CATALYST LOCATION


A215835E01


Text in Illustration 
*1
w/ Exhaust Heat Recirculation System
*2
Exhaust Manifold Sub-assembly
*3
Front Exhaust Pipe Assembly (TWC: Front and Rear Catalyst)
*4
Tail Exhaust Pipe Assembly
*5
Air Fuel Ratio Sensor (Sensor 1)
*6
Heated Oxygen Sensor (Sensor 2)
*7
w/o Exhaust Heat Recirculation System
-
-

CONFIRMATION DRIVING PATTERN

HINT:
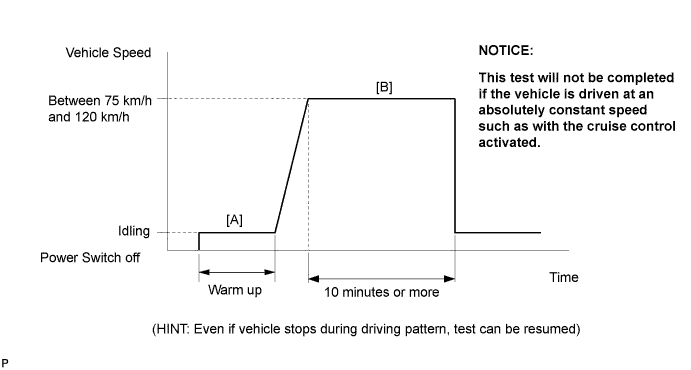
Performing this confirmation pattern will activate the catalyst monitor. This is very useful for verifying the completion of a repair.


A201252E30

  1. Connect the intelligent tester to the DLC3.
  2. Turn the power switch on (IG).
  3. Turn the tester on.
  4. Clear the DTCs (Click here).
  5. Turn the power switch off.
  6. Turn the power switch on (IG) and turn the tester on.
  7. Enter the following menus: Powertrain / Engine and ECT / Data List / Catalyst Monitor.
  8. Check that Catalyst Monitor is Incmpl (Incomplete).
  9. Put the engine in inspection mode (Click here).
  10. Start the engine and warm it up (until the engine coolant temperature is 75°C (167°F) or higher) [A].
  11. Drive the vehicle at between 75 and 120 km/h (47 and 75 mph) for at least 10 minutes or more [B].
  12. Those items will change to Compl (Complete) after completing the driving pattern.
  13. Enter the following menus: Powertrain / Engine and ECT / DTC / Pending.
  14. Check if any DTCs (pending DTCs) are set.

HINT:
If Catalyst does not change to Compl (Complete), and no pending DTCs are stored, extend the driving time.


CONDITIONING FOR SENSOR TESTING


HINT:
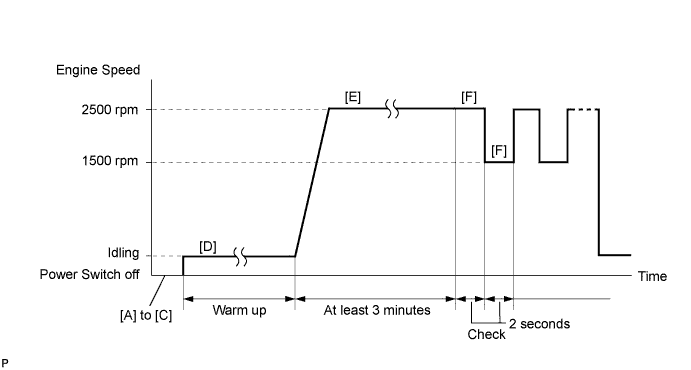
Perform the operation with the engine speeds and time durations described below prior to checking the waveforms of the air fuel ratio sensor and heated oxygen sensor. This is in order to activate the sensors sufficiently to obtain the appropriate inspection results.

A118003E57

  1. (a) Connect the intelligent tester to the DLC3 [A].
  2. (b) Turn the power switch on (IG) and turn the tester on [B].
  3. (c) Put the engine in inspection mode (Click here) [C].
  4. (d) Start the engine and warm it up with all the accessories switched off until the engine coolant temperature stabilizes [D].
  5. (e) Run the engine at an engine speed of between 2500 rpm for at least 3 minutes [E].
  6. (f) While running the engine at 2500 rpm for 2 seconds and 1500 rpm for 2 seconds, check the waveforms of the air fuel ratio and heated oxygen sensors using the tester [F].


HINT:
  1. If either of the voltage outputs of the air fuel ratio or heated oxygen sensor does not fluctuate, or there is noise in the waveform of either sensor, the sensor may be malfunctioning.
  2. If the voltage outputs of both the sensors remain lean or rich, the air fuel ratio may be extremely lean or rich. In such cases, perform the Active Test operation by enter the following menus: Powertrain / Engine and ECT / Active Test / Control the Injection Volume for A/F sensor.
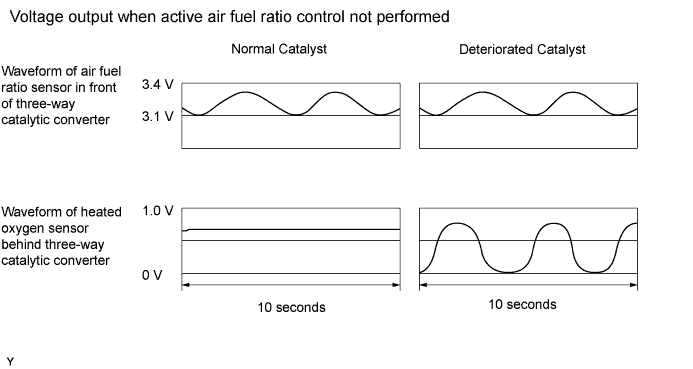
  3. If the three-way catalytic converter has deteriorated, the heated oxygen sensor (located behind the three-way catalytic converter) voltage output fluctuates up and down frequently, even under normal driving conditions (active air fuel ratio control is not performed).

A121610E39


INSPECTION PROCEDURE


AIR FUEL RATIO CONTROL
The following instructions describe how to conduct the Control the Injection Volume for A/F Sensor operation using the intelligent tester.

HINT:
Malfunctioning areas can be identified by performing the Control the Injection Volume for A/F Sensor function provided in the Active Test. The Control the Injection Volume for A/F Sensor function can help to determine whether the air fuel ratio sensor, heated oxygen sensor and other potential trouble areas are malfunctioning.

  1. Connect the intelligent tester to the DLC3.

  2. Turn the power switch on (IG) and turn the tester on.

  3. Put the engine in inspection mode (Click here).

  4. Start the engine.

  5. Warm up the engine at an engine speed of 2500 rpm for approximately 90 seconds.

  6. Enter the following menus: Powertrain / Engine and ECT / Active Test / Control the Injection Volume for A/F Sensor.

  7. Perform the Active Test operation with the engine in an idling condition (press the RIGHT or LEFT button to change the fuel injection volume).

  8. Monitor the voltage outputs of the air fuel ratio and heated oxygen sensors (AFS Voltage B1S1 and O2S B1S2) displayed on the tester.

    HINT:
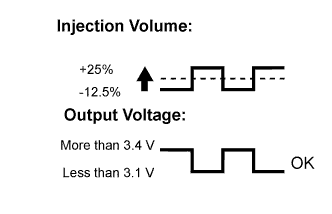
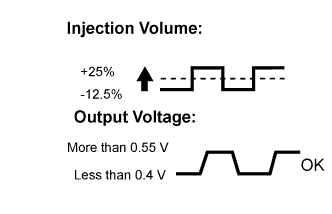
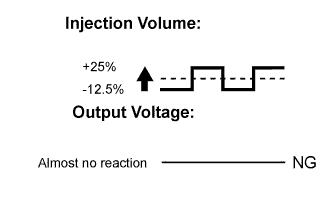
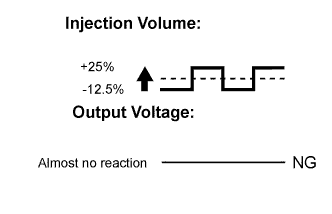
    1. The Control the Injection Volume for A/F Sensor operation lowers the fuel injection volume by 12.5% or increases the injection volume by 25%.
    2. Each sensor reacts in accordance with increases and decreases in the fuel injection volume.


    Tester Display (Sensor)
    Injection Volume
    Status
    Voltage
    AFS Voltage B1S1
    (Air fuel ratio)
    +25%
    Rich
    Less than 3.1 V
    AFS Voltage B1S1
    (Air fuel ratio)
    -12.5%
    Lean
    More than 3.4 V
    O2S B1S2
    (Heated oxygen)
    +25%
    Rich
    More than 0.55 V
    O2S B1S2
    (Heated oxygen)
    -12.5%
    Lean
    Less than 0.4 V

    NOTICE:
    The air fuel ratio sensor has an output delay of a few seconds and the heated oxygen sensor has a maximum output delay of approximately 20 seconds.


    Case
    Air Fuel Ratio Sensor (Sensor 1)
    Output Voltage
    Heated Oxygen Sensor (Sensor 2)
    Output Voltage
    Main Suspected Trouble Area
    1
    A162605E12
    A162598E12
    -
    2
    A162596E06
    A162598E12
    1. Air fuel ratio sensor
    2. Air fuel ratio sensor heater
    3. Air fuel ratio sensor circuit
    3
    A162605E12
    A162596E07
    1. Heated oxygen sensor
    2. Heated oxygen sensor heater
    3. Heated oxygen sensor circuit
    4. Exhaust gas leaks
    4
    A162596E06
    A162596E06
    1. Fuel pressure
    2. Exhaust gas leaks
      (Air fuel ratio extremely lean or rich)
    1. Following the Control the Injection Volume for A/F Sensor procedure enables technicians to check and graph the voltage outputs of both the air fuel ratio and heated oxygen sensors.
    2. To display the graph, enter the following menus: Powertrain / Engine and ECT / Active Test / Control the Injection Volume for A/F Sensor / A/F Control System / AFS Voltage B1S1 and O2S B1S2.

    HINT:
    Read freeze frame data using the intelligent tester. The ECM records vehicle and driving condition information as freeze frame data the moment a DTC is stored. When troubleshooting, freeze frame data can help determine if the vehicle was moving or stationary, if the engine was warmed up or not, if the air fuel ratio was lean or rich, and other data from the time the malfunction occurred.

1.CHECK ANY OTHER DTCS OUTPUT (IN ADDITION TO DTC P0420)
  1. Connect the intelligent tester to the DLC3.

  1. Turn the power switch on (IG).

  1. Turn the tester on.

  1. Enter the following menus: Powertrain / Engine and ECT / DTC.

  1. Read the DTCs.

    Result:
    Result
    Proceed to
    DTC P0420 is output
    A
    DTC P0420 and other DTCs are output
    B

    HINT:
    If any DTCs other than P0420 are output, troubleshoot those DTCs first.


B
GO TO DTC CHART (Click here)
A


2.PERFORM ACTIVE TEST USING INTELLIGENT TESTER (AIR FUEL RATIO CONTROL)
  1. Connect the intelligent tester to the DLC3.

  1. Turn the power switch on (IG) and turn the tester on.

  1. Put the engine in inspection mode (Click here).

  1. Start the engine and warm it up.

  1. Run the engine at an engine speed of 2500 rpm for approximately 90 seconds.

  1. Enter the following menus: Powertrain / Engine and ECT / Active Test / Control the Injection Volume for A/F sensor.

  1. Perform the Active Test operation with the engine in an idling condition (press the RIGHT or LEFT button to change the fuel injection volume).

  1. Monitor the voltage outputs of the air fuel ratio sensor and heated oxygen sensor (AFS Voltage B1S1 and O2S B1S2) displayed on the tester.

    HINT:
    1. The Control the Injection Volume for A/F sensor operation lowers the fuel injection volume by 12.5% or increases the injection volume by 25%.
    2. Each sensor reacts in accordance with increases and decreases in the fuel injection volume.

      Standard:

      Tester Display
      (Sensor)
      Injection Volume
      Status
      Voltage
      AFS Voltage B1S1
      (Air fuel ratio)
      +25%
      Rich
      Less than 3.1 V
      -12.5%
      Lean
      More than 3.4 V
      O2S B1S2
      (Heated oxygen)
      +25%
      Rich
      More than 0.55 V
      -12.5%
      Lean
      Less than 0.4 V


      Result:

      Status
      AFS Voltage B1S1
      Status
      O2S B1S2
      Air Fuel Ratio Condition and Air Fuel Ratio and
      Heated Oxygen Sensors Condition
      Misfire
      Main Suspected Trouble Area
      Proceed to
      Lean/Rich
      Lean/Rich
      Normal
      -
      1. Three-way catalytic converter
      2. Gas leaks from exhaust system
      A
      Lean
      Lean/Rich
      Air fuel ratio sensor malfunction
      -
      1. Air fuel ratio sensor
      B
      Rich
      Lean/Rich
      Air fuel ratio sensor malfunction
      -
      1. Air fuel ratio sensor
      Lean/Rich
      Lean
      Heated oxygen sensor malfunction
      -
      1. Heated oxygen sensor
      2. Gas leaks from exhaust system
      C
      Lean/Rich
      Rich
      Heated oxygen sensor malfunction
      -
      1. Heated oxygen sensor
      2. Gas leaks from exhaust system
      Lean
      Lean
      Actual air fuel ratio lean
      May occur
      1. Extremely rich or lean actual air fuel ratio
      2. Gas leaks from exhaust system
      D
      Rich
      Rich
      Actual air fuel ratio rich
      -
      1. Extremely rich or lean actual air fuel ratio
      2. Gas leaks from exhaust system

      Lean: During Control the Injection Volume for A/F sensor, the air fuel ratio sensor output voltage (AFS Voltage) is consistently more than 3.4 V, and the heated oxygen sensor output voltage (O2S) is consistently less than 0.4 V.
      Rich: During the AFS Voltage is consistently less than 3.1 V, and the O2S is consistently more than 0.55 V.
      Lean/Rich: During Control the Injection Volume for A/F sensor of the Active Test, the output voltage of the heated oxygen sensor alternates correctly.
    3. The air fuel ratio sensor has an output delay of a few seconds and the heated oxygen sensor has a maximum output delay of approximately 20 seconds.


B
REPLACE AIR FUEL RATIO SENSOR NO.2 (SENSOR 1) (Click here)

C
Go to step 6

D
Go to step 7
A


3.INSPECT FOR EXHAUST GAS LEAK
  1. Inspect for exhaust gas leaks from the exhaust manifold sub-assembly and exhaust pipes.

OK:
No gas leaks.


NG
REPAIR OR REPLACE EXHAUST GAS LEAK POINT
OK


4.PERFORM ACTIVE TEST USING INTELLIGENT TESTER (CONTROL THE EGR STEP POSITION)
  1. Connect the intelligent tester to the DLC3.

  1. Turn the power switch on (IG).

  1. Turn the tester on.

  1. Put the engine in inspection mode (Click here).

  1. Start the engine and warm it up until the engine coolant temperature reaches 75°C (167°F) or more.

    HINT:
    The A/C switch and all accessory switches should be off.

  1. Enter the following menus: Powertrain / Engine and ECT / Active Test / Control the EGR Step Position.

  1. Confirm the Throttle Idle Position is ON and check the engine idling condition and MAP values in the Data List while performing the Active Test.

    HINT:
    1. Do not leave the EGR valve open for 10 seconds or more during the Active Test.
    2. Be sure to return the EGR valve to step 0 when the Active Test is completed.
    3. Do not open the EGR valve 30 steps or more during the Active Test.

    OK:
    MAP and idling condition change in response to EGR step position when Throttle Idle Position is ON in Data List.


    Standard:

    -
    EGR Step Position (Active Test)
    0 Steps
    0 to 30 Steps
    Idling condition
    Steady idling
    Idling changes from steady to rough idling
    MAP
    (Data List)
    MAP value is 20 to 40 kPa (150 to 300 mmHg)
    (EGR valve is fully closed)
    MAP value is at least +10 kPa (75 mmHg) higher than when EGR valve is fully closed

    HINT:
    During Active Test, if the idling condition does not change in response to EGR step position, then there is probably a malfunction in the EGR valve.

    Result:
    Result
    Proceed to
    Outside of standard range
    A
    Within standard range
    B


B
REPLACE FRONT EXHAUST PIPE ASSEMBLY (TWC: FRONT AND REAR CATALYST) (Click here)
A


5.INSPECT EGR VALVE ASSEMBLY
  1. Remove the EGR valve assembly (Click here).

  1. Check if the EGR valve is stuck open.

    OK:
    EGR valve is tightly closed.

  1. Reinstall the EGR valve assembly (Click here).


NG
REPLACE EGR VALVE ASSEMBLY (Click here)
OK

REPLACE FRONT EXHAUST PIPE ASSEMBLY (TWC: FRONT AND REAR CATALYST) (Click here)  

6.INSPECT FOR EXHAUST GAS LEAK
  1. Inspect for exhaust gas leaks from the exhaust manifold sub-assembly and exhaust pipes.

OK:
No gas leaks.


NG
REPAIR OR REPLACE EXHAUST GAS LEAK POINT
OK

REPLACE HEATED OXYGEN SENSOR (SENSOR 2) (Click here)  

7.INSPECT FOR EXHAUST GAS LEAK
  1. Inspect for exhaust gas leaks from the exhaust manifold sub-assembly and exhaust pipes.

OK:
No gas leaks.


NG
REPAIR OR REPLACE EXHAUST GAS LEAK POINT
OK


8.PERFORM ACTIVE TEST USING INTELLIGENT TESTER (CONTROL THE EGR STEP POSITION)
  1. Connect the intelligent tester to the DLC3.

  1. Turn the power switch on (IG).

  1. Turn the tester on.

  1. Put the engine in inspection mode (Click here).

  1. Start the engine and warm it up until the engine coolant temperature reaches 75°C (167°F) or more.

    HINT:
    The A/C switch and all accessory switches should be off.

  1. Enter the following menus: Powertrain / Engine and ECT / Active Test / Control the EGR Step Position.

  1. Confirm the Throttle Idle Position is ON and check the engine idling condition and MAP values in the Data List while performing the Active Test.

    HINT:
    1. Do not leave the EGR valve open for 10 seconds or more during the Active Test.
    2. Be sure to return the EGR valve to step 0 when the Active Test is completed.
    3. Do not open the EGR valve 30 steps or more during the Active Test.

    OK:
    MAP and idling condition change in response to EGR step position when Throttle Idle Position is ON in Data List.


    Standard:

    -
    EGR Step Position (Active Test)
    0 Steps
    0 to 30 Steps
    Idling condition
    Steady idling
    Idling changes from steady to rough idling
    MAP
    (Data List)
    MAP value is 20 to 40 kPa (150 to 300 mmHg)
    (EGR valve is fully closed)
    MAP value is at least +10 kPa (75 mmHg) higher than when EGR valve is fully closed

    HINT:
    During Active Test, if the idling condition does not change in response to EGR step position, then there is probably a malfunction in the EGR valve.

    Result:
    Result
    Proceed to
    Outside of standard range
    A
    Within standard range
    B


B
CHECK ENGINE TO DETERMINE CAUSE OF EXTREMELY RICH OR LEAN ACTUAL AIR FUEL RATIO
A


9.INSPECT EGR VALVE ASSEMBLY
  1. Remove the EGR valve assembly (Click here).

  1. Check if the EGR valve is stuck open.

    OK:
    EGR valve is tightly closed.

  1. Reinstall the EGR valve assembly (Click here).


NG
REPLACE EGR VALVE ASSEMBLY (Click here)
OK

CHECK ENGINE TO DETERMINE CAUSE OF EXTREMELY RICH OR LEAN ACTUAL AIR FUEL RATIO