Home › Vehicle Exterior › DOOR / HATCH › REAR DOOR

REAR DOOR > ADJUSTMENT

for Preparation Click here


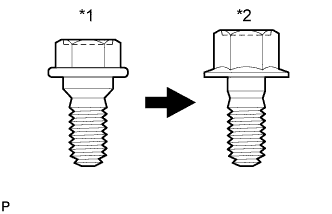
B228782E01
Text in Illustration 
*1
Centering Bolt
*2
Standard Bolt

CAUTION:
Before adjusting the door positions of vehicles equipped with side and curtain shield airbags, be sure to disconnect the battery. After adjustment, check that the SRS warning light is operating normally and there are no SRS DTCs output.

HINT:
  1. Use the same procedure for the RH side and LH side.
  2. The following procedure is for the LH side.
  3. Centering bolts are used to mount the door hinge to the vehicle body and door. The door cannot be adjusted with the centering bolts installed. Substitute the centering bolts with standard bolts when making adjustments.
  4. Specified torque for standard bolts is shown in the standard bolt chart (Click here).


1. INSPECT REAR DOOR


  1. Check that the clearance measurements of areas *1 through *15 are within each standard range.
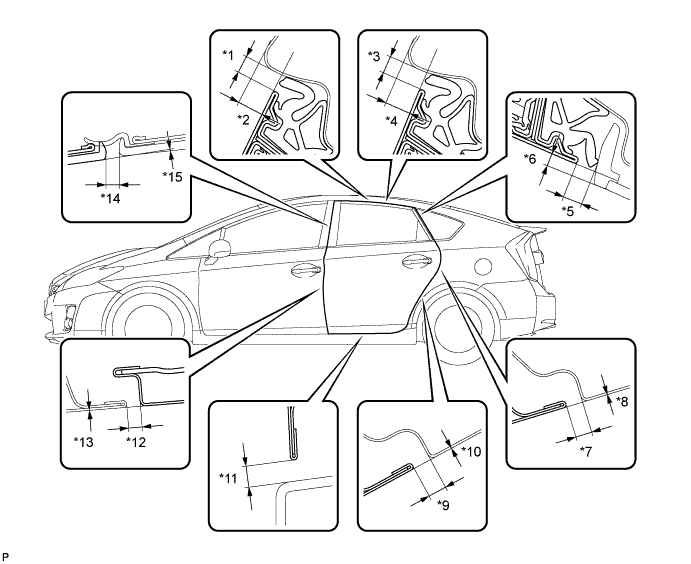

    B227960E01


    Standard Clearance 
    Area
    Measurement
    Area
    Measurement
    *1
    3.57 to 6.57 mm (0.141 to 0.259 in.)
    *2
    6.17 to 9.17 mm (0.243 to 0.361 in.)
    *3
    3.57 to 6.57 mm (0.141 to 0.259 in.)
    *4
    5.97 to 8.97 mm (0.235 to 0.353 in.)
    *5
    4.62 to 7.62 mm (0.182 to 0.300 in.)
    *6
    1.72 to 4.72 mm (0.0677 to 0.186 in.)
    *7
    2.7 to 5.7 mm (0.106 to 0.224 in.)
    *8
    -1.5 to 1.5 mm (-0.0591 to 0.0591 in.)
    *9
    2.7 to 5.7 mm (0.106 to 0.224 in.)
    *10
    -1.5 to 1.5 mm (-0.0591 to 0.0591 in.)
    *11
    4.15 to 7.15 mm (0.163 to 0.282 in.)
    *12
    2.7 to 5.7 mm (0.106 to 0.224 in.)
    *13
    -1.5 to 1.5 mm (-0.0591 to 0.0591 in.)
    *14
    2.8 to 5.8 mm (0.110 to 0.228 in.)
    *15
    -1.3 to 1.7 mm (-0.0512 to 0.0669 in.)
    -
    -


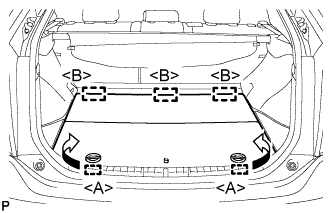
2. REMOVE REAR NO. 2 FLOOR BOARD


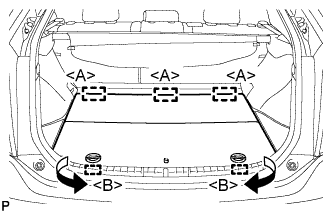
    B227787E01
  1. Disengage the 2 guides <A> as shown in the illustration.

  1. Disengage the 3 guides <B> and remove the rear No. 2 floor board.


3. REMOVE REAR DECK FLOOR BOX
  1. Remove the rear deck floor box.


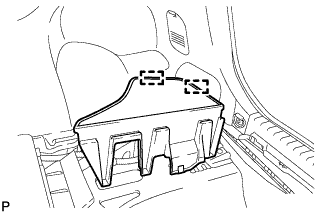
4. REMOVE REAR NO. 3 FLOOR BOARD


    B227791
  1. Disengage the 2 guides and remove the rear No. 3 floor board.


5. PRECAUTION (w/ Navigation System for HDD)

NOTICE:
After the power switch is turned off, the display and navigation module display (HDD navigation system) records various types of memory and settings. As a result, after turning the power switch off, make sure to wait at least 60 seconds before disconnecting the cable from the negative (-) battery terminal.


6. DISCONNECT CABLE FROM NEGATIVE BATTERY TERMINAL

CAUTION:
Wait at least 90 seconds after disconnecting the cable from the negative (-) battery terminal to disable the SRS system.

NOTICE:
When disconnecting the cable, some systems need to be initialized after the cable is reconnected (Click here).


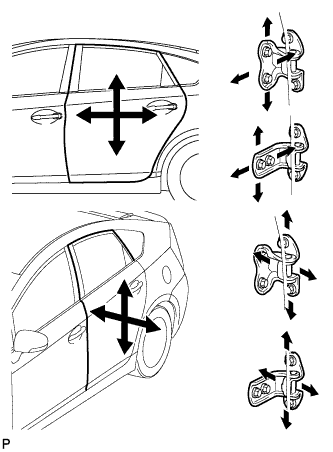
7. ADJUST REAR DOOR


    B228897
  1. Using SST, loosen the hinge bolts on the vehicle body and adjust the door position.

    SST
    09812-00010  

  1. Tighten the hinge bolts on the vehicle body after the adjustment.

    Torque:
    26 N*m{ 265 kgf*cm , 19 ft.*lbf }

  1. Loosen the hinge bolts on the door and adjust the door position.

  1. Tighten the hinge bolts on the door after the adjustment.

    Torque:
    26 N*m{ 265 kgf*cm , 19 ft.*lbf }


    B228898
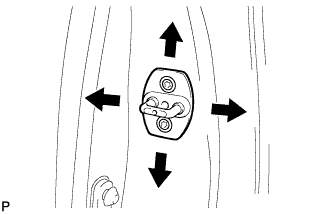
  1. Using a T40 "TORX" socket wrench, slightly loosen the striker mounting screws.

  1. Using a brass bar and a hammer, hit the striker to adjust its position.

  1. Using a T40 "TORX" socket wrench, tighten the striker mounting screws after the adjustment.

    Torque:
    23 N*m{ 235 kgf*cm , 17 ft.*lbf }


8. CONNECT CABLE TO NEGATIVE BATTERY TERMINAL

NOTICE:
When disconnecting the cable, some systems need to be initialized after the cable is reconnected (Click here).


9. INSTALL REAR NO. 3 FLOOR BOARD


    B227791
  1. Engage the 2 guides to install the rear No. 3 floor board.


10. INSTALL REAR DECK FLOOR BOX
  1. Install the rear deck floor box.


11. INSTALL REAR NO. 2 FLOOR BOARD


    B227788E01
  1. Engage the 3 guides <A>.

  1. Engage the 2 guides <B> and install the rear No. 2 floor board as shown in the illustration.


12. INSPECT SRS WARNING LIGHT
(Click here)