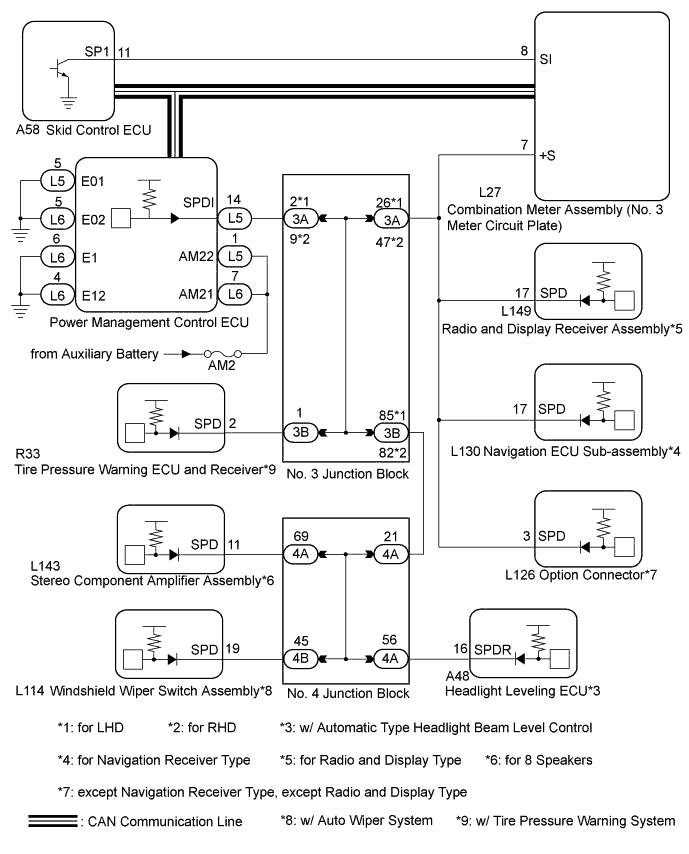
DTC B2282 Vehicle Speed Signal Malfunction |
| DTC No. | DTC Detection Condition | Trouble Area |
| B2282 | Speed information received by the power management control ECU via direct line and via CAN is inconsistent. |
|
| 1.CHECK CAN COMMUNICATION SYSTEM |
Check if CAN communication DTCs are output.
|
| ||||
| OK | |
 |
| 2.CHECK SPEEDOMETER OPERATION |
Connect the intelligent tester to the DLC3.
Turn the power switch on (IG).
Turn the intelligent tester on.
Enter the following menus: Body / Combination Meter / Data List.
Check the Data List for proper functioning of the vehicle speed signal.
| Tester Display | Measurement Item/Range | Normal Condition | Diagnostic Note |
| Vehicle Speed Meter | Vehicle speed/Min.: 0, Max.: 255 | Almost same as actual speed (When driving) | - |
|
| ||||
| OK | |
|
| 3.READ VALUE USING INTELLIGENT TESTER |
Enter the following menus: Body / Power Source Control / Data List.
Read the Data List according to the display on the intelligent tester.
| Tester Display | Measurement Item/Range | Normal Condition | Diagnostic Note |
| Vehicle speed signal | Vehicle speed signal/Stop or Run | Stop: Vehicle stopped Run: Vehicle running | - |
|
| ||||
| OK | ||
 | ||
| ||
| 4.CHECK HARNESS AND CONNECTOR (AUXILIARY BATTERY - POWER MANAGEMENT CONTROL ECU) |
Disconnect the L5 and L6 connectors from the power management control ECU.
Measure the voltage according to the value(s) in the table below.
| Tester Connection | Condition | Specified Condition |
| L5-1 (AM22) - Body ground | Always | 9.5 to 16 V |
| L6-7 (AM21) - Body ground | Always | 9.5 to 16 V |
|
| ||||
| OK | |
|
| 5.CHECK HARNESS AND CONNECTOR (POWER MANAGEMENT CONTROL ECU - BODY GROUND) |
Measure the resistance according to the value(s) in the table below.
| Tester Connection | Condition | Specified Condition |
| L5-5 (E01) - Body ground | Always | Below 1 Ω |
| L5-6 (E1) - Body ground | Always | Below 1 Ω |
| L6-4 (E12) - Body ground | Always | Below 1 Ω |
| L6-5 (E02) - Body ground | Always | Below 1 Ω |
|
| ||||
| OK | |
|
| 6.CHECK HARNESS AND CONNECTOR (COMBINATION METER ASSEMBLY - POWER MANAGEMENT CONTROL ECU) |
Disconnect the L27 connector from the combination meter assembly.
Measure the resistance according to the value(s) in the table below.
| Tester Connection | Condition | Specified Condition |
| L5-14 (SPDI) - L27-7 (+S) | Always | Below 1 Ω |
| L5-14 (SPDI) - Body ground | Always | 10 kΩ or higher |
|
| ||||
| OK | |
|
| 7.INSPECT COMBINATION METER ASSEMBLY |
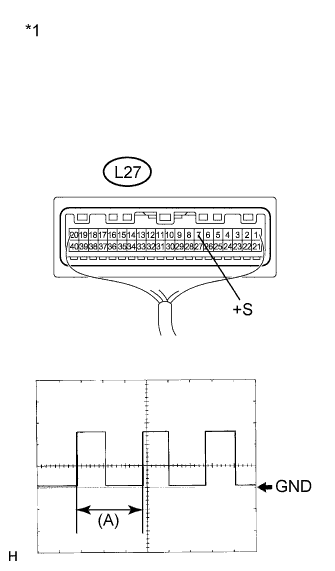 |
Remove the combination meter (Click here).
Reconnect the L27 connector to the combination meter assembly.
Reconnect the L5 connector to the power management control ECU.
Connect an oscilloscope to terminal L27-7 (+S) and body ground.
Turn the power switch on (IG).
Turn the wheel slowly.
Check the signal waveform according to the condition(s) in the table below.
| Item | Condition |
| Tool setting | 5 V/DIV., 20 ms./DIV. |
| Vehicle condition | Driving at approx. 20 km/h (12 mph) |
| *1 | Component with harness connected (Combination Meter Assembly) |
|
| ||||
| OK | ||
| ||
| ||
| 8.CHECK HARNESS AND CONNECTOR (COMBINATION METER ASSEMBLY - NO. 3 JUNCTION BLOCK) |
Disconnect the 3A connector.
Measure the resistance according to the value(s) in the table below.
| Tester Connection | Condition | Specified Condition |
| L27-7 (+S) - 3A-26*1 L27-7 (+S) - 3A-47*2 | Always | Below 1 Ω |
| L27-7 (+S) - Body ground | Always | 10 kΩ or higher |
|
| ||||
| OK | |
|
| 9.CHECK HARNESS AND CONNECTOR (POWER MANAGEMENT CONTROL ECU - JUNCTION BLOCK) |
Measure the resistance according to the value(s) in the table below.
| Tester Connection | Condition | Specified Condition |
| L5-14 (SPDI) - 3A-2*1 L5-14 (SPDI) - 3A-9*2 | Always | Below 1 Ω |
| L5-14 (SPDI) - Body ground | Always | 10 kΩ or higher |
|
| ||||
| OK | ||
| ||
| ||

