Home › Drivetrain › AXLE AND DIFFERENTIAL › FRONT AXLE HUB BOLT

FRONT AXLE HUB BOLT > REPLACEMENT

for Preparation Click here


NOTICE:
When the brake pedal is first depressed after replacing the brake pads or pushing back the disc brake piston, DTC C1214 may be output. As there is no malfunction, clear the DTC.

HINT:
  1. Use the same procedure for the RH side and LH side.
  2. The procedure listed below is for the LH side.


1. PRECAUTION (w/ Navigation System for HDD)

NOTICE:
After the power switch is turned off, the display and navigation module display (HDD navigation system) records various types of memory and setting. As a result, after turning the power switch off, make sure to wait at least 60 seconds before disconnecting the cable from the negative (-) battery terminal.


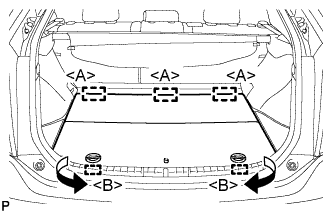
2. REMOVE REAR NO. 2 FLOOR BOARD


    B227787E01
  1. Disengage the 2 guides <A> as shown in the illustration.

  1. Disengage the 3 guides <B> and remove the rear No. 2 floor board.


3. REMOVE REAR DECK FLOOR BOX
  1. Remove the rear deck floor box.


4. REMOVE REAR NO. 3 FLOOR BOARD


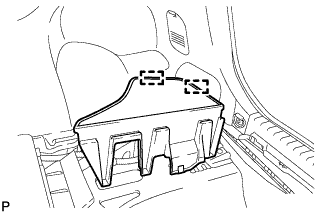
    B227791
  1. Disengage the 2 guides and remove the rear No. 3 floor board.


5. DISABLE BRAKE CONTROL
  1. Wait at least 2 minutes after the power switch off.
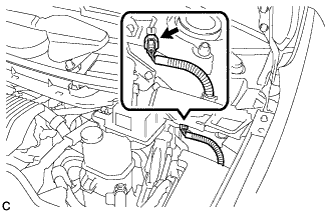
    NOTICE:
    When the brake pedal is depressed or the door courtesy switch is turned on even if the power switch is off, the brake control system activates. Therefore do not depress the brake pedal or open/close the doors until the reservoir level switch connector is disconnected.


    C205666
  1. Disconnect the reservoir level switch connector with the parking brake applied.

  1. Disconnect the cable from the negative (-) battery terminal.

    NOTICE:
    When disconnecting the cable, some systems need to be initialized after the cable is reconnected (Click here).

  1. Depress the brake pedal 40 times or more to return all the fluid in the accumulator back to the reservoir.

  1. Check that the brake pedal can not be further depressed.

  1. Release the parking brake.


6. REMOVE FRONT WHEEL


7. SEPARATE FRONT DISC BRAKE CALIPER ASSEMBLY


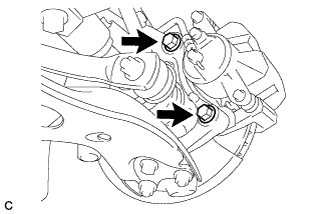
    C205582
  1. Remove the 2 bolts and separate the front disc brake caliper assembly.

    NOTICE:
    Use wire or an equivalent tool to keep the front disc brake caliper assembly from hanging down by the flexible hose.


8. REMOVE FRONT DISC


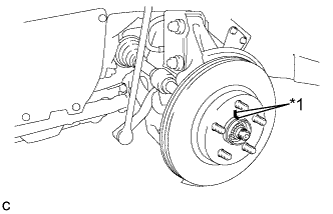
    C205538E01
  1. Remove the front disc.
    Text in Illustration 
    *1
    Matchmark

    HINT:
    Put matchmarks on the disc and the axle hub.


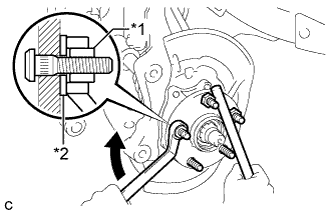
9. REMOVE FRONT AXLE HUB BOLT


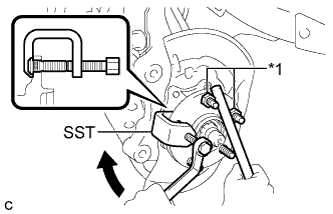
    C205574E01
  1. Temporarily install 2 nuts to the front axle hub bolts as shown in the illustration.
    Text in Illustration 
    *1
    Nut

    Recommended service nut:
    Thread diameter: 12.0 mm (0.472 in.)
    Thread pitch: 1.5 mm (0.0591 in.)

    NOTICE:
    Install nuts to prevent damage to the hub bolts.

  1. Using SST and a brass bar or an equivalent tool to hold the front axle, remove the front axle hub bolt.

    SST
    09611-12010  

    NOTICE:
    Do not damage the threads of the front axle hub bolts.


10. INSTALL FRONT AXLE HUB BOLT


    C205575E01
  1. Install a washer and nut to a new front axle hub bolt as shown in the illustration.
    Text in Illustration 
    *1
    Nut
    *2
    Washer

    Recommended service nut:
    Thread diameter: 12.0 mm (0.472 in.)
    Thread pitch: 1.5 mm (0.0591 in.)

    HINT:
    Recommended thickness of the washer is 5 mm (0.197 in.) or more.

  1. Using a brass bar or an equivalent tool to hold the front axle, install the hub bolt by tightening the nut.

    NOTICE:
    1. Install the nuts to prevent damage to the front axle hub bolts.
    2. Do not damage the threads of the front axle hub bolts.

  1. Remove the 3 nuts and washer from the 3 front axle hub bolts.


11. INSTALL FRONT DISC


    C205538E01
  1. Align the matchmarks of the disc and axle hub, and install the disc.
    Text in Illustration 
    *1
    Matchmark

    NOTICE:
    When replacing the disc with a new one, select the installation position where the front disc has minimal runout.


12. INSTALL FRONT DISC BRAKE CALIPER ASSEMBLY


    C205582
  1. Install the front disc brake caliper assembly to the steering knuckle with the 2 bolts.

    Torque:
    137 N*m{ 1398 kgf*cm , 101 ft.*lbf }

    NOTICE:
    Do not twist the brake hose when installing the front disc brake caliper assembly.


13. INSTALL FRONT WHEEL

Torque:
103 N*m{ 1050 kgf*cm , 76 ft.*lbf }


14. CONNECT CABLE TO NEGATIVE BATTERY TERMINAL
  1. Connect the cable to the negative (-) battery terminal.

    NOTICE:
    When disconnecting the cable, some systems need to be initialized after the cable is reconnected (Click here).

  1. Connect the reservoir level switch connector.

  1. Clear the DTCs (Click here).


15. INSTALL REAR NO. 3 FLOOR BOARD


    B227791
  1. Engage the 2 guides to install the rear No. 3 floor board.


16. INSTALL REAR DECK FLOOR BOX
  1. Install the rear deck floor box.


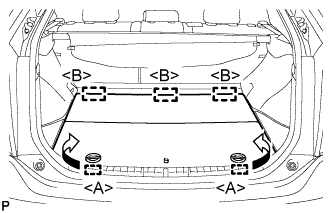
17. INSTALL REAR NO. 2 FLOOR BOARD


    B227788E01
  1. Engage the 3 guides <A>.

  1. Engage the 2 guides <B> and install the rear No. 2 floor board as shown in the illustration.