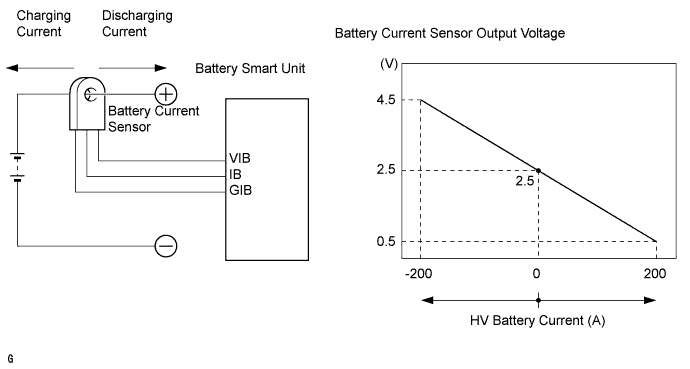
DTC P0ABF-123 Hybrid Battery Pack Current Sensor Circuit |
DTC P0AC1-123 Hybrid Battery Pack Current Sensor "A" Circuit Low |
DTC P0AC2-123 Hybrid Battery Pack Current Sensor "A" Circuit High |
| DTC No. | DTC Detection Condition | Trouble Area |
| P0ABF-123 P0AC1-123 P0AC2-123 | When the battery current sensor is abnormal (1 trip detection) |
|
| 1.CHECK DTC OUTPUT (DTC P0AFC-123 IS OUTPUT) |
Connect the intelligent tester to the DLC3.
Turn the power switch on (IG).
Enter the following menus: Powertrain / Hybrid Control / Trouble Codes.
Read output DTCs (Click here).
| Result | Proceed to |
| P0AFC-123 is not output. | A |
| P0AFC-123 is also output. | B |
Disconnect the intelligent tester from the DLC3.
|
| ||||
| A | |
 |
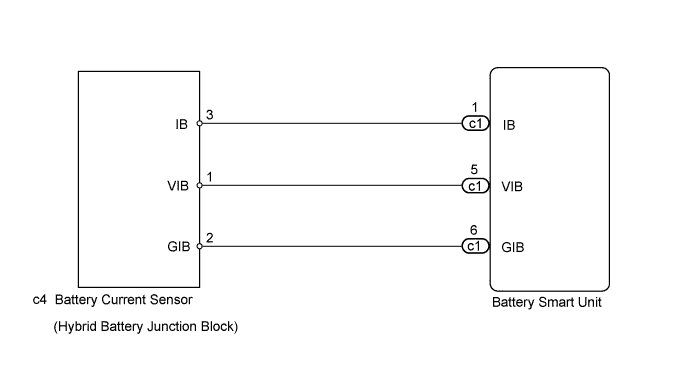
| 2.CHECK HARNESS AND CONNECTOR (HYBRID BATTERY JUNCTION BLOCK - BATTERY SMART UNIT) |
Disconnect the cable from the negative (-) battery terminal.
Check that the service plug grip is not installed.
Remove the No. 1 hybrid vehicle battery carrier bracket sub-assembly (Click here).
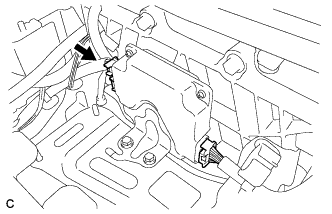 |
Disconnect only the c1 connector of the battery smart unit.
Disconnect the c4 battery current sensor connector from the hybrid battery junction block.
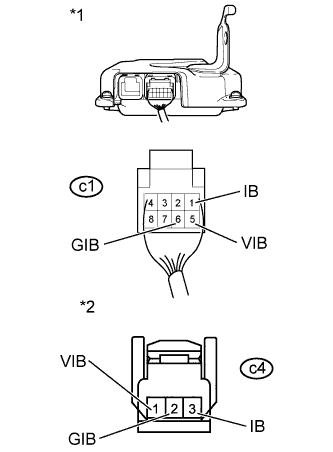 |
Measure the resistance according to the value(s) in the tables below.
| Tester Connection | Switch Condition | Specified Condition |
| c1-1 (IB) - c4-3 (IB) | Power switch off | Below 1 Ω |
| c1-6 (GIB) - c4-2 (GIB) | Power switch off | Below 1 Ω |
| c1-5 (VIB) - c4-1 (VIB) | Power switch off | Below 1 Ω |
| Tester Connection | Switch Condition | Specified Condition |
| c1-1 (IB) or c4-3 (IB) - Body ground and other terminals | Power switch off | 10 kΩ or higher |
| c1-6 (GIB) or c4-2 (GIB) - Body ground and other terminals | Power switch off | 10 kΩ or higher |
| c1-5 (VIB) or c4-1 (VIB) - Body ground and other terminals | Power switch off | 10 kΩ or higher |
| *1 | Rear view of wire harness connector (to Battery Smart Unit) |
| *2 | Front view of wire harness connector (to Hybrid Battery Junction Block) |
Connect the c1 connector to the battery smart unit.
Connect the c4 battery current sensor connector to the hybrid battery junction block.
Install the No. 1 hybrid vehicle battery carrier bracket sub-assembly (Click here).
Connect the cable to the negative (-) battery terminal.
|
| ||||
| OK | |
|
| 3.CHECK BATTERY SMART UNIT (VIB VOLTAGE) |
Disconnect the cable from the negative (-) battery terminal.
Check that the service plug grip is not installed.
Remove the No. 1 hybrid vehicle battery carrier bracket sub-assembly (Click here).
Connect the cable to the negative (-) battery terminal.
Turn the power switch on (IG).
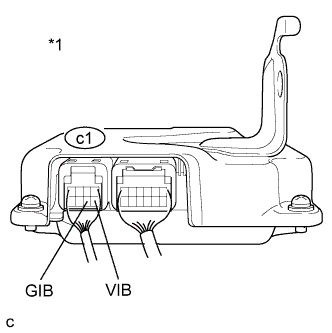 |
Measure the voltage according to the value(s) in the table below.
| Tester Connection | Switch Condition | Specified Condition |
| c1-5 (VIB) - c1-6 (GIB) | Power switch on (IG) | 4.6 to 5.4 V |
| *1 | Component with harness connected (Battery Smart Unit) |
Turn the power switch off.
Disconnect the cable from the negative (-) battery terminal.
Install the No. 1 hybrid vehicle battery carrier bracket sub-assembly (Click here).
Connect the cable to the negative (-) battery terminal.
|
| ||||
| OK | |
|
| 4.CHECK BATTERY SMART UNIT |
Disconnect the cable from the negative (-) battery terminal.
Check that the service plug grip is not installed.
Remove the No. 1 hybrid vehicle battery carrier bracket sub-assembly (Click here).
Connect the cable to the negative (-) battery terminal.
Turn the power switch on (IG).
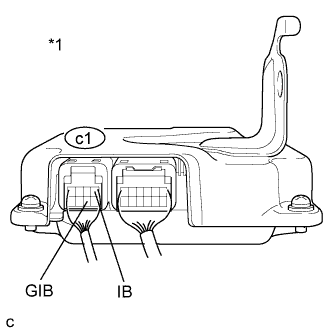 |
Measure the voltage according to the value(s) in the table below.
| Tester Connection | Switch Condition | Specified Condition |
| c1-1 (IB) - c1-6 (GIB) | Power switch on (IG) | 2.46 to 2.54 V |
| *1 | Component with harness connected (Battery Smart Unit) |
Turn the power switch off.
Disconnect the cable from the negative (-) battery terminal.
Install the No. 1 hybrid vehicle battery carrier bracket sub-assembly (Click here).
Connect the cable to the negative (-) battery terminal.
|
| ||||
| OK | ||
 | ||
| ||
