| B |  |
| GO TO DTC CHART |
DTC P0AAE-123 Hybrid Battery Pack Air Temperature Sensor "A" Circuit Low |
DTC P0AAF-123 Hybrid Battery Pack Air Temperature Sensor "A" Circuit High |
| DTC No. | DTC Detection Condition | Trouble Area |
| P0AAE-123 P0AAF-123 | When the temperature indicated by the inlet air temperature sensor is lower than a predetermined limit (open circuit) or is higher than a predetermined limit (short circuit) |
|
| Displayed Temperature | Malfunction |
| -45°C (-49°F) or less | Open or +B short circuit |
| 95°C (203°F) or more | GND short |
| 1.CHECK FOR DTCS (DTC P0AFC-123 IS OUTPUT) |
Connect the intelligent tester to the DLC3.
Turn the power switch on (IG).
Enter the following menus: Powertrain / Hybrid Control / Trouble Codes.
Read output DTCs (Click here).
| Result | Proceed to |
| P0AFC-123 is not output. | A |
| P0AFC-123 is also output. | B |
Disconnect the intelligent tester from the DLC3.
|
| ||||
| A | |
 |
| 2.CHECK INSTALLATION OF INLET AIR TEMPERATURE SENSOR |
Disconnect the cable from the negative (-) battery terminal.
Check that the service plug grip is not installed.
Remove the No. 1 hybrid vehicle battery carrier bracket sub-assembly (Click here).
Check installation of inlet air temperature sensor
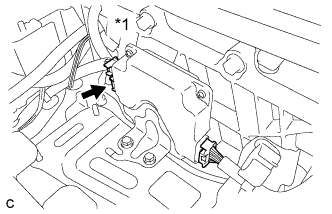 |
Check the connections of the z17 connector of the battery smart unit.
| Result | Proceed to |
| NG | B |
| OK | Go to next step |
| *1 | Battery Smart Unit |
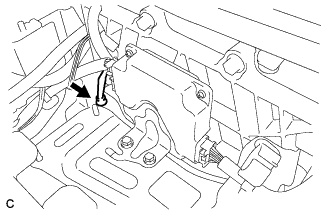 |
Visually check the installation condition of the inlet air temperature sensor.
| Result | Proceed to |
| The inlet air temperature sensor is installed in the correct location and its claws are engaged securely | A |
| Claws are damaged. | C |
| Inlet air temperature sensor is not installed correctly, but claws are not damaged. | D |
Install the No. 1 hybrid vehicle battery carrier bracket sub-assembly (Click here).
Connect the cable to the negative (-) battery terminal.
|
| ||||
|
| ||||
|
| ||||
| A | |
|
| 3.CHECK HYBRID BATTERY THERMISTOR (INLET AIR TEMPERATURE SENSOR AND BATTERY TEMPERATURE SENSOR) |
Disconnect the cable from the negative (-) battery terminal.
Check that the service plug grip is not installed.
Remove the No. 1 hybrid vehicle battery carrier bracket sub-assembly (Click here).
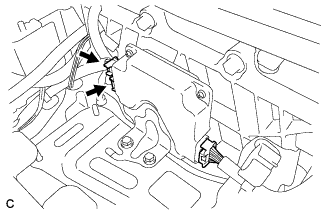 |
Disconnect the c1 and z17 connectors from the battery smart unit.
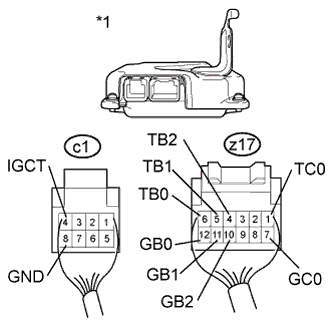 |
Measure the resistance according to the value(s) in the table below.
| Tester Connection | Condition | Specified Condition |
| z17-1 (TC0) - z17-7 (GC0) | 0°C (32°F) | 26.7 to 27.8 kΩ |
| 25°C (77°F) | 9.9 to 10.1 kΩ | |
| 40°C (104°F) | 5.73 to 5.92 kΩ |
| *1 | Rear view of wire harness connector (to Battery Smart Unit) |
Measure the resistance according to the value(s) in the table below.
| Tester Connection | Switch Condition | Specified Condition |
| z17-1 (TC0) - c1-4 (IGCT) | Power switch off | 10 kΩ or higher |
| z17-1 (TC0) - c1-8 (GND) | Power switch off | 10 kΩ or higher |
| z17-7 (GC0) - c1-4 (IGCT) | Power switch off | 10 kΩ or higher |
| z17-7 (GC0) - c1-8 (GND) | Power switch off | 10 kΩ or higher |
Measure the resistance according to the value(s) in the table below.
| Tester Connection | Switch Condition | Specified Condition |
| z17-6 (TB0) - c1-4 (IGCT) | Power switch off | 10 kΩ or higher |
| z17-6 (TB0) - c1-8 (GND) | Power switch off | 10 kΩ or higher |
| z17-12 (GB0) - c1-4 (IGCT) | Power switch off | 10 kΩ or higher |
| z17-12 (GB0) - c1-8 (GND) | Power switch off | 10 kΩ or higher |
| z17-5 (TB1) - c1-4 (IGCT) | Power switch off | 10 kΩ or higher |
| z17-5 (TB1) - c1-8 (GND) | Power switch off | 10 kΩ or higher |
| z17-11 (GB1) - c1-4 (IGCT) | Power switch off | 10 kΩ or higher |
| z17-11 (GB1) - c1-8 (GND) | Power switch off | 10 kΩ or higher |
| z17-4 (TB2) - c1-4 (IGCT) | Power switch off | 10 kΩ or higher |
| z17-4 (TB2) - c1-8 (GND) | Power switch off | 10 kΩ or higher |
| z17-10 (GB2) - c1-4 (IGCT) | Power switch off | 10 kΩ or higher |
| z17-10 (GB2) - c1-8 (GND) | Power switch off | 10 kΩ or higher |
Connect the c1 and z17 connectors to the battery smart unit.
Install the No. 1 hybrid vehicle battery carrier bracket sub-assembly (Click here).
Connect the cable to the negative (-) battery terminal.
|
| ||||
| OK | |
|
| 4.CHECK BATTERY SMART UNIT (VIB VOLTAGE) |
Disconnect the cable from the negative (-) battery terminal.
Check that the service plug grip is not installed.
Remove the No. 1 hybrid vehicle battery carrier bracket sub-assembly (Click here).
Connect the cable to the negative (-) battery terminal.
Turn the power switch on (IG).
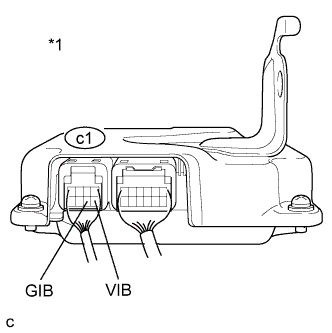 |
Measure the voltage according to the value(s) in the table below.
| Tester Connection | Switch Condition | Specified Condition |
| c1-5 (VIB) - c1-6 (GIB) | Power switch on (IG) | 4.6 to 5.4 V |
| *1 | Component with harness connected (Battery Smart Unit) |
Turn the power switch off.
Disconnect the cable from the negative (-) battery terminal.
Install the No. 1 hybrid vehicle battery carrier bracket sub-assembly (Click here).
Connect the cable to the negative (-) battery terminal.
|
| ||||
| OK | ||
 | ||
| ||
| 5.CHECK HYBRID BATTERY JUNCTION BLOCK |
Disconnect the cable from the negative (-) battery terminal.
Check that the service plug grip is not installed.
Remove the No. 1 hybrid vehicle battery carrier bracket sub-assembly (Click here).
Disconnect the c4 battery current sensor connector from the hybrid battery junction block.
Connect the cable to the negative (-) battery terminal.
Turn the power switch on (IG).
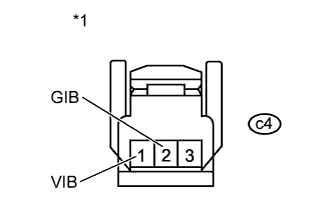 |
Measure the voltage according to the value(s) in the table below.
| Tester Connection | Switch Condition | Specified Condition |
| c4-1 (VIB) - c4-2 (GIB) | Power switch on (IG) | 4.6 to 5.4 V |
| *1 | Front view of wire harness connector (to Hybrid Battery Junction Block) |
Turn the power switch off.
Connect the c4 battery current sensor connector to the hybrid battery junction block.
Install the No. 1 hybrid vehicle battery carrier bracket sub-assembly (Click here).
|
| ||||
| OK | ||
| ||
| ||
| 6.CHECK HARNESS AND CONNECTOR (BATTERY SMART UNIT - HYBRID BATTERY JUNCTION BLOCK) |
Disconnect the cable from the negative (-) battery terminal.
Check that the service plug grip is not installed.
Remove the No. 1 hybrid vehicle battery carrier bracket sub-assembly (Click here).
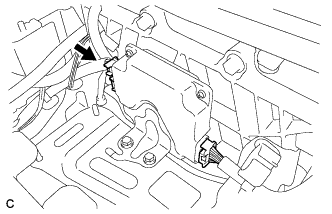 |
Disconnect only the c1 connector of the battery smart unit.
Disconnect the c4 battery current sensor connector from the hybrid battery junction block.
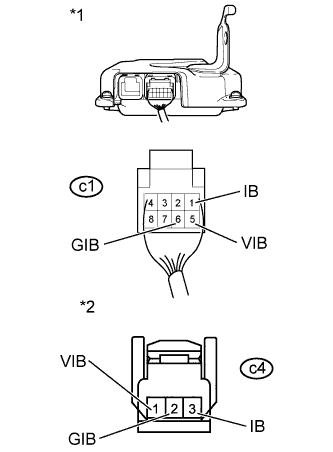 |
Measure the resistance according to the value(s) in the tables below.
| Tester Connection | Switch Condition | Specified Condition |
| c1-1 (IB) - c4-3 (IB) | Power switch off | Below 1 Ω |
| c1-6 (GIB) - c4-2 (GIB) | Power switch off | Below 1 Ω |
| c1-5 (VIB) - c4-1 (VIB) | Power switch off | Below 1 Ω |
| Tester Connection | Switch Condition | Specified Condition |
| c1-1 (IB) or c4-3 (IB) - Body ground and other terminals | Power switch off | 10 kΩ or higher |
| c1-6 (GIB) or c4-2 (GIB) - Body ground and other terminals | Power switch off | 10 kΩ or higher |
| c1-5 (VIB) or c4-1 (VIB) - Body ground and other terminals | Power switch off | 10 kΩ or higher |
| *1 | Rear view of wire harness connector (to Battery Smart Unit) |
| *2 | Front view of wire harness connector (to Hybrid Battery Junction Block) |
Connect the c1 connector to the battery smart unit.
Connect the c4 battery current sensor connector to the hybrid battery junction block.
Install the No. 1 hybrid vehicle battery carrier bracket sub-assembly (Click here).
Connect the cable to the negative (-) battery terminal.
|
| ||||
| OK | ||
| ||
| ||
| 7.CHECK HARNESS AND CONNECTOR (INLET AIR TEMPERATURE SENSOR AND BATTERY TEMPERATURE SENSOR) |
Disconnect the cable from the negative (-) battery terminal.
Check that the service plug grip is not installed.
Remove the upper hybrid battery cover sub-assembly (Click here).
Check the wire harness and connectors of the battery temperature sensor and inlet air temperature sensor for abnormalities by sight and touch.
Install the upper hybrid battery cover sub-assembly (Click here).
Connect the cable to the negative (-) battery terminal.
|
| ||||
| OK | ||
| ||
| ||
