| NG |  |
| Go to step 2 |
COOLING FAN SYSTEM > Cooling Fan Circuit |
| 1.PERFORM ACTIVE TEST USING INTELLIGENT TESTER (CONTROL THE ELECTRIC COOLING FAN) |
Connect the intelligent tester to the DLC3.
Turn the power switch on (IG).
Turn the tester on.
Enter the following menus: Powertrain / Engine and ECT / Active Test / Control the Electric Cooling Fan.
| Tester Operation | Specified Condition |
| ON | Fans operate |
| OFF | Fans do not operate |
|
| ||||
| OK | ||
 | ||
| ||
| 2.INSPECT ECM (FANL AND FANH VOLTAGE) |
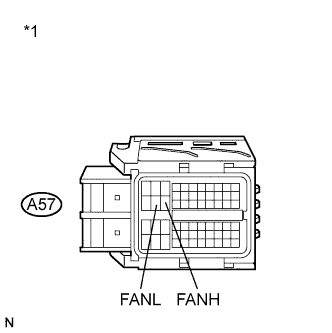 |
Disconnect the ECM connector.
Turn the power switch on (IG).
Measure the voltage according to the value(s) in the table below.
| Tester Connection | Switch Condition | Specified Condition |
| A57-22 (FANH) - Body ground | Power switch on (IG) | 11 to 14 V |
| A57-21 (FANL) - Body ground | Power switch on (IG) | 11 to 14 V |
| *1 | Front view of wire harness connector (to ECM) |
Reconnect the ECM connector.
|
| ||||
| OK | |
 |
| 3.INSPECT ENGINE ROOM RELAY BLOCK (FAN NO. 1 RELAY AND FAN NO. 3 RELAY VOLTAGE) |
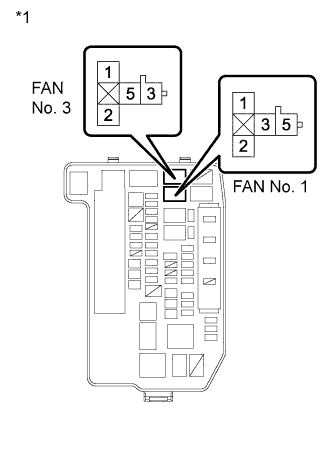 |
Remove the FAN No. 1 relay and FAN No. 3 relay from the engine room relay block.
Measure the voltage according to the value(s) in the table below.
| Tester Connection | Condition | Specified Condition |
| 3 (FAN No. 1 relay) - Body ground | Always | 11 to 14 V |
| 5 (FAN No. 3 relay) - Body ground | Always | 11 to 14 V |
| *1 | Engine Room Relay Block |
Reinstall the FAN No. 1 relay and FAN No. 3 relay.
|
| ||||
| OK | |
|
| 4.INSPECT FAN NO. 1 RELAY |
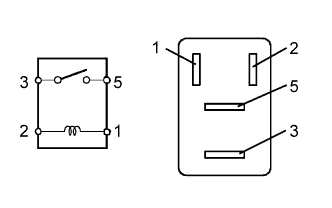 |
Remove the FAN No. 1 relay from the engine room relay block.
Measure the resistance according to the value(s) in the table below.
| Tester Connection | Condition | Specified Condition |
| 3 - 5 | Battery voltage is not applied between terminals 1 and 2 | 10 kΩ or higher |
| Battery voltage is applied between terminals 1 and 2 | Below 1 Ω |
Reinstall the FAN No. 1 relay.
|
| ||||
| OK | |
|
| 5.INSPECT FAN NO. 2 RELAY |
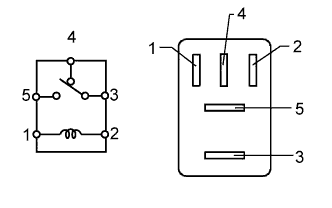 |
Remove the FAN No. 2 relay from the engine room relay block.
Measure the resistance according to the value(s) in the table below.
| Tester Connection | Condition | Specified Condition |
| 3 - 4 | Battery voltage is not applied between terminals 1 and 2 | Below 1 Ω |
| Battery voltage is applied between terminals 1 and 2 | 10 kΩ or higher | |
| 3 - 5 | Battery voltage is not applied between terminals 1 and 2 | 10 kΩ or higher |
| Battery voltage is applied between terminals 1 and 2 | Below 1 Ω |
Reinstall the FAN No. 2 relay.
|
| ||||
| OK | |
|
| 6.INSPECT FAN NO. 3 RELAY |
|
Remove the FAN No. 3 relay from the engine room relay block.
Measure the resistance according to the value(s) in the table below.
| Tester Connection | Condition | Specified Condition |
| 3 - 5 | Battery voltage is not applied between terminals 1 and 2 | 10 kΩ or higher |
| Battery voltage is applied between terminals 1 and 2 | Below 1 Ω |
Reinstall the FAN No. 3 relay.
|
| ||||
| OK | |
|
| 7.CHECK HARNESS AND CONNECTOR (FAN NO. 2 RELAY - BODY GROUND) |
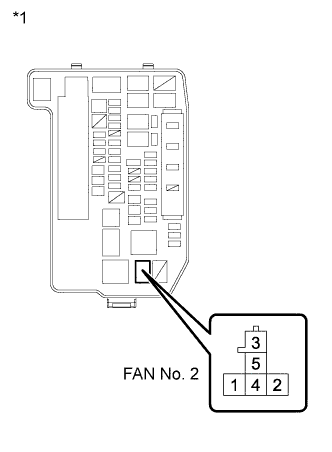 |
Remove the FAN No. 2 relay from the engine room relay block.
Measure the resistance according to the value(s) in the table below.
| Tester Connection | Condition | Specified Condition |
| 5 (FAN No. 2 relay) - Body ground | Always | Below 1 Ω |
| *1 | Engine Room Relay Block |
Reinstall the FAN No. 2 relay.
|
| ||||
| OK | |
|
| 8.INSPECT COOLING FAN MOTOR |
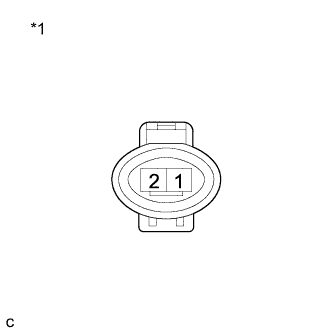 |
Disconnect the cooling fan motor connector.
Check that the cooling fan motor operates smoothly when the battery is connected to the cooing fan motor connector.
Measure the current while the motor is operating.
| Tester Connection | Condition | Specified Condition |
| 1 - 2 | Always | 11.2 to 14.5 A |
| *1 | Component without harness connected (Cooling Fan Motor) |
Reconnect the cooling fan motor connector.
|
| ||||
| OK | |
|
| 9.CHECK HARNESS AND CONNECTOR (COOLING FAN MOTOR - BODY GROUND) |
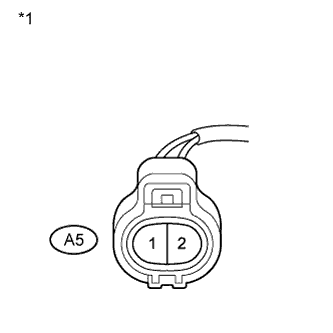 |
Disconnect the cooling fan motor connector.
Measure the resistance according to the value(s) in the table below.
| Tester Connection | Condition | Specified Condition |
| A5-1 - Body ground | Always | Below 1 Ω |
| *1 | Front view of wire harness connector (to Cooling Fan Motor) |
Reconnect the cooling fan motor connector.
|
| ||||
| OK | |
|
| 10.CHECK HARNESS AND CONNECTOR (COOLING FAN MOTOR - ENGINE ROOM RELAY BLOCK) |
Disconnect the cooling fan motor connector.
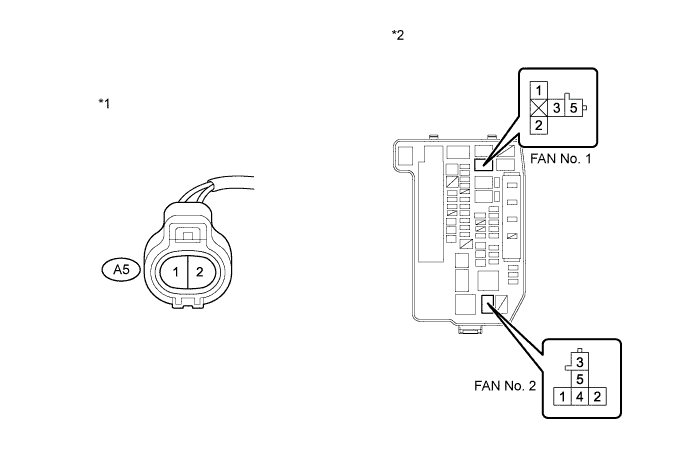
Remove the FAN No. 1 relay and FAN No. 2 relay from the engine room relay block.
Measure the resistance according to the value(s) in the table below.
| Tester Connection | Condition | Specified Condition |
| A5-2 - 5 (FAN No. 1 relay) | Always | Below 1 Ω |
| A5-2 - 4 (FAN No. 2 relay) | Always | Below 1 Ω |
| Tester Connection | Condition | Specified Condition |
| A5-2 or 5 (FAN No. 1 relay) - Body ground | Always | 10 kΩ or higher |
| A5-2 or 4 (FAN No. 2 relay) - Body ground | Always | 10 kΩ or higher |
| *1 | Front view of wire harness connector (to Cooling Fan Motor) |
| *2 | Engine Room Relay Block |
Reconnect the cooling fan motor connector.
Reinstall the FAN No. 1 relay and FAN No. 2 relay.
|
| ||||
| OK | |
|
| 11.INSPECT NO. 2 COOLING FAN MOTOR |
|
Disconnect the No. 2 cooling fan motor connector.
Check that the No. 2 cooling fan motor operates smoothly when the battery is connected to the No. 2 cooling fan motor connector.
Measure the current while the motor is operating.
| Tester Connection | Condition | Specified Condition |
| 1 - 2 | Always | 7.4 to 10.9 A |
| *1 | Component without harness connected (No. 2 Cooling Fan Motor) |
Reconnect the No. 2 cooling fan fan motor connector.
|
| ||||
| OK | |
|
| 12.CHECK HARNESS AND CONNECTOR (NO. 2 COOLING FAN MOTOR - ENGINE ROOM RELAY BLOCK) |
Disconnect the No. 2 cooling fan motor connector.
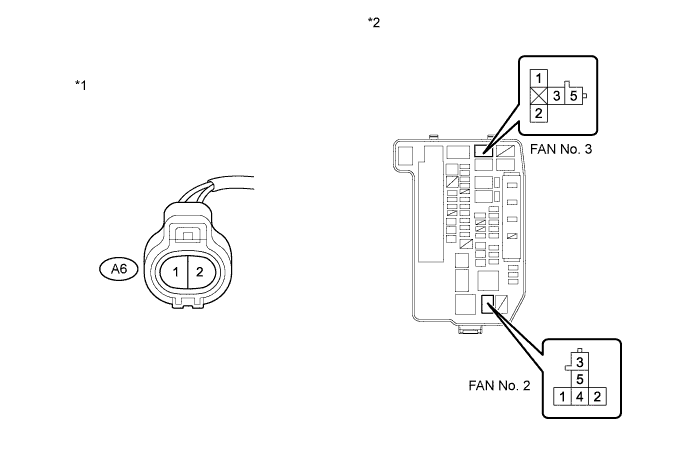
Remove the FAN No. 2 relay and FAN No. 3 relay from the engine room relay block.
Measure the resistance according to the value(s) in the table below.
| Tester Connection | Condition | Specified Condition |
| A6-1 - 3 (FAN No. 2 relay) | Always | Below 1 Ω |
| A6-2 - 3 (FAN No. 3 relay) | Always | Below 1 Ω |
| Tester Connection | Condition | Specified Condition |
| A6-1 or 3 (FAN No. 2 relay) - Body ground | Always | 10 kΩ or higher |
| A6-2 or 3 (FAN No. 3 relay) - Body ground | Always | 10 kΩ or higher |
| *1 | Front view of wire harness connector (to No. 2 Cooling Fan Motor) |
| *2 | Engine Room Relay Block |
Reconnect the No. 2 cooling fan motor connector.
Reinstall the FAN No. 2 relay and FAN No. 3 relay.
|
| ||||
| OK | |
|
| 13.INSPECT ENGINE ROOM RELAY BLOCK (FAN NO. 1 RELAY - FAN NO. 2 RELAY) |
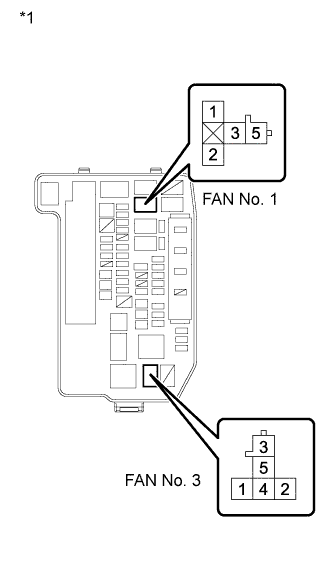 |
Remove the FAN No. 1 relay and FAN No. 2 relay from the engine room relay block.
Measure the resistance according to the value(s) in the table below.
| Tester Connection | Condition | Specified Condition |
| 1 (FAN No. 1 relay) - 1 (FAN No. 2 relay) | Always | Below 1 Ω |
| 2 (FAN No. 1 relay) - 2 (FAN No. 2 relay) | Always | Below 1 Ω |
| Tester Connection | Condition | Specified Condition |
| 1 (FAN No. 1 relay) or 1 (FAN No. 2 relay) - Body ground | Always | 10 kΩ or higher |
| 2 (FAN No. 1 relay) or 2 (FAN No. 2 relay) - Body ground | Always | 10 kΩ or higher |
| *1 | Engine Room Relay Block |
Reinstall the FAN No. 1 relay and FAN No. 2 relay.
|
| ||||
| OK | ||
| ||
| ||
| 14.CHECK FUSE (ECU-IG NO. 1 FUSE VOLTAGE) |
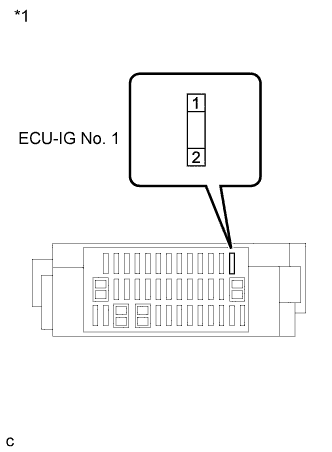 |
Remove the ECU-IG No. 1 fuse from the instrument panel junction block assembly.
Turn the power switch on (IG).
Measure the voltage according to the value(s) in the table below.
| Tester Connection | Switch Condition | Specified Condition |
| 1 (ECU-IG No. 1 fuse) - Body ground | Power switch on (IG) | 11 to 14 V |
| *1 | Instrument Panel Junction Block Assembly |
Reinstall the ECU-IG No. 1 fuse.
|
| ||||
| OK | |
|
| 15.INSPECT INSTRUMENT PANEL JUNCTION BLOCK ASSEMBLY |
Disconnect the instrument panel junction block assembly connector.
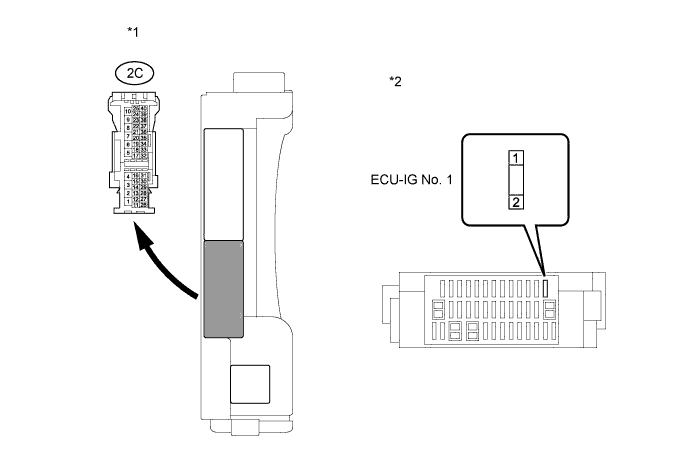
Remove the ECU-IG No. 1 fuse from the instrument panel junction block assembly.
Measure the resistance according to the value(s) in the table below.
| Tester Connection | Condition | Specified Condition |
| 2C-30 - 2 (ECU-IG No. 1) | Always | Below 1 Ω |
| Tester Connection | Condition | Specified Condition |
| 2C-30 or 2 (ECU-IG No. 1) - Body ground | Always | 10 kΩ or higher |
| *1 | Component without harness connected (Instrument Panel Junction Block Assembly) | *2 | Instrument Panel Junction Block Assembly |
Reconnect the ECU-IG No. 1 fuse.
Reconnect the instrument panel junction block assembly connector.
|
| ||||
| OK | |
|
| 16.INSPECT FAN NO. 1 RELAY |
|
Remove the FAN No. 1 relay from the engine room relay block.
Measure the resistance according to the value(s) in the table below.
| Tester Connection | Condition | Specified Condition |
| 3 - 5 | Battery voltage is not applied between terminals 1 and 2 | 10 kΩ or higher |
| Battery voltage is applied between terminals 1 and 2 | Below 1 Ω |
Reinstall the FAN No. 1 relay.
|
| ||||
| OK | |
|
| 17.INSPECT FAN NO. 2 RELAY |
|
Remove the FAN No. 2 relay from the engine room relay block.
Measure the resistance according to the value(s) in the table below.
| Tester Connection | Condition | Specified Condition |
| 3 - 4 | Battery voltage is not applied between terminals 1 and 2 | Below 1 Ω |
| Battery voltage is applied between terminals 1 and 2 | 10 kΩ or higher | |
| 3 - 5 | Battery voltage is not applied between terminals 1 and 2 | 10 kΩ or higher |
| Battery voltage is applied between terminals 1 and 2 | Below 1 Ω |
Reinstall the FAN No. 2 relay.
|
| ||||
| OK | |
|
| 18.INSPECT FAN NO. 3 RELAY |
|
Remove the FAN No. 3 relay from the engine room relay block.
Measure the resistance according to the value(s) in the table below.
| Tester Connection | Condition | Specified Condition |
| 3 - 5 | Battery voltage is not applied between terminals 1 and 2 | 10 kΩ or higher |
| Battery voltage is applied between terminals 1 and 2 | Below 1 Ω |
Reinstall the FAN No. 3 relay.
|
| ||||
| OK | |
|
| 19.CHECK HARNESS AND CONNECTOR (ENGINE ROOM RELAY BLOCK - ECM) |
Remove the FAN No. 1 relay, FAN No. 2 relay and FAN No. 3 relay from the engine room relay block.
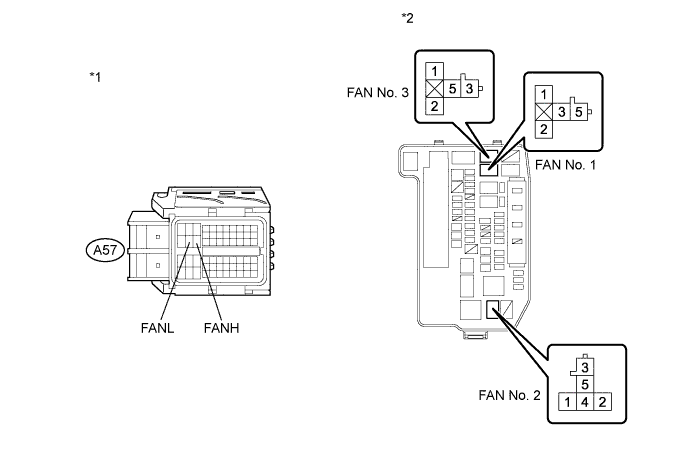
Disconnect the ECM connector.
Measure the resistance according to the value(s) in the table below.
| Tester Connection | Condition | Specified Condition |
| 2 (FAN No. 1 relay) - A57-22 (FANH) | Always | Below 1 Ω |
| 2 (FAN No. 2 relay) - A57-22 (FANH) | Always | Below 1 Ω |
| 2 (FAN No. 3 relay) - A57-21 (FANL) | Always | Below 1 Ω |
| Tester Connection | Condition | Specified Condition |
| 2 (FAN No. 1 relay) or A57-22 (FANH) - Body ground | Always | 10 kΩ or higher |
| 2 (FAN No. 2 relay) or A57-22 (FANH) - Body ground | Always | 10 kΩ or higher |
| 2 (FAN No. 3 relay) or A57-21 (FANL) - Body ground | Always | 10 kΩ or higher |
| *1 | Front view of wire harness connector (to ECM) |
| *2 | Engine Room Relay Block |
Reinstall the FAN No. 1 relay, FAN No. 2 relay and FAN No. 3 relay.
Reconnect the ECM connector.
|
| ||||
| OK | ||
| ||
| ||
| 20.INSPECT INSTRUMENT PANEL JUNCTION BLOCK ASSEMBLY (IG1 NO. 1 RELAY) |
Disconnect the instrument panel junction block assembly connector.
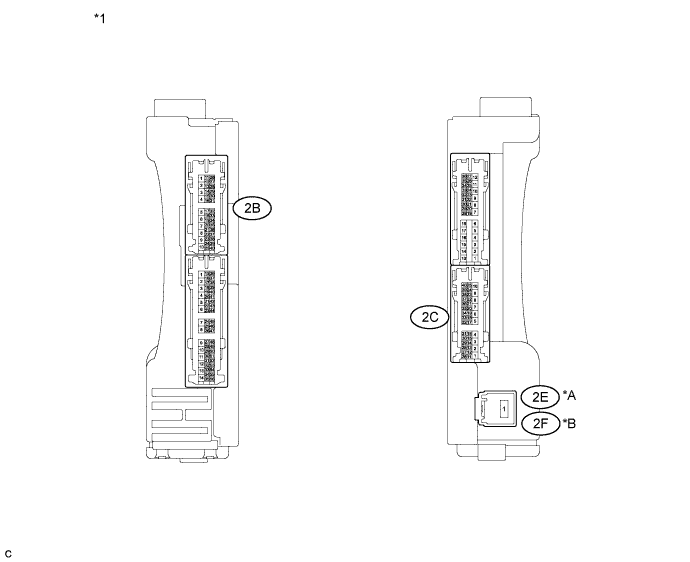
Measure the resistance according to the value(s) in the table below.
| Tester Connection | Condition | Specified Condition |
| 2E-1 - 2C-30 | Battery voltage is not applied between terminals 2B-25 - 2B-6 | 10 kΩ or higher |
| Battery voltage is applied between terminals 2B-25 - 2B-6 | Below 1 Ω |
| Tester Connection | Condition | Specified Condition |
| 2F-1 - 2C-30 | Battery voltage is not applied between terminals 2B-25 - 2B-6 | 10 kΩ or higher |
| Battery voltage is applied between terminals 2B-25 - 2B-6 | Below 1 Ω |
| *A | for LHD |
| *B | for RHD |
| *1 | Component without harness connected (to Instrument Panel Junction Block Assembly) |
Reconnect the instrument panel junction block assembly connector.
|
| ||||
| OK | |
|
| 21.INSPECT INSTRUMENT PANEL JUNCTION BLOCK ASSEMBLY (IG1 NO. 1 RELAY VOLTAGE) |
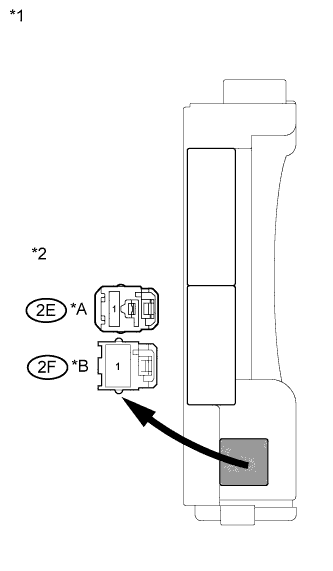 |
Disconnect the instrument panel junction block assembly connector.
Measure the voltage according to the value(s) in the table below.
| Tester Connection | Condition | Specified Condition |
| 2E-1 - Body ground | Always | 11 to 14 V |
| Tester Connection | Condition | Specified Condition |
| 2F-1 - Body ground | Always | 11 to 14 V |
| *A | for LHD |
| *B | for RHD |
| *1 | Instrument Panel Junction Block Assembly |
| *2 | Front view of wire harness connector (to Instrument Panel Junction Block Assembly) |
Reconnect the instrument panel junction block assembly connector.
|
| ||||
| OK | |
|
| 22.CHECK HARNESS AND CONNECTOR (IG1 NO. 1 RELAY - BODY GROUND) |
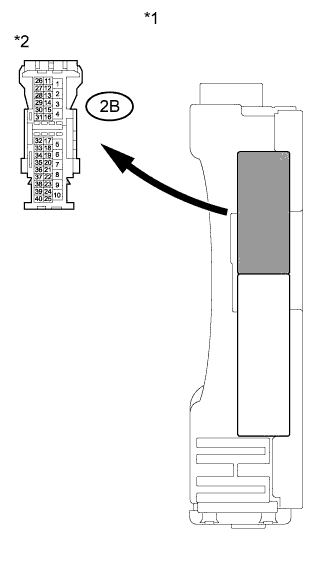 |
Disconnect the instrument panel junction block assembly connector.
Measure the resistance according to the value(s) in the table below.
| Tester Connection | Condition | Specified Condition |
| 2B-6 - Body ground | Always | Below 1 Ω |
| *1 | Instrument Panel Junction Block Assembly |
| *2 | Front view of wire harness connector (to Instrument Panel Junction Block Assembly) |
Reconnect the instrument panel junction block assembly connector.
|
| ||||
| OK | |
|
| 23.CHECK HARNESS AND CONNECTOR (IG1 NO. 1 RELAY - POWER MANAGEMENT CONTROL ECU) |
Disconnect the instrument panel junction block assembly connector.
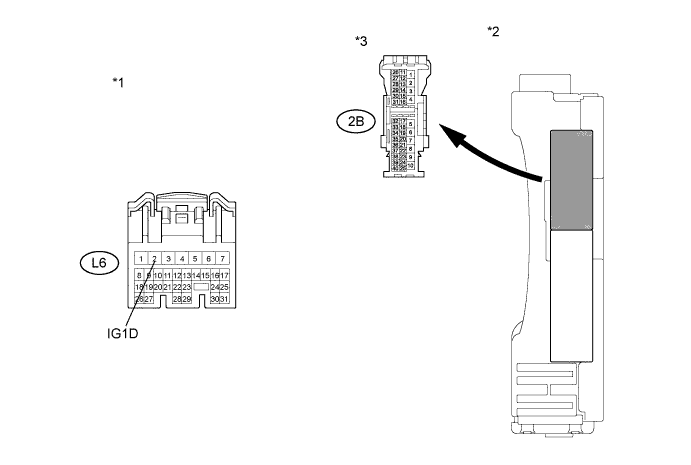
Disconnect the power management control ECU connector.
Measure the resistance according to the value(s) in the table below.
| Tester Connection | Condition | Specified Condition |
| L6-2 (IG1D) - 2B-25 | Always | Below 1 Ω |
| Tester Connection | Condition | Specified Condition |
| L6-2 (IG1D) or 2B-25 - Body ground | Always | 10 kΩ or higher |
| *1 | Front view of wire harness connector (to Power Management Control ECU) | *2 | Instrument Panel Junction Block Assembly |
| *3 | Front view of wire harness connector (to Instrument panel Junction Block Assembly) | - | - |
Reconnect the instrument panel junction block assembly connector.
Reconnect the power management control ECU connector.
|
| ||||
| OK | ||
| ||
| ||
