Home › Vehicle Interior › HEATING / AIR CONDITIONING › SOLAR SENSOR

SOLAR SENSOR > INSPECTION

for Preparation Click here


1. INSPECT SOLAR SENSOR


    E152686E33
  1. Disconnect the solar sensor connector.

  1. Measure the voltage according to the value(s) in the table below.

    Standard Voltage:
    Tester Connection
    Condition
    Specified Condition
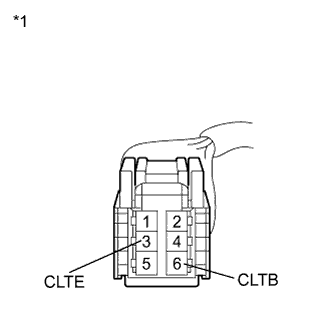
    6 (CLTB) - 3 (CLTE)
    Power switch off
    Below 1 V
    6 (CLTB) - 3 (CLTE)
    Power switch on (IG)
    11 to 14 V

    Text in Illustration 
    *1
    Front view of wire harness connector
    (to Solar Sensor)
    If the voltage is not as specified, repair or replace the wire harness or connector.


    E161710E41
  1. Reconnect the solar sensor connector.

  1. Turn the power switch on (IG).

  1. Measure the voltage according to the value(s) in the table below.

    Standard Voltage:
    Tester Connection
    Condition
    Specified Condition
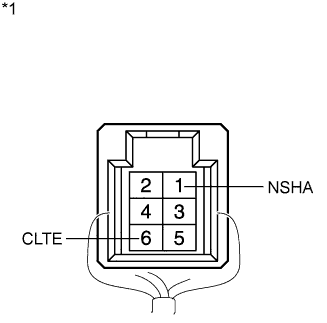
    1 (NSHA) - 6 (CLTE)
    Sensor is exposed to electric light
    0.8 to 4.3 V
    1 (NSHA) - 6 (CLTE)
    Sensor is covered with a cloth
    Below 0.8 V

    Text in Illustration 
    *1
    Component with harness connected
    (Solar Sensor)

    NOTICE:
    1. The connection procedure for using a digital tester such as a TOYOTA electrical tester is shown above. When using an analog tester, connect the positive (+) lead to terminal 6 and the negative (-) lead to terminal 1 of the solar sensor.
    2. While using the battery during inspection, do not bring the positive and negative tester probes too close to each other as a short circuit may occur.

    HINT:
    1. Use an incandescent light for inspection. Bring it within about 30 cm (11.8 in.) of the solar sensor.
    2. As the inspection light is moved away from the sensor, the voltage decreases.

    If the voltage is not as specified, replace the solar sensor.