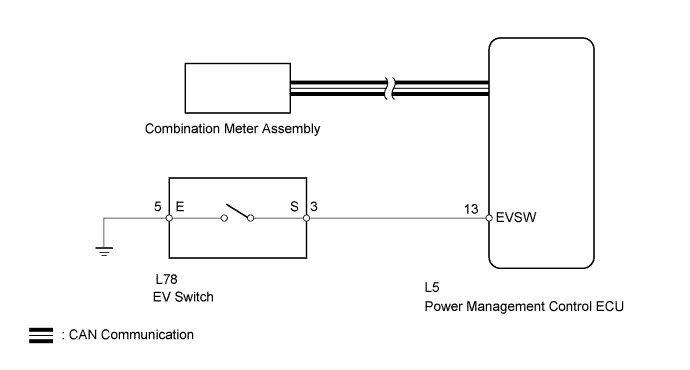
HYBRID CONTROL SYSTEM > EV Drive Mode Switch Circuit |
| EV Mode Entry Condition | Tester Display | Specified Condition |
| HV battery charge level | State of Charge | Approximately 50% or higher |
| Accelerator pedal position | Accelerator Degree | Below approximately 30% |
| Engine coolant temperature | Engine Coolant Temp | 0°C (32°F) or higher |
| HV battery temperature | Temp of Batt TB1 to TB6 | Between 10°C to 40°C (50°F to 104°F) |
| Vehicle speed (Varies depending on engine warm-up condition) | - | Cold: 30 km/h (19 mph) or lower Warmed-up: 45 km/h (28 mph) or lower |
| Defroster | - | OFF |
| Cruise control | - | OFF |
| Win | Charge Control Value | Below -20000W |
| Wout | Discharge Control Value | 20000W or higher |
| 1.ASK ABOUT VEHICLE CONDITION |
Check if a buzzer sounded and a message was displayed on the multi-information display when attempting to enter EV mode.
| Result | Proceed to |
| No buzzer sounded and no message was displayed on multi-information display. | A |
| A buzzer sounded and a message was displayed on multi-information display. | B |
|
| ||||
| A | |
 |
| 2.READ VALUE USING INTELLIGENT TESTER (BUS CHECK) |
Connect the intelligent tester to the DLC3.
Turn the power switch on (IG).
Enter the following menus: System Select / CAN Bus Check.
| Result | Proceed to |
| All of the ECUs and sensors that are currently connected to the CAN communication system are displayed. | A |
| None of the ECUs and sensors that are currently connected to the CAN communication system are displayed, or some of them are not displayed. | B |
|
| ||||
| A | |
|
| 3.CHECK DTC OUTPUT (ALL) |
Connect the intelligent tester to the DLC3.
Turn the power switch on (IG).
Check for DTCs of all system by following the prompts on the tester screen.
| Result | Proceed to |
| No DTCs are output | A |
| DTCs are output | B |
|
| ||||
| A | |
|
| 4.PERFORM ACTIVE TEST USING INTELLIGENT TESTER (COMBINATION METER) |
Connect the intelligent tester to the DLC3.
Turn the power switch on (IG).
Enter the following menus: Body Electrical / Combination Meter / Active Test / Indicat. EV Mode.
Perform the "Indicat. EV Mode" Active Test.
| Tester Display | Description | Inspection Condition | Specified Condition |
| Indicat. EV Mode | EV drive mode indicator light | EV Drive Mode | Comes on |
| Result | Proceed to |
| The EV mode light comes on | A |
| The EV mode light does not come on | B |
|
| ||||
| A | |
|
| 5.CHECK POWER MANAGEMENT CONTROL ECU |
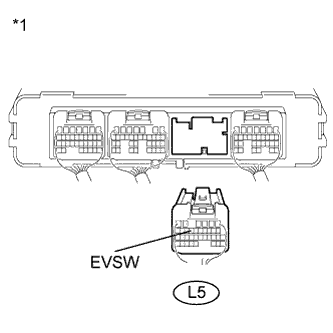 |
Disconnect connector L5 from the power management control ECU.
Measure the resistance according to the value(s) in the table below.
| Tester Connection | Condition | Specified Condition |
| L5-13 (EVSW) - Body ground | EV Switch ON | Below 1 Ω |
| L5-13 (EVSW) - Body ground | EV Switch OFF | 10 kΩ or higher |
| *1 | Rear view of wire harness connector (to Power Management Control ECU) |
Connect the power management control ECU connector.
|
| ||||
| OK | ||
 | ||
| ||
| 6.CHECK PATTERN SELECT SWITCH (EV SWITCH) |
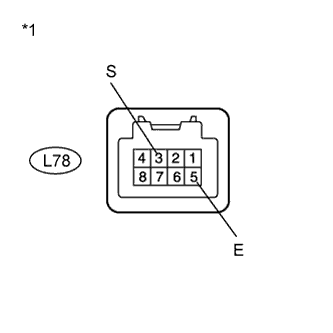 |
Remove the pattern select switch (EV switch).
Measure the resistance according to the value(s) in the table below.
| Tester Connection | Condition | Specified Condition |
| L78-3 (S) - L78-5 (E) | EV Switch ON | Below 1 Ω |
| L78-3 (S) - L78-5 (E) | EV Switch OFF | 10 kΩ or higher |
| *1 | Pattern Select Switch (EV Switch) |
Install the pattern select switch.
|
| ||||
| OK | |
|
| 7.CHECK HARNESS AND CONNECTOR (EV SWITCH - BODY GROUND) |
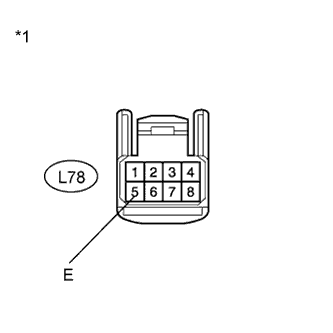 |
Disconnect connector L78 from the pattern select switch.
Measure the resistance according to the value(s) in the table below.
| Tester Connection | Condition | Specified Condition |
| L78-5 (E) - Body ground | Always | Below 1 Ω |
| *1 | Front view of wire harness connector (to Pattern Select Switch (EV Switch)) |
Connect the pattern select switch connector.
|
| ||||
| OK | |
|
| 8.CHECK HARNESS AND CONNECTOR (EV SWITCH - POWER MANAGEMENT CONTROL ECU) |
Disconnect connector L78 from the EV switch.
Disconnect connector L5 from the power management control ECU.
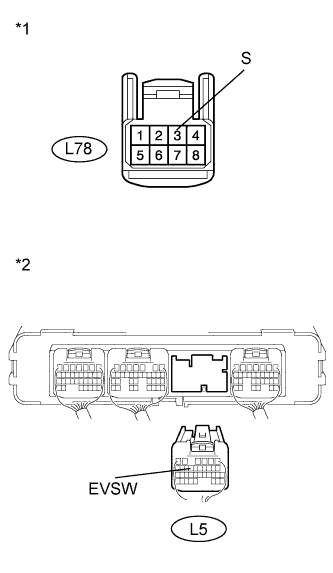 |
Measure the resistance according to the value(s) in the table below.
| Tester Connection | Condition | Specified Condition |
| L78-3 (S) - L5-13 (EVSW) | Always | Below 1 Ω |
| L78-3 (S) or L5-13 (EVSW) - Body ground | Always | 10 kΩ or higher |
| *1 | Front view of wire harness connector (to Pattern Select Switch (EV Switch)) |
| *2 | Rear view of wire harness connector (to Power Management Control ECU) |
Connect the pattern select switch connector.
Connect the power management control ECU connector.
|
| ||||
| OK | ||
| ||
| ||

