Preparation for adjustment
Park the vehicle in a flat place with the steering wheel centered.
- HINT:
- Before parking the vehicle, be sure to move the vehicle forward and in reverse to check that the tires are facing straight ahead with the steering wheel centered.
Adjust the tire pressure to specifications.
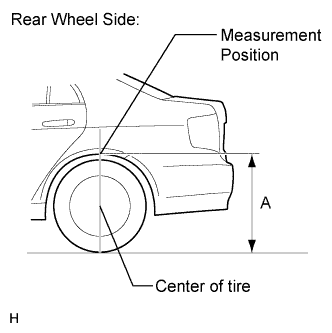
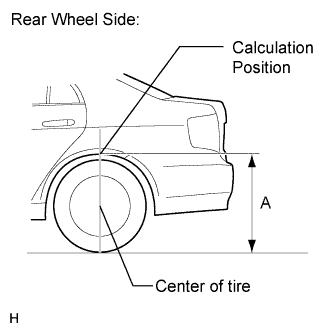
Measure distance A between the ground and the edge of a rear wheel arch.
Calculate the difference between distance A and the standard height below.
- Standard height:
- 697 mm (2.29 ft.)
- HINT:
- Subtract the standard height from the measured value to get the height compensation value. When the measured value is 707 mm: 707 - 697 = +10 (height compensation value is +10 mm).
Set a target bar behind the vehicle for optical axis adjustment of the rear television camera.
- HINT:
- Only when adjusting the optical axis of the camera, create a target bar for adjustment.
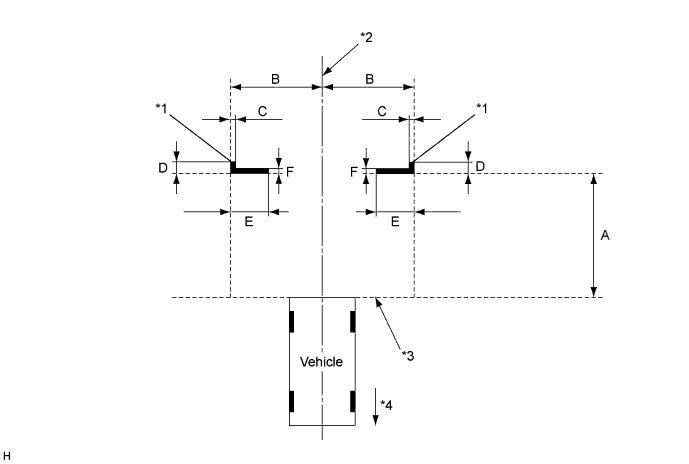
- Dimension:
A B C D E F 1100 mm
(3.61 ft.)1600 mm
(5.25 ft.)30 mm
(1.18 in.)100 mm
(3.94 in.)500 mm
(1.64 ft.)30 mm
(1.18 in.)
Text in Illustration *1 Target Bar for Camera Adjustment *2 Vehicle Center *3 Bumper Edge *4 Front Side - HINT:
- Check the tape color on the navigation ECU sub-assembly and choose a tape color which can be easily seen.
 |
Start diagnostic mode (Click here).
- NOTICE:
- The following must be carried out with the hybrid system started. Apply the parking brake, depress the brake pedal, push the P position switch, and ensure that the vehicle is not moving.
- HINT:
- The displayed items may differ depending on vehicle specifications.
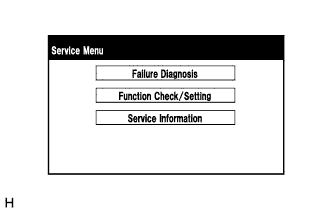
Select "Function Check/Setting" on the "Service Menu" screen.
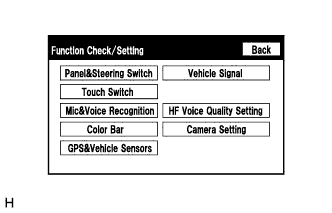
Select "Camera Setting" on the "Function Check/Setting" screen.
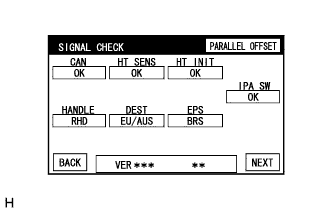
Check that "CHK" (red) is not displayed on the "SIGNAL CHECK" screen.
- NOTICE:
- When "CHK" (red) is displayed for any items "HT INIT" on the "SIGNAL CHECK" screen, perform inspections using the "SIGNAL CHECK" screen (Click here).
- HINT:
- When the screen does not change to the "HEIGHT SET" screen, check for DTCs and perform troubleshooting based on the output DTCs (Click here).
 |
 |
 |
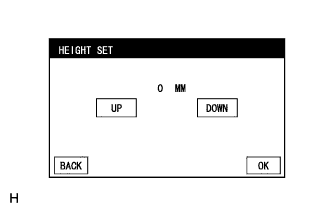
HEIGHT SET
- NOTICE:
- HEIGHT SET (entering the height compensation value) must be performed in a flat place.
- Before performing television camera optical axis adjustment, the height compensation value must be entered using the "HEIGHT SET" screen (Height Control Sensor Vehicle Height Difference Setting).
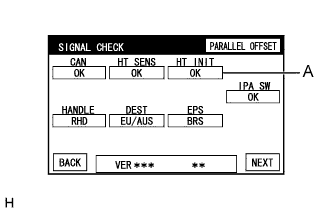
Select indicator A for "HT INIT" on the "SIGNAL CHECK" screen.
Press "UP" or "DOWN" to enter the height compensation value calculated previously.
- HINT:
- Positive values are indicated in green and negative values are indicated in red.
- When the value is shown as "10 MM" in green, it means +10 mm.
- Available setting range: -102 mm to +102 mm (can be adjusted in 1 mm increments)
After entering the height compensation value, select "OK". The setting will be stored.
- HINT:
- When "OK" is selected, a beep will sound to confirm that the height compensation value has been stored.
- The value will not be stored unless "OK" is selected.
- The value is not stored until the beep has sounded.
- When "BACK" is selected, the screen changes to SIGNAL CHECK screen without storing the value.
- Press "OK" with the vehicle in the same condition as when the vehicle height was measured.
- If a person was in the driver seat when the vehicle height was measured, press "OK" with the same person in the driver seat.
- On the "SIGNAL CHECK" screen, check that indicator A for "HT INIT" is "OK" (blue).
Select "NEXT" on the "SIGNAL CHECK" screen.
 |
 |
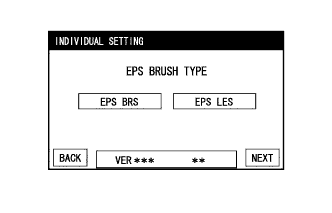 |
INDIVIDUAL SETTING
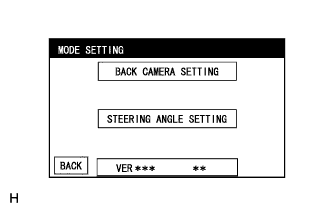
Select "EPS LES" on the "INDIVIDUAL SETTING" screen.
- HINT:
- Selected EPS brush specification is indicated in blue.
- EPS brush refers to the type of motor used for the EPS system (with brushes or brushless).
Select "NEXT" on the "INDIVIDUAL SETTING" screen.
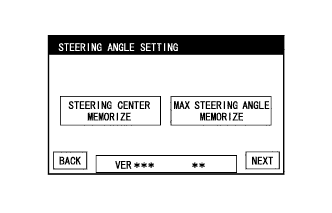
STEERING ANGLE SETTING
Perform the "STEERING CENTER MEMORIZE" operation.
- Check that the steering wheel is centered, and then select "STEERING CENTER MEMORIZE".
- HINT:
- When performing removal and installation, or replacement of the television camera, steering angle setting is not required.
- Check that the steering wheel is centered, and then select "STEERING CENTER MEMORIZE".
Perform the "MAX STEERING ANGLE MEMORIZE" operation.
- After performing the steering center memorize operation, turn the steering wheel to the left and right lock positions and select "MAX STEERING ANGLE MEMORIZE". The maximum steering angle is then stored and the screen changes to the "BACK CAMERA POSITION SETTING" screen.
- HINT:
- It is also possible to start by initially turning the steering to the right side.
- When "MAX STEERING ANGLE MEMORIZE" is selected, a beep will sound to confirm that the "STEERING ANGLE SETTING" values have been stored.
- The values are not stored until the beep has sounded.
- The values will not be stored unless "MAX STEERING ANGLE MEMORIZE" is selected after turning the steering wheel from lock to lock.
- When "BACK" is selected, the screen changes to the "INDIVIDUAL SETTING" screen without storing any values.
- The "NEXT" button does not respond until the system memorizes the steering center and maximum steering angle.
- Even if no DTCs are detected, selecting"MAX STEERING ANGLE MEMORIZE" may not cause the values to be stored if the steering sensor is malfunctioning.
- If selecting"MAX STEERING ANGLE MEMORIZE" does not cause the values to be stored after performing the steering angle setting procedure, replace the spiral cable with sensor sub-assembly (Click here).
- After performing the steering center memorize operation, turn the steering wheel to the left and right lock positions and select "MAX STEERING ANGLE MEMORIZE". The maximum steering angle is then stored and the screen changes to the "BACK CAMERA POSITION SETTING" screen.
 |
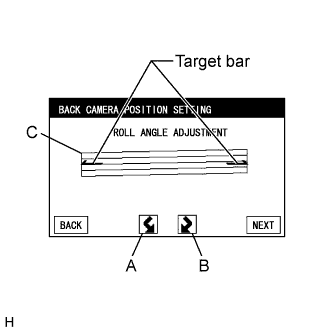 |
"BACK CAMERA POSITION SETTING" (ROLL ANGLE ADJUSTMENT)
- NOTICE:
- Before performing television camera optical axis adjustment, the height compensation value must be entered using the "HEIGHT SET" screen (Height Control Sensor Vehicle Height Difference Setting).
- HINT:
- When the back door is open, the "Back door is open. Do not use the rear view monitor when the back door is not completely closed." message will be displayed and television camera optical axis adjustment will not be possible.
- If the "Back door is open. Do not use the rear view monitor when the back door is not completely closed." message is displayed even when the back door is closed, perform inspections according to Problem Symptoms Table (A back door open warning message is displayed even after back door is closed) (Click here).
Select switches A and B to rotate C so that it is parallel to the target adjustment bar.
Select "NEXT" on the "BACK CAMERA POSITION SETTING" (ROLL ANGLE ADJUSTMENT) screen.
"BACK CAMERA POSITION SETTING" (VERTICAL AND HORIZONTAL POSITION ADJUSTMENT)
By pressing the left and right, and up and down switches, move the parallelograms (A) vertically and horizontally so that the corners of the target bars (C) and the corners of the parallelograms (A) match.
- NOTICE:
- If the left and right parallelograms (A) and target bars do not match completely, just match the corners of the target bars (C) with the corners of the parallelograms (A).
- If the left and right parallelograms (A) and the corners of the target bars (C) do not match, make the gaps between each parallelogram (A) and the target bars equal on the left and right sides.
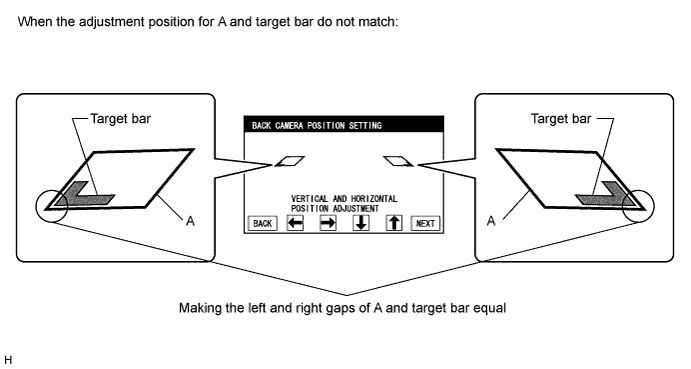
Select "NEXT" on the "BACK CAMERA POSITION SETTING" (VERTICAL AND HORIZONTAL POSITION ADJUSTMENT) screen.
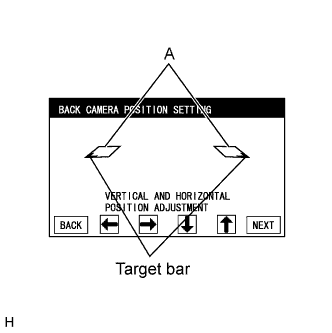 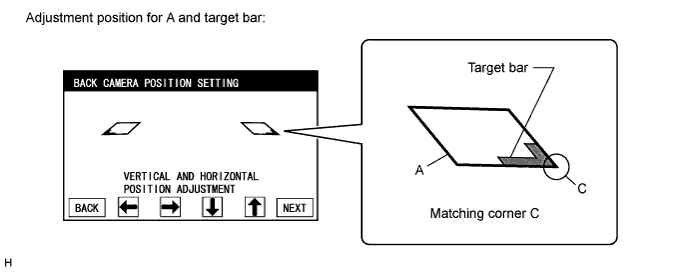 |
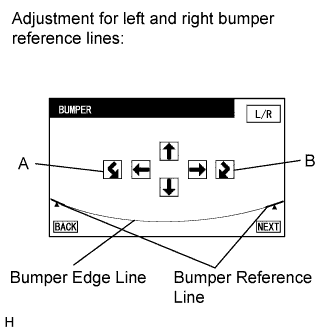 |
BUMPER (SIMULTANEOUS ADJUSTMENT)
By pressing the left and right, up and down and A and B switches, move the bumper reference lines vertically and horizontally or rotate them so that the bumper reference lines overlap or contact the bumper edge line.
- HINT:
- If the bumper reference lines do not overlap or contact the bumper edge line, select "L/R" to perform bumper reference line position adjustment (individual adjustment).
- Adjust the position of the bumper reference lines so that they touch the left and right edges of the screen.
When the bumper reference lines and bumper edge line overlap or contact each other, select "NEXT".
LEFT BUMPER (INDIVIDUAL ADJUSTMENT)
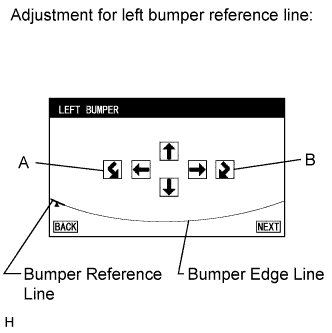
By pressing the left and right, up and down and A and B switches, move the left bumper reference line vertically and horizontally or rotate it so that the bumper reference line overlaps or contacts the bumper edge line.
- HINT:
- When the left bumper reference line overlaps or contacts the bumper edge line in the bumper reference line position adjustment (individual adjustment) step, select "NEXT".
- Adjust the position of the bumper reference line so that it touches the left edge of the screen.
Select "NEXT" on the "LEFT BUMPER" screen.
 |
RIGHT BUMPER (INDIVIDUAL ADJUSTMENT)
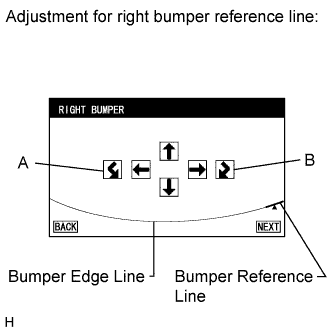
By pressing the left and right, up and down and A and B switches, move the right bumper reference line vertically and horizontally or rotate it so that the bumper reference line overlaps or contacts the bumper edge line.
- HINT:
- When the right bumper reference line overlaps or contacts the bumper edge line in the bumper reference line position adjustment (individual adjustment) step, select "NEXT".
- Adjust the position of the bumper reference line so that it touches the right edge of the screen.
Select "NEXT" on the "RIGHT BUMPER" screen.
 |
BACK VERIFY MODE
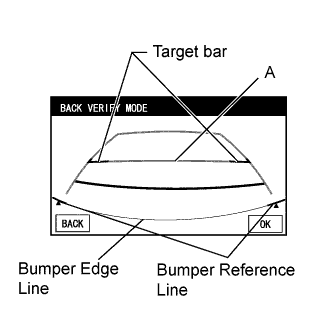
Check that line A (indicating 1100 mm from the bumper edge) and the target bars are nearly overlapping and that the bumper reference lines and bumper edge line are nearly overlapping. With the steering wheel centered, check that the predicted path line is straight (overlapping the vehicle width extension lines).
Selecting "OK" on the "BACK VERIFY MODE" screen completes "BACK CAMERA POSITION SETTING".
- HINT:
- When "OK" is selected, a beep will sound to confirm that the "BACK CAMERA POSITION SETTING" values have been stored.
- The values will not be stored unless "OK" is selected.
- The values are not stored until the beep has sounded.
 |
Finish diagnostic mode (Click here).
Confirm steering angle adjustment.
- HINT:
- If the steering angle setting procedure has been performed, confirm the steering angle adjustment using the intelligent parking assist screen after finishing diagnosis mode.
Check on the intelligent parking assist screen that the predicted path line moves until the steering wheel is fully turned to either the left or right.
- HINT:
- If the predicted path line stops moving before the steering wheel is fully turned to either the left or right, the values have not been stored correctly. In this case, perform "STEERING CENTER MEMORIZE" and "MAX STEERING ANGLE MEMORIZE" again.