Home › Engine / Hybrid System › HYBRID / BATTERY CONTROL › HYBRID CONTROL SYSTEM

DTC    P082B-575    Gear Lever X Position Circuit Low

DTC    P082C-576    Gear Lever X Position Circuit High

DTC    P082E-571    Gear Lever Y Position Circuit Low

DTC    P082F-572    Gear Lever Y Position Circuit High

DTC    P181A-596    Gear Lever X Position Circuit "A" / "B" Correlation

DTC    P181B-595    Gear Lever Y Position Circuit "A" / "B" Correlation

DTC    P182B-577    Gear Lever X Position "B" Circuit Low

DTC    P182C-578    Gear Lever X Position "B" Circuit High

DTC    P182E-573    Gear Lever Y Position "B" Circuit Low

DTC    P182F-574    Gear Lever Y Position "B" Circuit High

for Preparation Click here


DESCRIPTION

HINT:
  1. The electronic shift lever system is a linkless type that does not use a shift cable.
  2. The shift and select sensors are non-contact type sensors.


  1. The shift lock control unit assembly (selector lever) is a momentary type, which returns to its home position by spring reaction as the driver's hand is released from the selector lever after shifting.
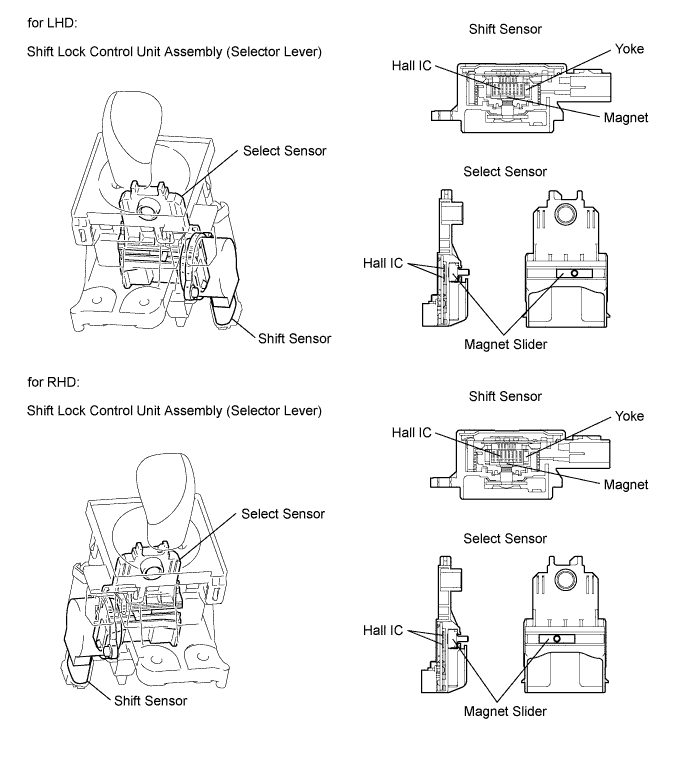
    The shift lock control unit assembly (selector lever) contains a shift sensor and a select sensor to detect the selector lever position (Home, R, N, D or B). Because both sensors operate using Hall elements, they can accurately detect shift positions in a reliable manner. Both sensors contain two detection circuits, a main and a sub circuit.


    A221566E01


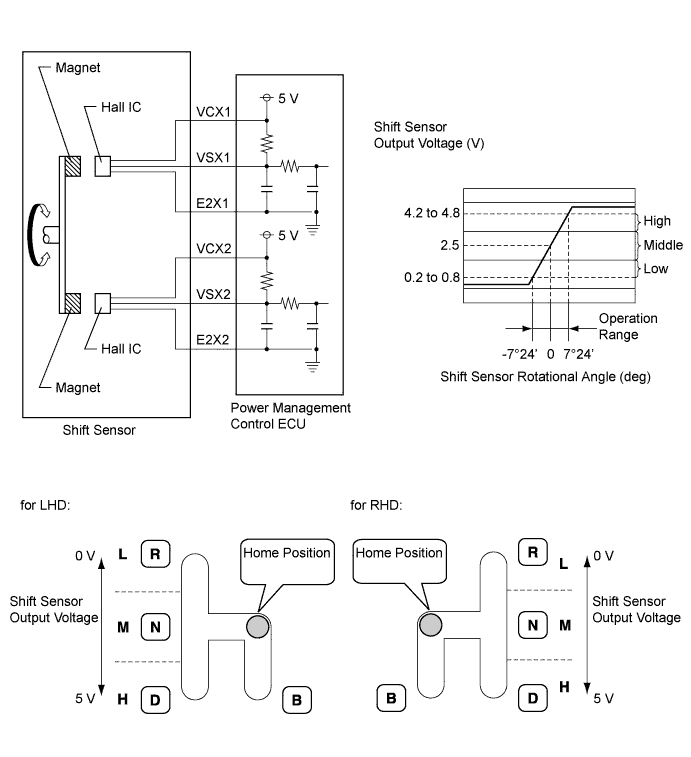
  2. The shift sensor outputs voltage, which varies between 0 and 5 V in accordance with the vertical movement of the selector lever, to the power management control ECU (HV CPU). The power management control ECU (HV CPU) interprets low level voltage input from the shift sensor as the R position, middle level voltage as the home or N position, and high level voltage as the D or B position.


    A221567E01


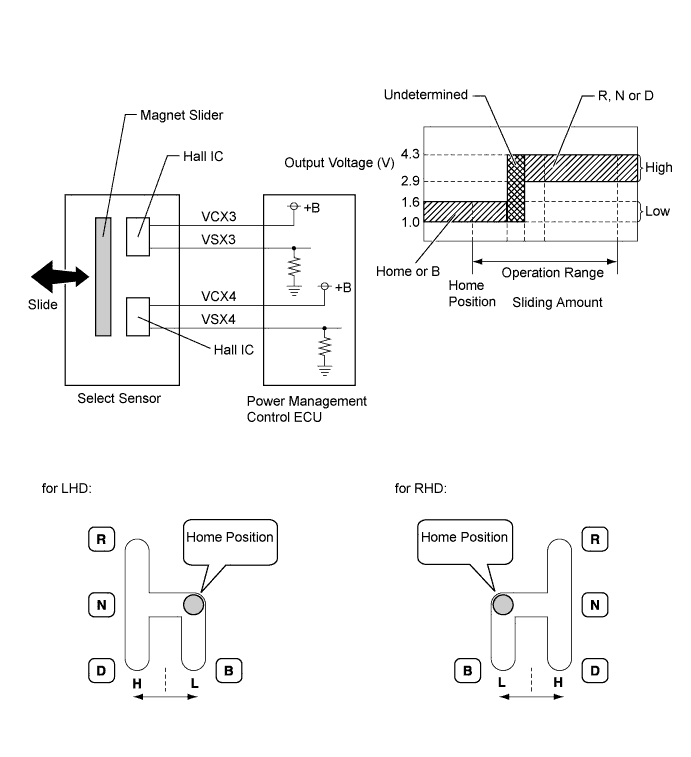
  3. The select sensor outputs voltage, which varies between 0 and 5 V in accordance with the horizontal movement of the selector lever, to the power management control ECU (HV CPU). The power management control ECU (HV CPU) interprets low level voltage input from the select sensor as the home or B position, and high level voltage as the R, N, or D position.
    The power management control ECU (HV CPU) determines the position of the selector lever in accordance with the combination of the signals from the shift sensor and select sensor.


    A221568E01


DTC No.
INF Code
DTC Detection Condition
Trouble Area
P082B
575
Open or GND short in select main sensor circuit
  1. Wire harness or connector
  2. Shift lock control unit assembly
  3. Power management control ECU
P082C
576
+B short in select main sensor circuit
P082E
571
Open or GND short in shift main sensor circuit
P082F
572
+B short in shift main sensor circuit
P181A
596
Difference between select main sensor value and select sub sensor value is large
P181B
595
Difference between shift main sensor value and shift sub sensor value is large
P182B
577
Open or GND short in select sub sensor circuit
P182C
578
+B short in select sub sensor circuit
P182E
573
Open or GND short in shift sub sensor circuit
P182F
574
+B short in shift sub sensor circuit

HINT:
When any of DTCs P082E-571, P082F-572, P182E-573 or P182F-574 are output, check Shift Sensor Main and Shift Sensor Sub voltages using the intelligent tester.


Shift Sensor Main, Shift Sensor Sub 
R position
(Main)
Home or N position
(Main)
D or B position
(Main)
R position
(Sub)
Home or N position
(Sub)
D or B position
(Sub)
Trouble Area
0.3 to 1.8 V
2.0 to 3.0 V
3.2 to 4.8 V
0.3 to 1.8 V
2.0 to 3.0 V
3.2 to 4.8 V
Correct shift sensor voltage
0 to 0.3 V
0 to 0.3 V
0 to 0.3 V
0.3 to 1.8 V
2.0 to 3.0 V
3.2 to 4.8 V
Open in VCX1 circuit
GND short in VSX1 circuit
0.3 to 1.8 V
2.0 to 3.0 V
3.2 to 4.8 V
0 to 0.3 V
0 to 0.3 V
0 to 0.3 V
Open in VCX2 circuit
GND short in VSX2 circuit
4.8 to 5.0 V
4.8 to 5.0 V
4.8 to 5.0 V
0.3 to 1.8 V
2.0 to 3.0 V
3.2 to 4.8 V
Open in VSX1 circuit
Open in E2X1 circuit
0.3 to 1.8 V
2.0 to 3.0 V
3.2 to 4.8 V
4.8 to 5.0 V
4.8 to 5.0 V
4.8 to 5.0 V
Open in VSX2 circuit
Open in E2X2 circuit

HINT:
When any of DTCs P082B-575, P082C-576, P182B-577 or P182C-578 are output, check Shift Sensor Select Main and Shift Sensor Select Sub voltages using the intelligent tester.


Shift Sensor Select Main, Shift Sensor Select Sub 
R, N or D Position
Select Main)
Home or B Position
Select Main)
R, N or D Position
Select Sub)
Home or B Position
Select Sub)
Trouble Area
2.9 to 4.3 V
1.0 to 1.6 V
2.9 to 4.3 V
1.0 to 1.6 V
Correct select sensor voltage
0 to 0.5 V
0 to 0.5 V
2.9 to 4.3 V
1.0 to 1.6 V
Open in VCX3 circuit
Open or GND short in VSX3 circuit
2.9 to 4.3 V
1.0 to 1.6 V
0 to 0.5 V
0 to 0.5 V
Open in VCX4 circuit
Open or GND short in VSX4 circuit
4.9 to 5 V
4.9 to 5 V
2.9 to 4.3 V
1.0 to 1.6 V
+B short in VSX3 circuit
2.9 to 4.3 V
1.0 to 1.6 V
4.9 to 5 V
4.9 to 5 V
+B short in VSX4 circuit

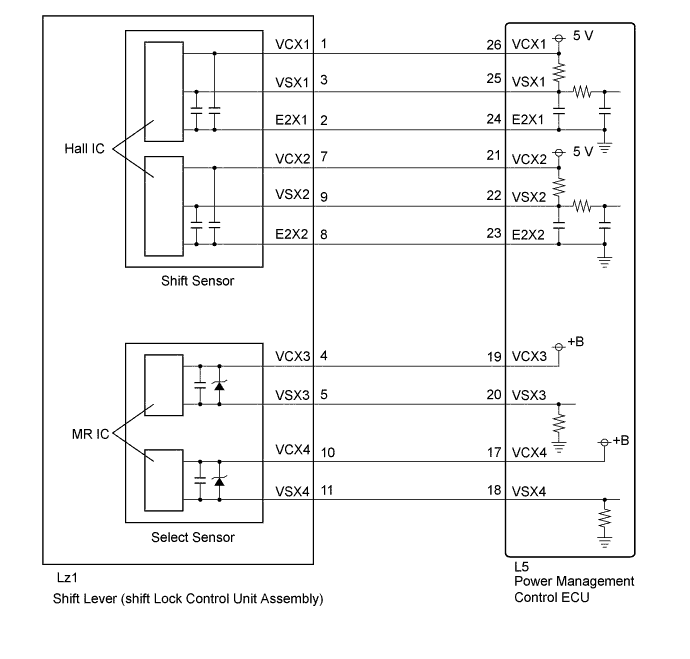
WIRING DIAGRAM


A296414E03

Refer to the wiring diagram for DTC P0AE6-225 .

INSPECTION PROCEDURE

1.READ VALUE USING INTELLIGENT TESTER (SHIFT SENSOR MAIN, SHIFT SENSOR SUB)
  1. Connect the intelligent tester to the DLC3.

  1. Turn the power switch on (IG).

  1. Enter the following menus: Powertrain / Hybrid Control / Data List / Shift Sensor Main, Shift Sensor Sub.

  1. Read the Data List.

    Result:
    Tester Display
    Condition
    Specified Condition
    Shift Sensor Main
    R position
    0.3 to 1.8 V
    Home or N position
    2.0 to 3.0 V
    D or B position
    3.2 to 4.8 V
    Shift Sensor Sub
    R position
    0.3 to 1.8 V
    Home or N position
    2.0 to 3.0 V
    D or B position
    3.2 to 4.8 V

  1. Turn the power switch off.


NG
Go to step 6
OK


2.READ VALUE USING INTELLIGENT TESTER (SHIFT SENSOR SELECT MAIN, SHIFT SENSOR SELECT SUB)
  1. Connect the intelligent tester to the DLC3.

  1. Turn the power switch on (IG).

  1. Enter the following menus: Powertrain / Hybrid Control / Data List / Shift Sensor Select Main, Shift Sensor Select Sub.

  1. Read the Data List.

    Result:
    Tester Display
    Condition
    Specified Condition
    Shift Sensor Select Main
    R, N or D Position
    2.9 to 4.3 V
    Home or B Position
    1.0 to 1.6 V
    Shift Sensor Select Sub
    R, N or D Position
    2.9 to 4.3 V
    Home or B Position
    1.0 to 1.6 V

  1. Turn the power switch off.


NG
Go to step 11
OK


3.REPLACE SHIFT LOCK CONTROL UNIT ASSEMBLY
  1. Replace the shift lock control unit assembly (Click here).


NEXT


4.CLEAR DTC
  1. Connect the intelligent tester to the DLC3.

  1. Turn the power switch on (IG).

  1. Enter the following menus: Powertrain / Hybrid Control / Trouble Codes.

  1. Read and record the DTCs and freeze frame data.

  1. Clear DTCs and freeze frame data.

  1. Turn the power switch off.


NEXT


5.CHECK DTC OUTPUT (HV)
  1. Connect the intelligent tester to the DLC3.

  1. Turn the power switch on (IG).

  1. With the brake pedal depressed, slowly move the shift lever as follows to select each shift state: N → R → N → D → B.

  1. Enter the following menus: Powertrain / Hybrid Control / Trouble Codes.

  1. Check if DTCs are output.

    Result:
    Result
    Proceed to
    No DTCs are output.
    A
    P082B-575, P082C-576, P082E-571, P082F-572, P181A-596, P181B-595, P182B-577, P182C-578, P182E-573 or P182F-574 is output again.
    B

  1. Turn the power switch off.


B
REPLACE POWER MANAGEMENT CONTROL ECU (Click here)
A

COMPLETED 

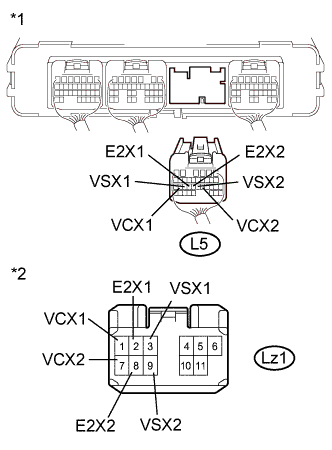
6.CHECK HARNESS AND CONNECTOR (POWER MANAGEMENT CONTROL ECU - SHIFT SENSOR)
  1. Disconnect connector L5 from the power management control ECU.

  1. Disconnect connector Lz1 from the shift lever (shift lock control unit assembly).


    A296926E01
  1. Measure the resistance according to the value(s) in the table below.

    Standard Resistance (Check for open):
    Tester Connection
    Switch Condition
    Specified Condition
    L5-26 (VCX1) - Lz1-1 (VCX1)
    Power switch off
    Below 1 Ω
    L5-25 (VSX1) - Lz1-3 (VSX1)
    Power switch off
    Below 1 Ω
    L5-24 (E2X1) - Lz1-2 (E2X1)
    Power switch off
    Below 1 Ω
    L5-21 (VCX2) - Lz1-7 (VCX2)
    Power switch off
    Below 1 Ω
    L5-22 (VSX2) - Lz1-9 (VSX2)
    Power switch off
    Below 1 Ω
    L5-23 (E2X2) - Lz1-8 (E2X2)
    Power switch off
    Below 1 Ω

    Standard Resistance (Check for short):
    Tester Connection
    Switch Condition
    Specified Condition
    L5-26 (VCX1) or Lz1-1 (VCX1) - Body ground and other terminals
    Power switch off
    10 kΩ or higher
    L5-25 (VSX1) or Lz1-3 (VSX1) - Body ground and other terminals
    Power switch off
    10 kΩ or higher
    L5-24 (E2X1) or Lz1-2 (E2X1) - Body ground and other terminals
    Power switch off
    10 kΩ or higher
    L5-21 (VCX2) or Lz1-7 (VCX2) - Body ground and other terminals
    Power switch off
    10 kΩ or higher
    L5-22 (VSX2) or Lz1-9 (VSX2) - Body ground and other terminals
    Power switch off
    10 kΩ or higher
    L5-23 (E2X2) or Lz1-8 (E2X2) - Body ground and other terminals
    Power switch off
    10 kΩ or higher

    Text in Illustration 
    *1
    Rear view of wire harness connector
    (to Power Management Control ECU)
    *2
    Front view of wire harness connector
    (to Shift Lock Control Unit Assembly)

    HINT:
    As necessary, check that there is no short to power supply wires when performing the above wire harness inspection.

  1. Connect the shift lever (shift lock control unit assembly) connector.

  1. Connect the power management control ECU connector.


NG
REPAIR OR REPLACE HARNESS OR CONNECTOR
OK


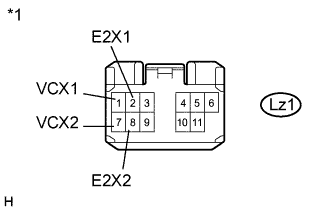
7.CHECK POWER MANAGEMENT CONTROL ECU (VCX1, VCX2 VOLTAGE)
  1. Disconnect connector Lz1 from the shift lever (shift lock control unit assembly).

  1. Turn the power switch on (IG).


    A296205E01
  1. Measure the voltage according to the value(s) in the table below.

    Standard Voltage:
    Tester Connection
    Switch Condition
    Specified Condition
    Lz1-1 (VCX1) - Lz1-2 (E2X1)
    Power switch on (IG)
    4.5 to 5.5 V
    Lz1-7 (VCX2) - Lz1-8 (E2X2)
    Power switch on (IG)
    4.5 to 5.5 V

    Text in Illustration 
    *1
    Front view of wire harness connector
    (to Shift Lock Control Unit Assembly)

  1. Connect the shift lever (shift lock control unit assembly) connector.


NG
REPLACE POWER MANAGEMENT CONTROL ECU (Click here)
OK


8.REPLACE SHIFT LOCK CONTROL UNIT ASSEMBLY
  1. Replace the shift lock control unit assembly (Click here).


NEXT


9.CLEAR DTC
  1. Connect the intelligent tester to the DLC3.

  1. Turn the power switch on (IG).

  1. Enter the following menus: Powertrain / Hybrid Control / Trouble Codes.

  1. Read and record the DTCs and freeze frame data.

  1. Clear DTCs and freeze frame data.

  1. Turn the power switch off.


NEXT


10.CHECK DTC OUTPUT (HV)
  1. Connect the intelligent tester to the DLC3.

  1. Turn the power switch on (IG).

  1. With the brake pedal depressed, slowly move the shift lever as follows to select each shift state: N → R → N → D → B.

  1. Enter the following menus: Powertrain / Hybrid Control / Trouble Codes.

  1. Check if DTCs are output.

    Result:
    Result
    Proceed to
    No DTCs are output.
    A
    P082B-575, P082C-576, P082E-571, P082F-572, P181A-596, P181B-595, P182B-577, P182C-578, P182E-573 or P182F-574 is output again.
    B

  1. Turn the power switch off.


B
REPLACE POWER MANAGEMENT CONTROL ECU (Click here)
A

COMPLETED 

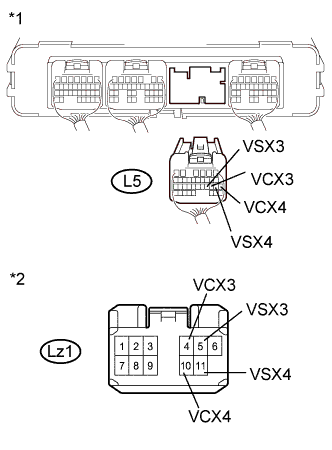
11.CHECK HARNESS AND CONNECTOR (POWER MANAGEMENT CONTROL ECU - SELECT SENSOR)
  1. Disconnect connector L5 from the power management control ECU.

  1. Disconnect connector Lz1 from the shift lever (shift lock control unit assembly).


    A296926E02
  1. Measure the resistance according to the value(s) in the table below.

    Standard Resistance (Check for open):
    Tester Connection
    Switch Condition
    Specified Condition
    L5-19 (VCX3) - Lz1-4 (VCX3)
    Power switch off
    Below 1 Ω
    L5-20 (VSX3) - Lz1-5 (VSX3)
    Power switch off
    Below 1 Ω
    L5-17 (VCX4) - Lz1-10 (VCX4)
    Power switch off
    Below 1 Ω
    L5-18 (VSX4) - Lz1-11 (VSX4)
    Power switch off
    Below 1 Ω

    Standard Resistance (Check for short):
    Tester Connection
    Switch Condition
    Specified Condition
    L5-19 (VCX3) or Lz1-4 (VCX3) - Body ground and other terminals
    Power switch off
    10 kΩ or higher
    L5-20 (VSX3) or Lz1-5 (VSX3) - Body ground and other terminals
    Power switch off
    10 kΩ or higher
    L5-17 (VCX4) or Lz1-10 (VCX4) - Body ground and other terminals
    Power switch off
    10 kΩ or higher
    L5-18 (VSX4) or Lz1-11 (VSX4) - Body ground and other terminals
    Power switch off
    10 kΩ or higher

    Text in Illustration 
    *1
    Rear view of wire harness connector
    (to Power Management Control ECU)
    *2
    Front view of wire harness connector
    (to Shift Lock Control Unit Assembly)

    HINT:
    As necessary, check that there is no short to power supply wires when performing the above wire harness inspection.

  1. Connect the shift lever (shift lock control unit assembly) connector.

  1. Connect the power management control ECU connector.


NG
REPAIR OR REPLACE HARNESS OR CONNECTOR
OK


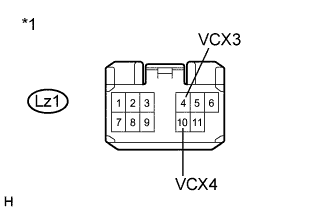
12.CHECK POWER MANAGEMENT CONTROL ECU (VCX3, VCX4 VOLTAGE)
  1. Disconnect connector Lz1 from the shift lever (shift lock control unit assembly).

  1. Turn the power switch on (IG).


    A296205E05
  1. Measure the voltage according to the value(s) in the table below.

    Standard Voltage:
    Tester Connection
    Switch Condition
    Specified Condition
    Lz1-4 (VCX3) - Body ground
    Power switch on (IG)
    9 to 14 V
    Lz1-10 (VCX4) - Body ground
    Power switch on (IG)
    9 to 14 V

    Text in Illustration 
    *1
    Front view of wire harness connector
    (to Shift Lock Control Unit Assembly)

  1. Connect the shift lever (shift lock control unit assembly) connector.


NG
REPLACE POWER MANAGEMENT CONTROL ECU (Click here)
OK


13.REPLACE SHIFT LOCK CONTROL UNIT ASSEMBLY
  1. Replace the shift lock control unit assembly (Click here).


NEXT


14.CLEAR DTC
  1. Connect the intelligent tester to the DLC3.

  1. Turn the power switch on (IG).

  1. Enter the following menus: Powertrain / Hybrid Control / Trouble Codes.

  1. Read and record the DTCs and freeze frame data.

  1. Clear DTCs and freeze frame data.

  1. Turn the power switch off.


NEXT


15.CHECK DTC OUTPUT (HV)
  1. Connect the intelligent tester to the DLC3.

  1. Turn the power switch on (IG).

  1. With the brake pedal depressed, slowly move the shift lever as follows to select each shift state: N → R → N → D → B.

  1. Enter the following menus: Powertrain / Hybrid Control / Trouble Codes.

  1. Check if DTCs are output.

    Result:
    Result
    Proceed to
    No DTCs are output.
    A
    P082B-575, P082C-576, P082E-571, P082F-572, P181A-596, P181B-595, P182B-577, P182C-578, P182E-573 or P182F-574 is output again.
    B

  1. Turn the power switch off.


B
REPLACE POWER MANAGEMENT CONTROL ECU (Click here)
A

COMPLETED