 |
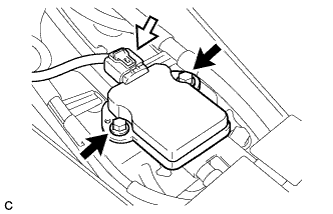
Connect the yaw rate and acceleration sensor connector.
- NOTICE:
- Make sure that the yaw rate and acceleration sensor connector is connected securely.
YAW RATE AND ACCELERATION SENSOR > INSTALLATION |
| 1. INSTALL YAW RATE AND ACCELERATION SENSOR |
|
Connect the yaw rate and acceleration sensor connector.
Install the yaw rate and acceleration sensor with the 2 bolts.
| 2. INSTALL UPPER INSTRUMENT PANEL FINISH PANEL ASSEMBLY |
Temporarily install the console box assembly.
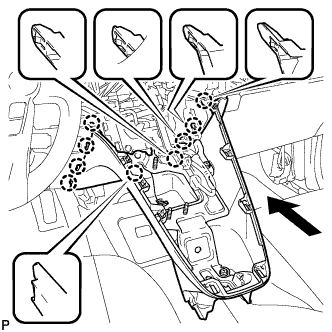 |
Engage the 9 claws as shown in the illustration.
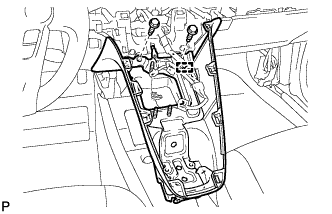 |
Install the to install the upper instrument panel finish panel assembly with the 2 bolts <A>.
Engage the clamp.
| 3. INSTALL SHIFT LOCK CONTROL UNIT ASSEMBLY |
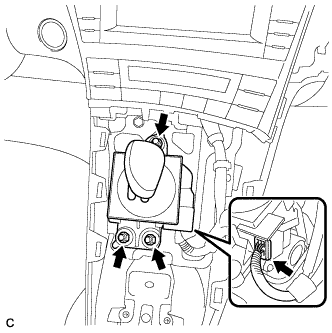 |
Install the shift lock control unit assembly with the 3 nuts.
Connect the connector to the shift lock control unit assembly.
| 4. INSTALL AIR CONDITIONING CONTROL ASSEMBLY |
Connect the connector.
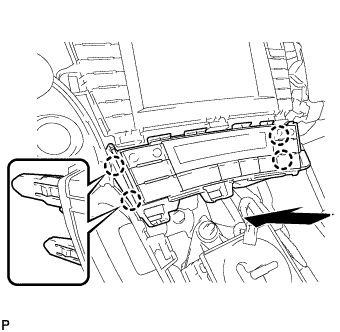 |
Engage the 4 claws to install the air conditioning control assembly.
| 5. INSTALL CONSOLE BOX ASSEMBLY |
Connect each connector.
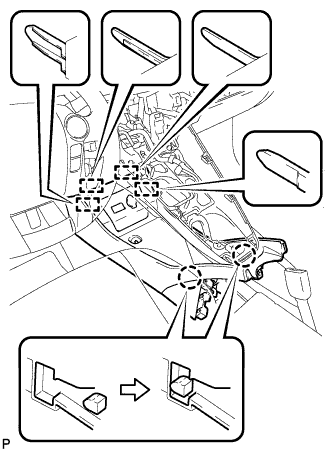 |
Engage the 4 guides and 2 claws as shown in the illustration.
Install the console box assembly with the bolt <B> and 2 clips.
| 6. INSTALL BOX BOTTOM MAT |
Engage the fastener to install the box bottom mat.
| 7. INSTALL FRONT NO. 2 CONSOLE BOX INSERT |
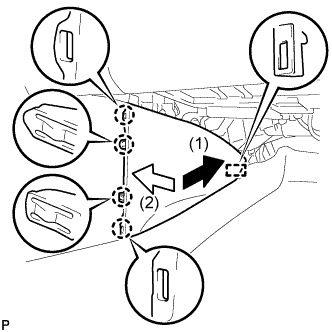 |
Engage the guide and 4 claws to install the front No. 2 console box insert as shown in the illustration.
| 8. INSTALL FRONT NO. 1 CONSOLE BOX INSERT |
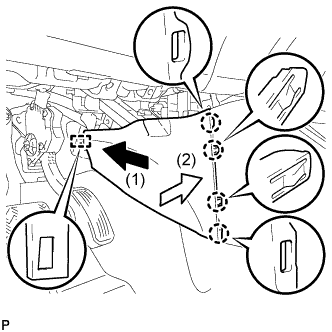 |
Engage the guide and 4 claws to install the front No. 1 console box insert as shown in the illustration.
| 9. INSTALL NO. 2 CONSOLE BOX MOUNTING BRACKET |
Install the No. 2 console box mounting bracket with the 6 bolts <B>.
| 10. INSTALL ELECTRICAL KEY OSCILLATOR |
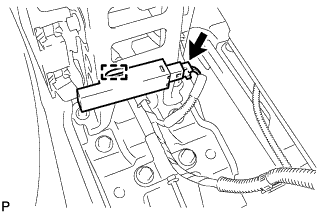 |
Engage the clamp and install the electrical key oscillator.
Connect the connector.
| 11. INSTALL REAR CONSOLE BOX ASSEMBLY |
| 12. INSTALL GLOVE COMPARTMENT DOOR |
Open the glove compartment door assembly.
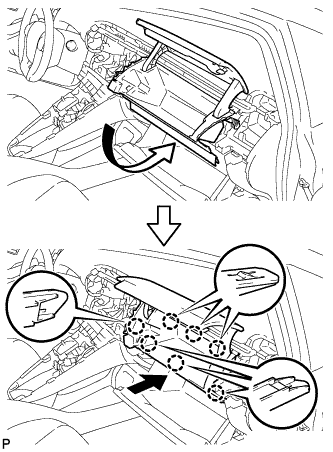 |
Insert the glove compartment door as shown in the illustration.
Engage the 7 claws to install the glove compartment door.
| 13. INSTALL NO. 2 INSTRUMENT PANEL REGISTER |
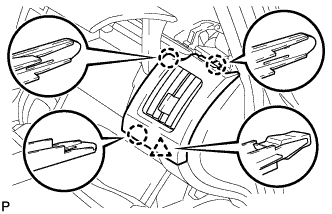 |
Engage the 3 claws and clip to install the No. 2 instrument panel register.
| 14. INSTALL NO. 1 SIDE DEFROSTER NOZZLE |
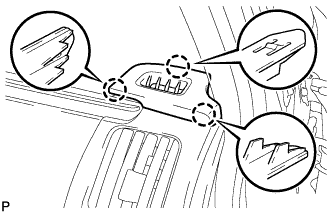 |
Engage the 3 claws to install the No. 1 side defroster nozzle.
| 15. INSTALL NAVIGATION RECEIVER WITH BRACKET (for Navigation Receiver Type) |
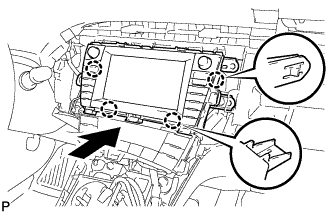 |
Engage the 4 claws and temporarily install the navigation receiver with bracket as shown in the illustration.
Install the navigation receiver with bracket with the 4 bolts.
| 16. INSTALL RADIO AND DISPLAY RECEIVER ASSEMBLY WITH BRACKET (for Radio and Display Type) |
Connect each connector.
Engage the 4 claws.
Install the radio and display receiver assembly with bracket with the 4 bolts.
| 17. INSTALL RADIO TUNER OPENING COVER WITH BRACKET (w/o Radio Receiver) |
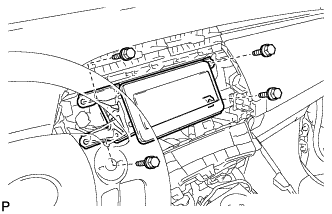 |
Install the radio tuner opening cover with bracket with the 4 bolts <B>.
| 18. INSTALL CENTER INSTRUMENT CLUSTER FINISH PANEL SUB-ASSEMBLY (w/o Radio Receiver) |
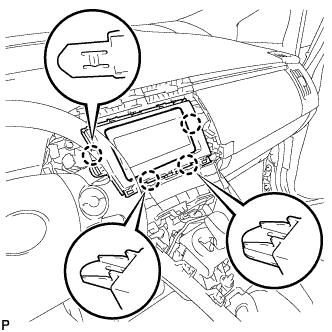 |
Engage the 4 claws to install the center instrument cluster finish panel sub-assembly.
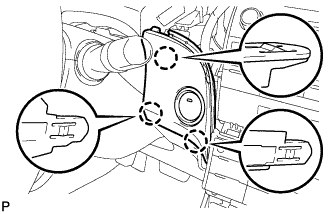
| 19. INSTALL UPPER INSTRUMENT PANEL FINISH PANEL SUB-ASSEMBLY |
 |
Connect the connector.
Engage the 3 claws to install the upper instrument panel finish panel sub-assembly.
| 20. INSTALL INSTRUMENT CLUSTER FINISH PANEL GARNISH |
Connect the connector.
Engage the 14 claws to install the instrument cluster finish panel garnish.
| 21. INSTALL LOWER CENTER INSTRUMENT CLUSTER FINISH PANEL SUB-ASSEMBLY |
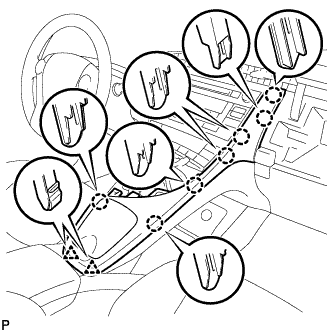 |
Engage the 7 claws and 2 clips to install the lower center instrument cluster finish panel sub-assembly.
| 22. INSTALL INTEGRATION CONTROL AND PANEL ASSEMBLY |
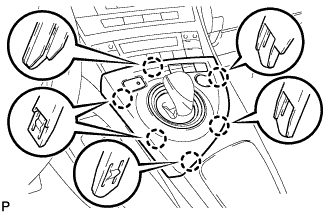 |
Connect each connector.
Engage the 6 claws to install the integration control and panel assembly.
| 23. CONNECT CABLE TO NEGATIVE BATTERY TERMINAL |
| 24. INSTALL REAR NO. 3 FLOOR BOARD |
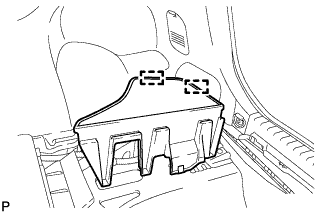 |
Engage the 2 guides to install the rear No. 3 floor board.
| 25. INSTALL REAR DECK FLOOR BOX |
Install the rear deck floor box.
| 26. INSTALL REAR NO. 2 FLOOR BOARD |
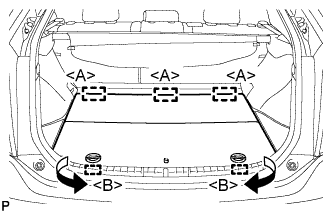 |
Engage the 3 guides <A>.
Engage the 2 guides <B> and install the rear No. 2 floor board as shown in the illustration.
| 27. PERFORM YAW RATE AND ACCELERATION SENSOR ZERO POINT CALIBRATION |